Week 5
Data persistance and intro to MongoDB
Assignment Due
Assignment 1 - Basic CRUD - is due before 11:00 am on Monday, February 8th.
It is worth 10% of your final grade.
Quiz 4: Middleware 15 mins
There will be a quiz today. It will be worth 2% of your final grade.
# Agenda
- KPI Survey (30 min)
- AMA (10 min)
- Quiz (10 min)
- Break (10 min)
- EX5-1 File system (15 min)
- Relational Databases v.s. Document Databases (20 min)
- EX5-2 Install MongoDB & Compass (15 mins)
- Break (10 mins)
- EX5-3 Connect with Mongoose (30 mins)
# File system
Data persistence is about saving the last known state of all data elements in our application - also known as the application state. Ultimately, this means saving it to a file on disk somewhere. This could be a local JSON file. It could be a cloud storage service like Amazon's S3 or Google Cloud Storage. More often it is handled by an intermediary database service like MongoDB or PostgreSQL.
# Synchronize cars.json
We are going to focus mostly on the database scenario for the rest of the course, but let's examine the local JSON file example for just a minute. If you think about the in-class exercise from last week, every time we restarted the application the cars collection reset to the initial four objects loaded from the cars.js file. With just a few extra lines of code, we could ensure that the current state of the application data is saved every time one of the route handlers is called.
# Convert cars.js to cars.json
[
  {
    "id": 1,
    "make": "Tesla",
    "model": "S",
    "colour": "Black"
  },
  {
    "id": 2,
    "make": "Tesla",
    "model": "3",
    "colour": "Indigo"
  },
  {
    "id": 3,
    "make": "Tesla",
    "model": "X",
    "colour": "Brown"
  },
  {
    "id": 4,
    "make": "Tesla",
    "model": "Y",
    "colour": "Silver"
  }
]
Update the import statements in both routes/cars.js and middleware/validateId.js to load the new JSON file.
const cars = require('../data/cars.json')
# Create new utility function
In the
routes/cars.jsmodule, you will need to import the fs (opens new window) core node module -- let's use the Promises version.Then create a new function called
writeJsonDatathat takes a JavaScript data structure as an argument – in our case it will be an array of objects. The function will open the/data/cars.jsonfile in write mode, and then write out thedataargument converted to JSON format.Wrap the logic in a
try/catchblock to handle any errors, and ensure thefilehandlegets closed by using thefinallyclause.
const fs = require('fs').promises

const writeJsonData = async data => {
  let filehandle
  try {
    filehandle = await fs.open(`../data/cars.json`, 'w')
    await filehandle.writeFile(JSON.stringify(data))
  } catch (err) {
    console.log(`Problem writing cars.json`, err)
  } finally {
    if (filehandle !== undefined) await filehandle.close()
  }
}
- Update each of the route hander functions that changes the cars data array (i.e. POST, PUT, PATCH, DELETE) to call
writeJsonData(cars)just before theres.sendcall.
Now as the data changes with each HTTP request, the application state (data) is copied to the JSON file, and the next time the server is restarted, it will be reloaded.
# Databases
Most real world applications need to store structured data that reflects the state of the application and is selectively searchable, with appropriate authorization credentials. This is the job of a database.
Traditionally databases systems have been based on a series of tables, like a spreadsheet, with the columns representing the properties on a record and each row containing the complete set of properties for that unique record.
The cars data we have been working with might be represented in a table like this.
| id | make | model | colour |
|---|---|---|---|
| 1 | Tesla | S | Black |
| 2 | Tesla | 3 | Indigo |
| 3 | Tesla | X | Brown |
| 4 | Tesla | Y | Silver |
# Relational Databases
As we build applications that follow an Object Oriented Design, each table maps to a collection of objects of a given class. Often several of these objects will have some relationship to another. For example in a blog application, an Article will have an Author. Article and Author represent two classes of objects and there is a relationship between specific instances of those objects.
We have typically solved the storage of this kind of data with Relational Databases (opens new window) -- invented be a guy named Ted Codd (opens new window) at IBM back in the early 1970s.
The standard API for interacting with a relational database is the Structured Query Language (opens new window) (SQL - commonly pronounced seequel). Some of the most common relational database systems are:
- MySQL / MariaDB
- PostgreSQL
- Oracle DB
- MS SQL Server
# Document Databases
About 10 years ago, along with the development of Node.js people started wondering if there was a different kind of database model that was a better fit for the rapidly iterating development cycle of the JavaScript world. Many variations on the Document Database model also know as NoSQL Databases came into being. All of them centred on the JSON document or a key/value pair structure as the storage model.
The biggest attraction with NoSQL databases is the flexibility. There is no need to predefine a table schema as there is with SQL databases. Some examples of NoSQL databases are:
- Google Firestore
- AWS Dynamo
- CouchDB
- MongoDB
# Relational DB v.s. Document DB
# Schema
A database schema, means to define the shape of the data that we want to store. With SQL databases, this must be defined in advance of storing data. With document databases, there is no database imposed schema. If you can put it in a JSON document, you can store it in the database.
You will sometimes hear NoSQL databases referred to as schema-less. This does not mean that your application has no structured data model. It just shifts the responsibility for enforcing that structure to the application code rather than the database.
Let's look at how we would represent the data for a simple attendance tracking application.
# SQL
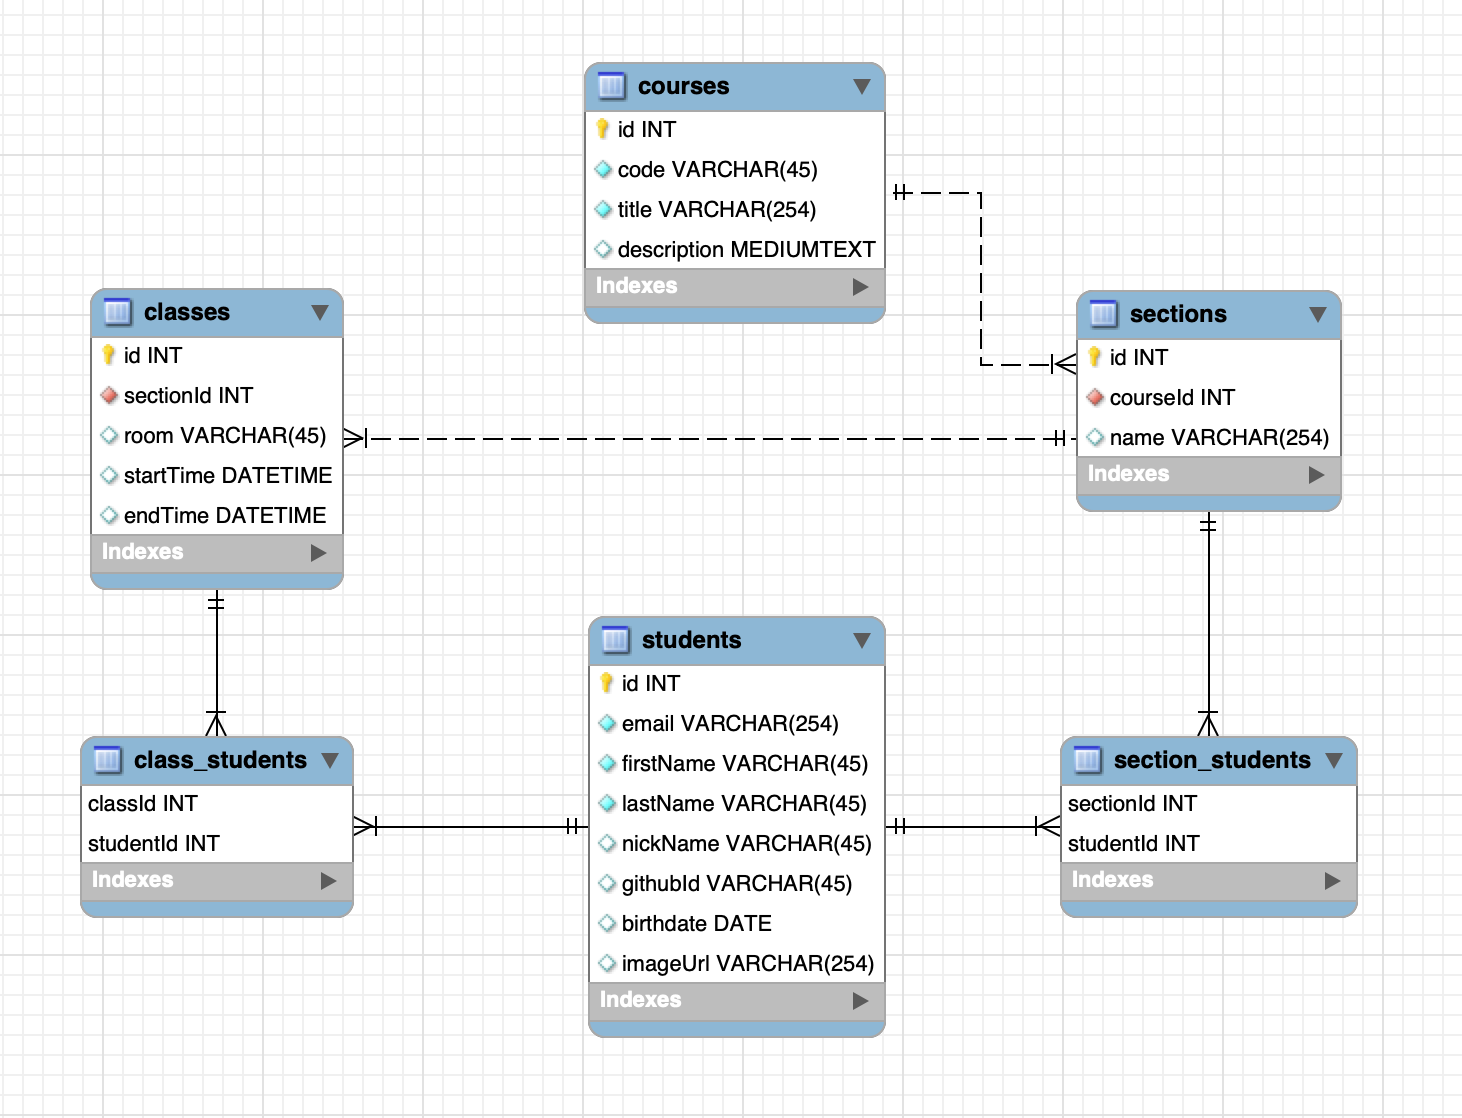
# MongoDB
# Embedded data structures to model relationships.
Although there is some benefit to this flexibility for rapid prototyping, there are trade-offs. The biggest one is synchronization of duplicate data. It takes just as much careful planning to build a robust and scalable NoSQL database.
Students
students: [
  {
    _id: 201800001,
    firstName: 'Mickey',
    lastName: 'Mouse',
    nickName: 'Steamboat Willie',
    email: 'mickey.mouse@disney.com',
    githubId: null,
    birthDate: '1928-11-18',
    imageUrl: null
  },
  {
    _id: 201800002,
    firstName: 'Minerva',
    lastName: 'Mouse',
    nickName: 'Minnie',
    email: 'minnie.mouse@disney.com',
    githubId: null,
    birthDate: '1928-11-18',
    imageUrl: null
  }
]
Courses
{
  courses: [
    {
      _id: 1,
      code: 'MAD9124',
      title: 'Mobile API Development',
      description: `Students enhance their JavaScript skills to become productive with Full-stack development. They use a hands-on approach to build APIs using Node.JS and a variety of tools, frameworks, libraries and packages. The creation of these modern APIs also requires the students to develop skills with persistent scalable database storage systems. Project work culminates with students creating APIs to be used with websites and mobile applications. Students work individually as well as with other students to complete tasks.`,
      sections: [
        {
          _id: 'mad9124w19s300',
          number: 300,
          name: 'Alpha Team',
          students: [201800001, 201800002],
          classes: [
            {
              _id: 1,
              room: 'WT127',
              startTime: '',
              endTime: '',
              students: [201800001, 201800002]
            },
            {
              _id: 2,
              room: 'WT127',
              startTime: '',
              endTime: '',
              students: [201800001, 201800002]
            },
            {
              _id: 3,
              room: 'WT127',
              startTime: '',
              endTime: '',
              students: [201800001]
            },
            {
              _id: 4,
              room: 'WT127',
              startTime: '',
              endTime: '',
              students: [201800001, 201800002]
            },
            {
              _id: 5,
              room: 'WT127',
              startTime: '',
              endTime: '',
              students: [201800002]
            },
            {
              _id: 6,
              room: 'WT127',
              startTime: '',
              endTime: '',
              students: [201800001, 201800002]
            },
            {
              _id: 7,
              room: 'WT127',
              startTime: '',
              endTime: '',
              students: [201800001, 201800002]
            },
            {
              _id: 8,
              room: 'WT127',
              startTime: '',
              endTime: '',
              students: [201800001, 201800002]
            },
            {
              _id: 9,
              room: 'WT127',
              startTime: '',
              endTime: '',
              students: [201800001, 201800002]
            },
            {
              _id: 10,
              room: 'WT127',
              startTime: '',
              endTime: '',
              students: [201800001, 201800002]
            },
            {
              _id: 11,
              room: 'WT127',
              startTime: '',
              endTime: '',
              students: [201800001, 201800002]
            },
            {
              _id: 12,
              room: 'WT127',
              startTime: '',
              endTime: '',
              students: [201800001, 201800002]
            },
            {
              _id: 13,
              room: 'WT127',
              startTime: '',
              endTime: '',
              students: [201800001, 201800002]
            },
            {
              _id: 14,
              room: 'WT127',
              startTime: '',
              endTime: '',
              students: [201800001, 201800002]
            }
          ]
        },
        {
          _id: 'mad9124w19s301',
          number: 301,
          name: 'Bravo Team',
          students: [],
          classes: [
            {_id: 21, room: 'WT127', startTime: '', endTime: '', students: []},
            {_id: 22, room: 'WT127', startTime: '', endTime: '', students: []},
            {_id: 23, room: 'WT127', startTime: '', endTime: '', students: []},
            {_id: 24, room: 'WT127', startTime: '', endTime: '', students: []},
            {_id: 25, room: 'WT127', startTime: '', endTime: '', students: []},
            {_id: 26, room: 'WT127', startTime: '', endTime: '', students: []},
            {_id: 27, room: 'WT127', startTime: '', endTime: '', students: []},
            {_id: 28, room: 'WT127', startTime: '', endTime: '', students: []},
            {_id: 29, room: 'WT127', startTime: '', endTime: '', students: []},
            {_id: 30, room: 'WT127', startTime: '', endTime: '', students: []},
            {_id: 31, room: 'WT127', startTime: '', endTime: '', students: []},
            {_id: 32, room: 'WT127', startTime: '', endTime: '', students: []},
            {_id: 33, room: 'WT127', startTime: '', endTime: '', students: []},
            {_id: 34, room: 'WT127', startTime: '', endTime: '', students: []}
          ]
        }
      ]
    }
  ]
}
# Hands on with MongoDB
# Install MongoDB
There are several ways to get MongoDB running in your local development environment.
- Download the runtime installer from the MongoDB website.
- Use Homebrew to install MongoDB.
- Use Docker and run it in a container.
For this course, we will use the Docker container option. This has the benefit of letting us use different versions for different projects and keep the test/development data isolated between projects. You can use a single container for all of our in-class exercises, but I recommend that you create a separate container with it's own data folder inside each of your projects.
But, don't forget to shut-down containers that you are not using
If you haven't already ...
Create a free Docker Hub (opens new window) account.
Download Docker Desktop and run the installer.
If you already have Docker installed, make sure that it is running the latest version.
# Docker Compose
Because this will be running only in our development environment, we don't need to worry about complicated security and user authentication set-up. Let's keep it simple.
In your code folder for this class (e.g. ~/code/mad9124), create a new configuration file called docker-compose.yml with the following content.
version: '3.8'

services:
  mongo:
    image: mongo:bionic
    restart: always
    volumes:
      - ./data/mongo:/data/db
    ports:
      - '27017-27019:27017-27019'
Now using the terminal in the same folder, create the data folder that the mongo container will use.
mkdir data
mkdir data/mongo
And then start your local MongoDB server with ...
docker-compose up -d
Verify that the MongoDB container is running ...
docker-compose ps
You should see something like ...
    Name                  Command             State                  Ports
------------------------------------------------------------------------------------------
mad9124_mongo_1   docker-entrypoint.sh mongod   Up    0.0.0.0:27017->27017/tcp,
                                                      0.0.0.0:27018->27018/tcp,
                                                      0.0.0.0:27019->27019/tcp
To shut it down, simply run ...
docker-compose down
# Install MongoDB Compass
If you have worked with MySQL databases in the past you probably used a tool like phpMyAdmin, MySQL WorkBench or Sequel PRO to manage and query your databases. MongoDB has a similar tool call Compass. You can read all about its capabilities on at MongoDB.com (opens new window).
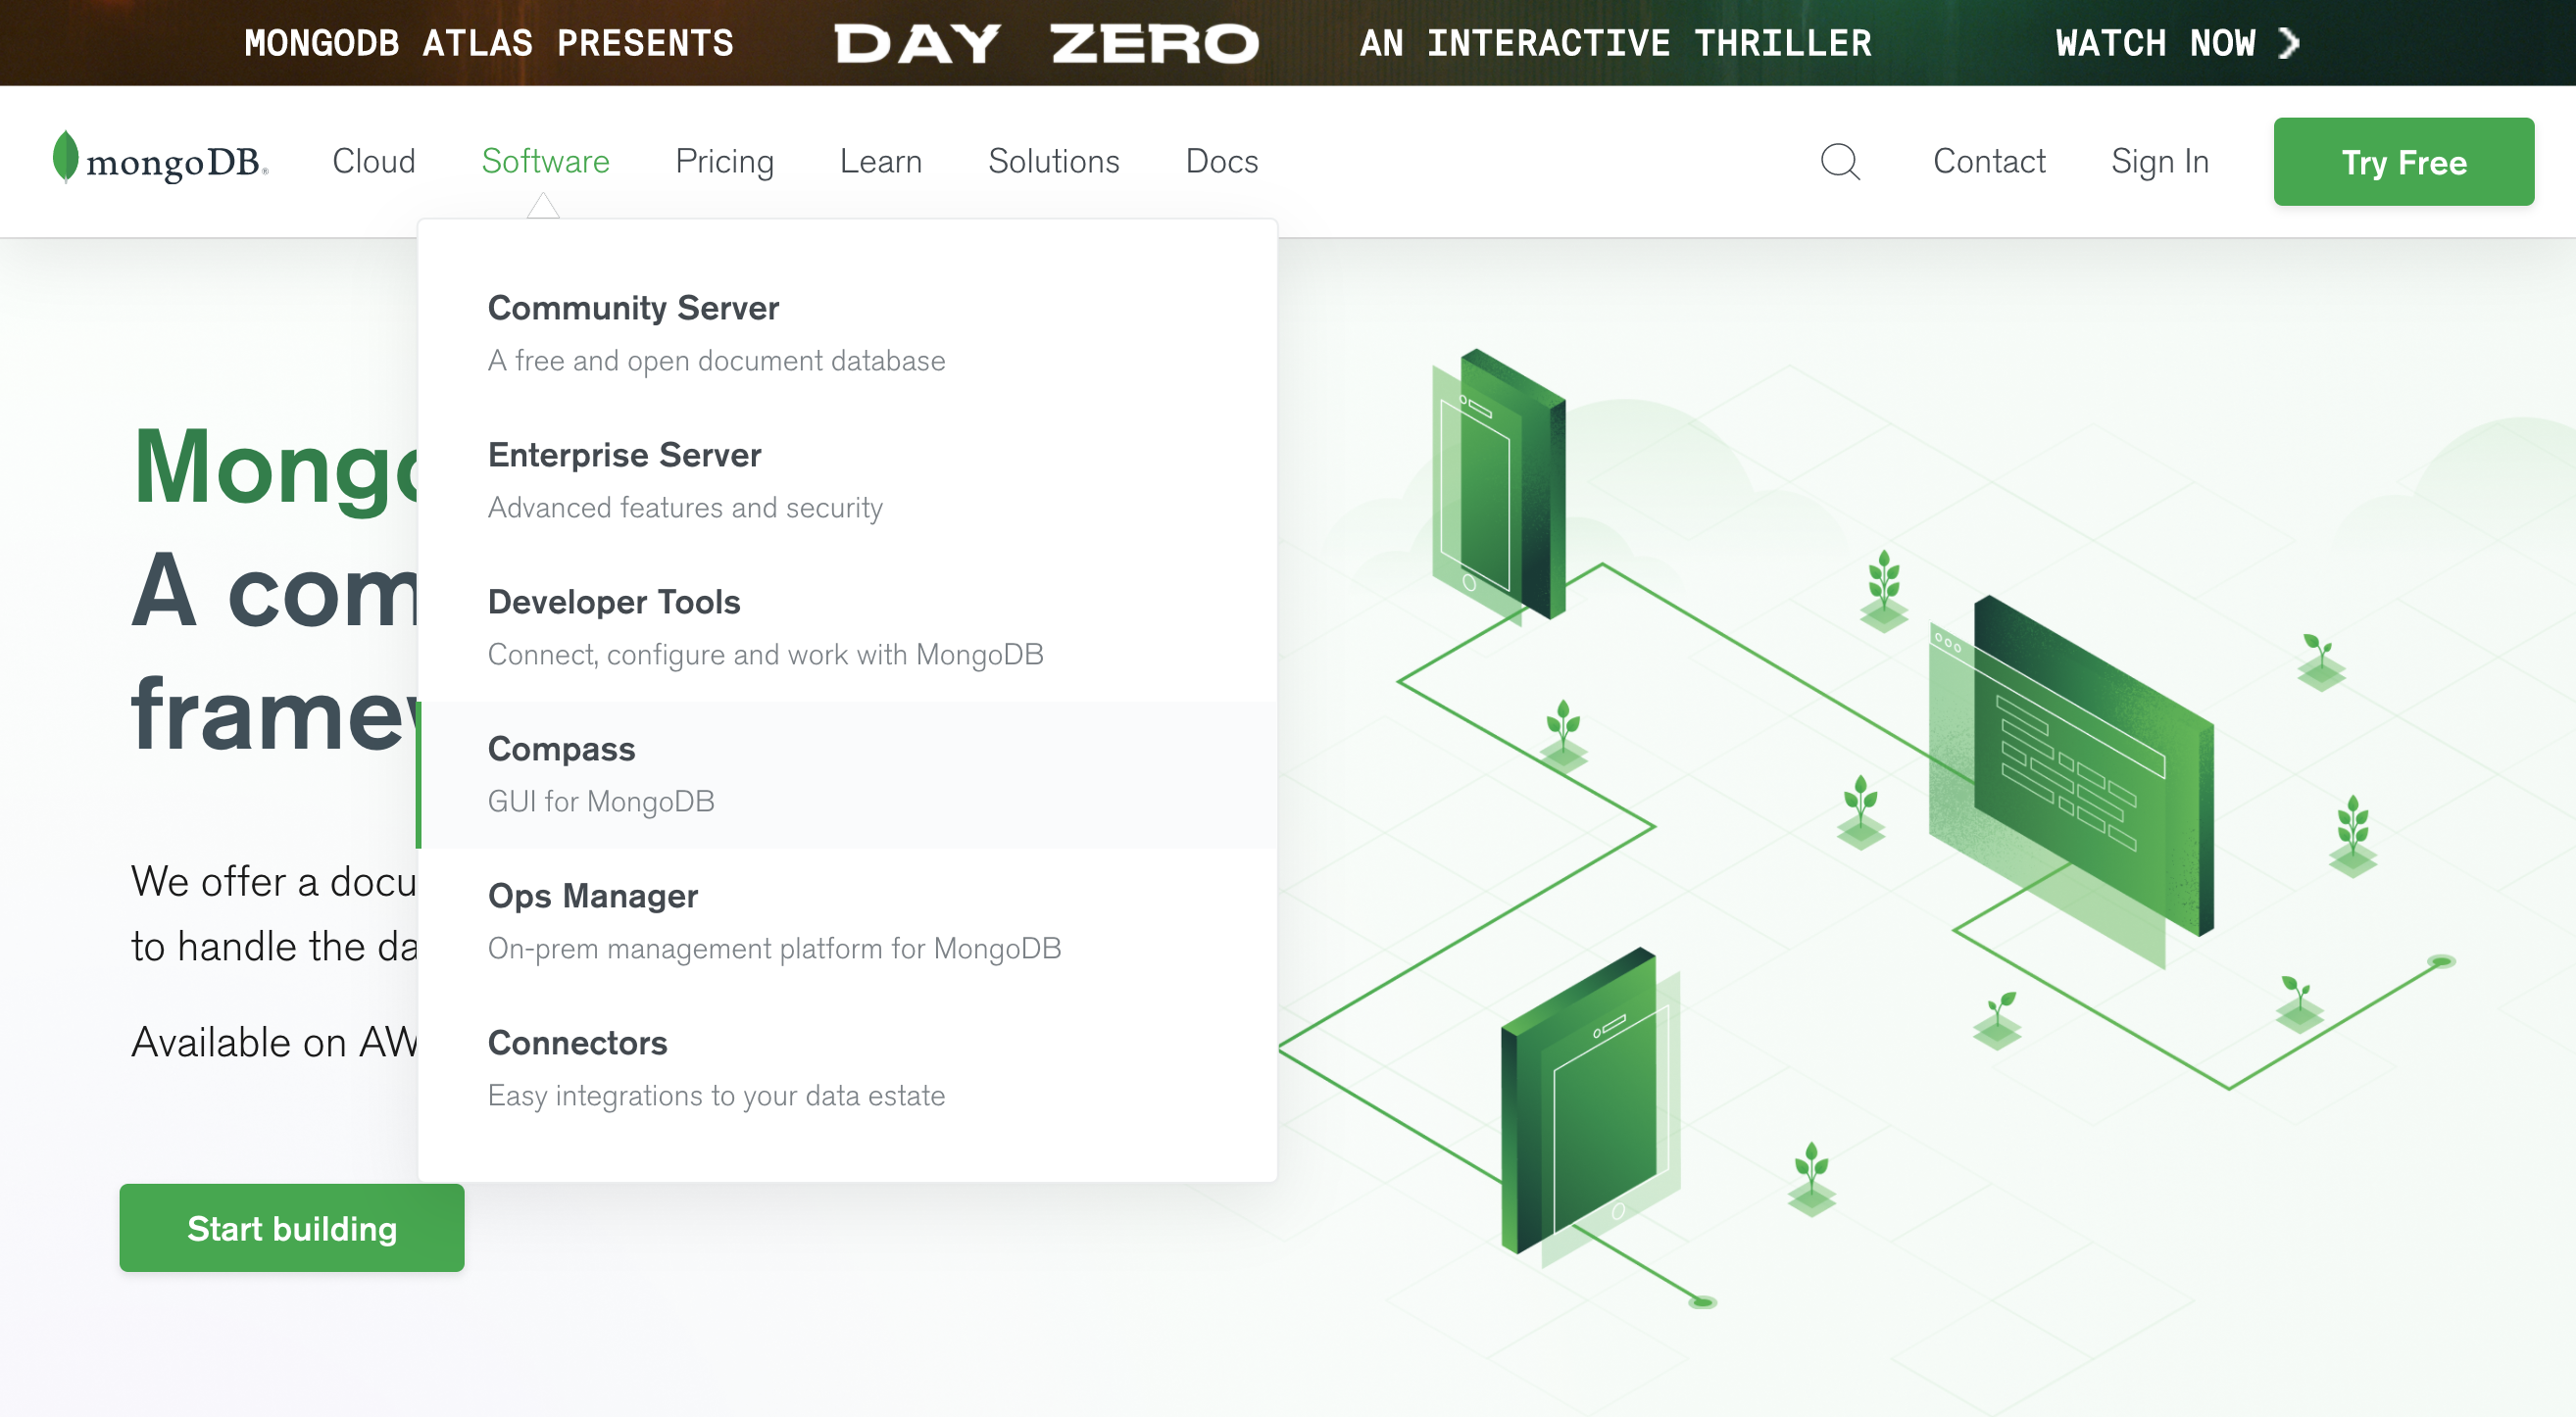
Lets download and install it from the MongoDB Download Center (opens new window). Make sure that you select the latest stable version (currently 1.24.6).
No more community version
There used to be a separate (free) community version and the (paid) enterprise version. There is now only one stream and it is free for everyone.
If you had the older community version installed, please uninstall it use the latest stable release version instead.
With the correct version selected, click the big green download button, and then run the DMG installer (the downloaded file).
# Running MongoDB locally
To run MongoDB in your local development environment, you need to start the docker container we created earlier. Open the terminal in your project folder and run this command ...
docker-compose up -d
This starts the MongoDB server (database engine) as a daemon process (opens new window) running in the Docker container. It will be accessible to MongoDB Compass (and any other client application) on port 27017 - that is the default port for MongoDB.
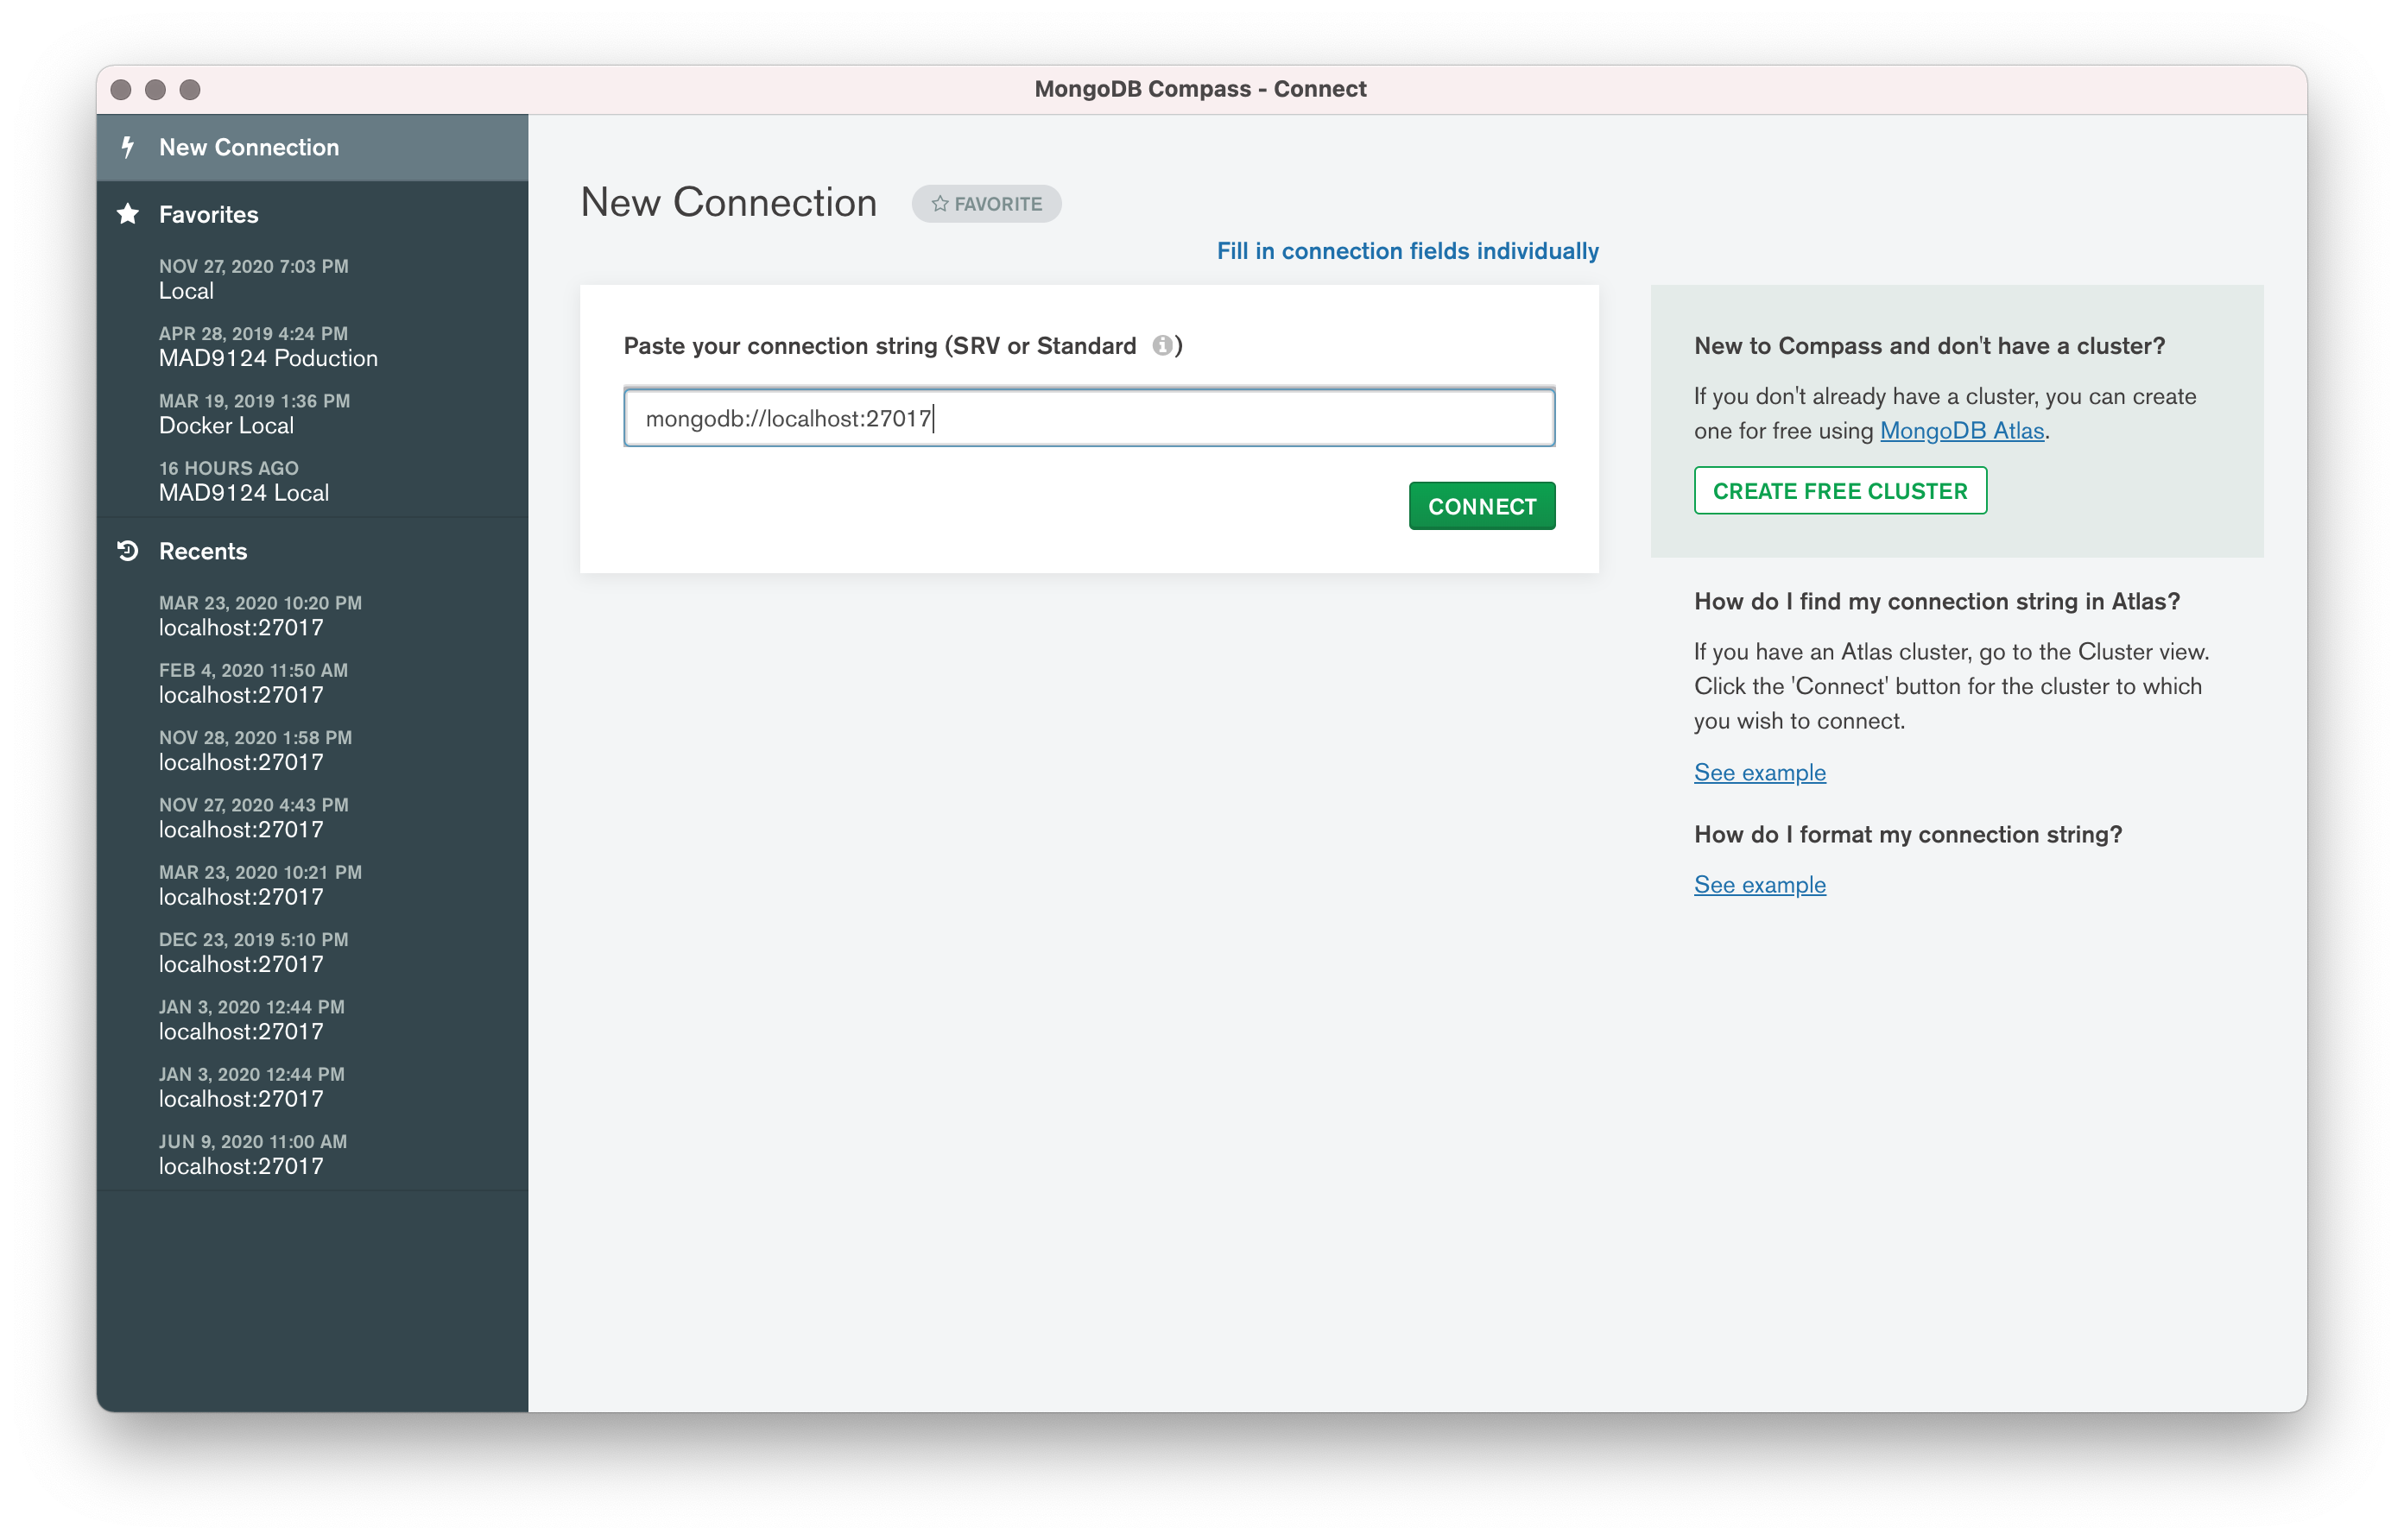
Now open the MongoDB Compass app and connect using this connection string mongodb://localhost:27017.
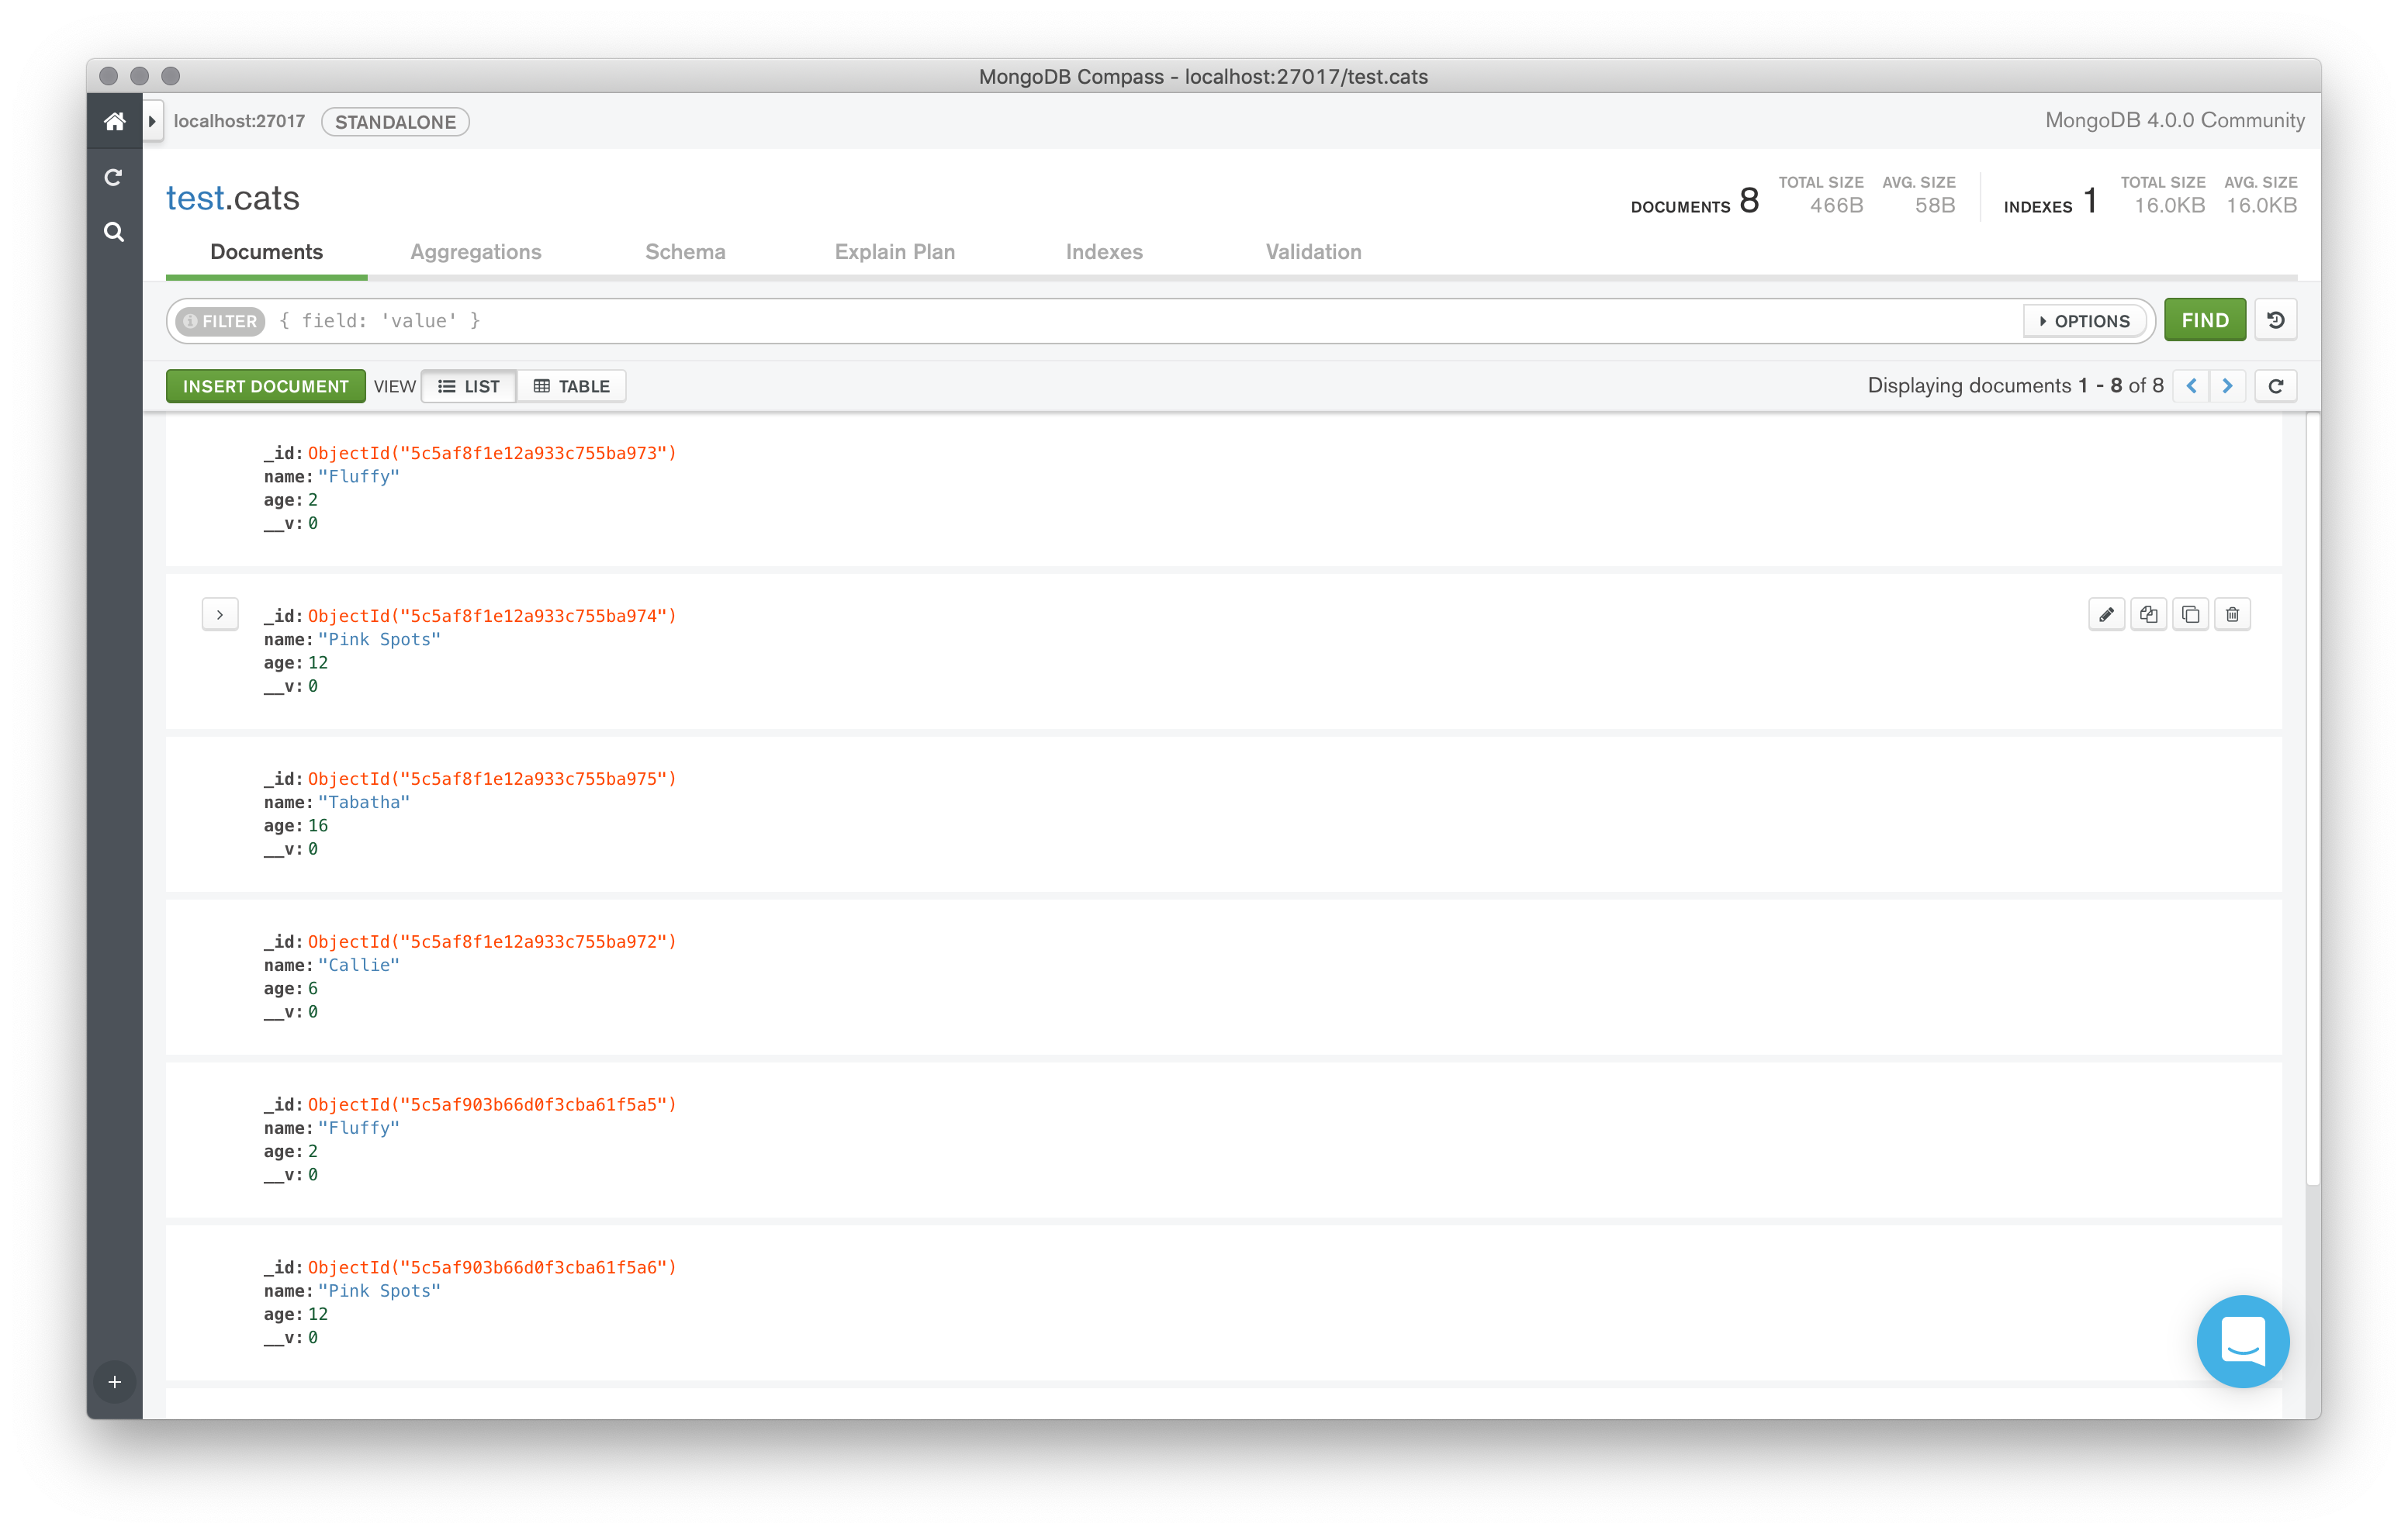
You should now see an active connection to the database engine that looks like this ...
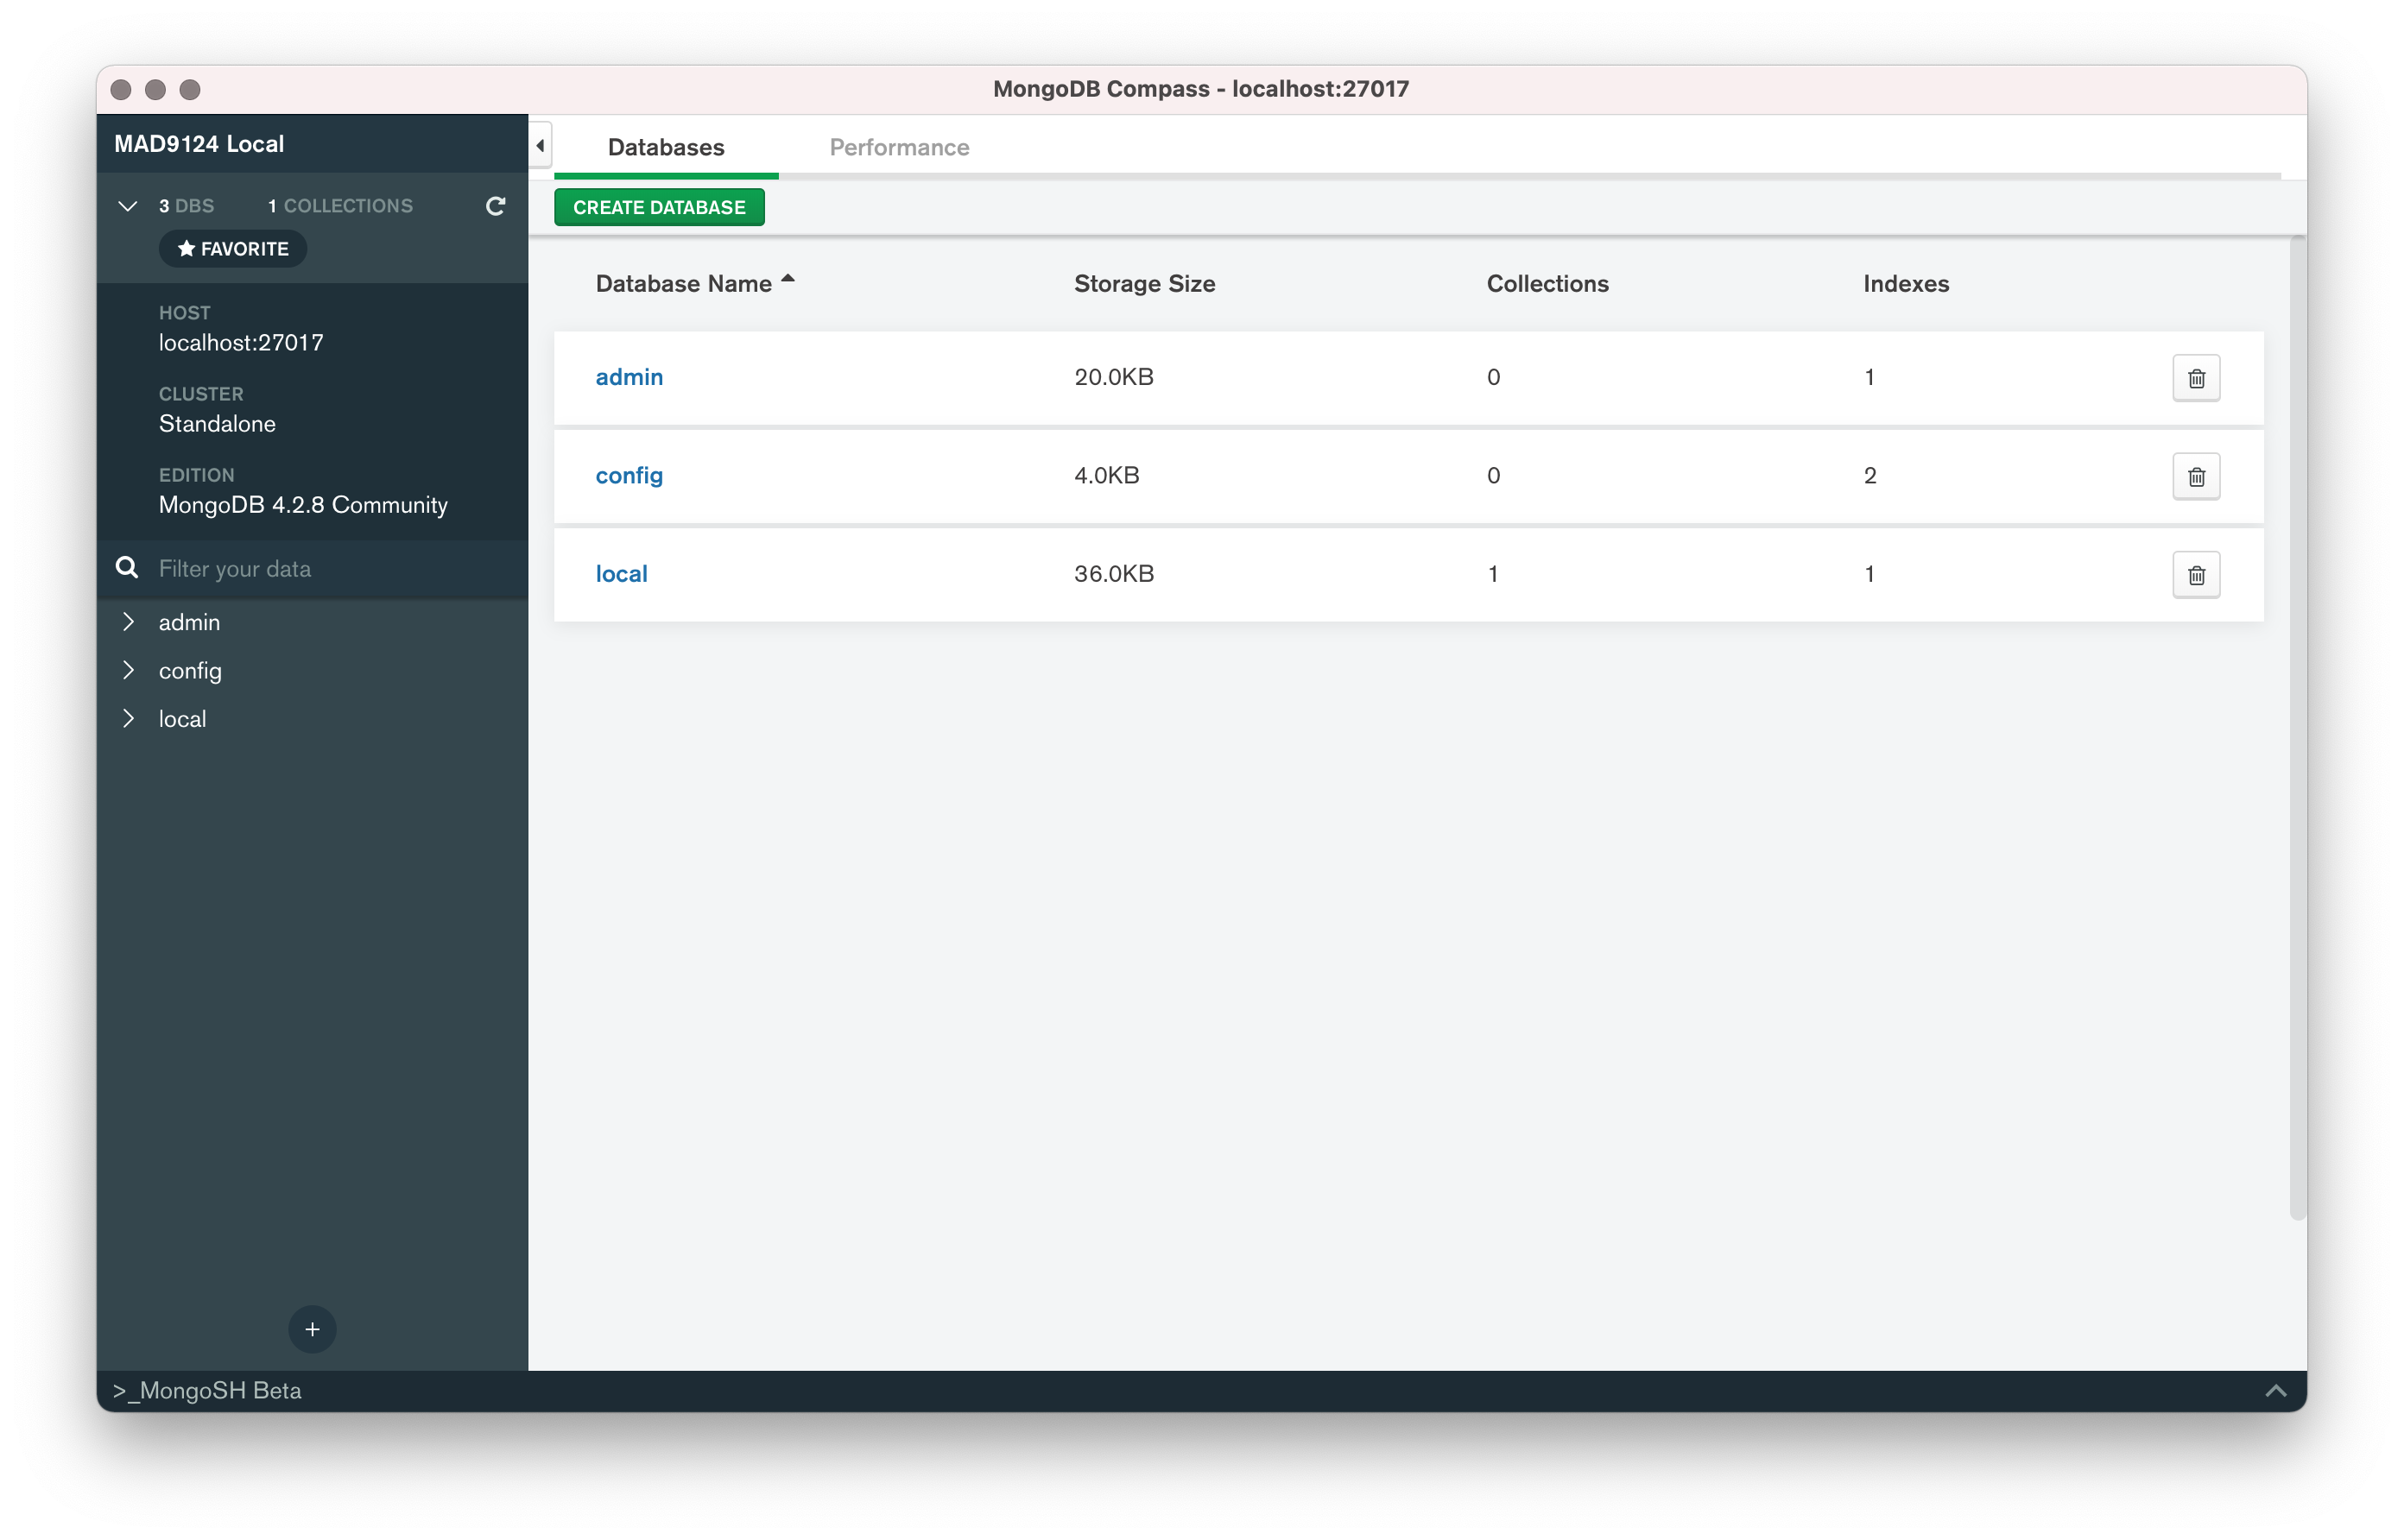
This will let you visually inspect the database and interactively create, update, and delete documents in the database. We will use this to verify our work in later activities.

# Connect to MongoDB from Node.js
All that set-up was so that we can persist application state in a database.
In your Node.js apps, you will need to open a connection to the MongoDB database so that you can store and retrieve your resource objects (JSON documents). MongoDB provides a official NPM package (opens new window) which we can use to interact with the database. To install it in your project, simply run npm install mongodb in the terminal.
However ...
For this course we will instead be using a popular data modelling library called Mongoose (opens new window).

# Mongoose Quick Start
npm install mongoose
Create a new file in your project folder called mongooseTest.js. We will give the mongoose.connect method the same connection string for our local MongoDB server that we used with Compass and then append the name of the database we want to connect to at the end. Let's call the database test. The full connection string should now be mongodb://localhost:27017/test.
const mongoose = require('mongoose')
mongoose.connect('mongodb://localhost:27017/test', {
  useNewUrlParser: true,
  useCreateIndex: true,
  useFindAndModify: false,
  useUnifiedTopology: true
})
WARNING
The mongoose.connect() method takes two arguments. The first is the connection string. The second is a configuration options object (opens new window). Here we have used the useNewUrlParser: true option and the useUnifiedTopology: true option. These are required for connecting to MongoDB servers of version 4.0 or higher. Also, with this option, the port number MUST be included in the connection string.
TIP
Even though we have not previously created this /test database, MongoDB will automatically create it the first time we try to interact with it.
const Cat = mongoose.model('Cat', {name: String})

const kitty = new Cat({name: 'Spot'})
kitty.save().then(savedKitty => console.log(`${savedKitty.name} says 'meow'`))
The mongoose.model method is a class factory (opens new window) that creates a resource class that represents a document collection and we can use it to interact with the database. In the example above we are giving it two properties: 'Cat' is the name of the class of objects to store in a collection in the database, and {name: String} is the expected shape of each 'Cat' document - it will have a property called 'name' which will hold some string data.
An instance of a Model is a Mongoose Document.
Use the new keyword with the model class to create a new instance, or new database document from that class.
Naming conventions
Models are named as a singular noun and start with a capital letter. Database tables or document collections are named as the plural of the model name and are all lower case.
OK. Lets run it and then check the results in MongoDB Compass.
node mongooseTest.js
Let's try adding another Cat instance to the collection. Change the name on line three and rerun it.
const Cat = mongoose.model('Cat', {name: String})

const kitty = new Cat({name: 'Patches'})
kitty.save().then(savedKitty => console.log(`${savedKitty.name} says 'meow'`))
Let's try adding an age to our next Cat.
const Cat = mongoose.model('Cat', {name: String})

const kitty = new Cat({name: 'Callie', age: 6})
kitty.save().then(savedKitty => console.log(`${savedKitty.name} says 'meow'`))
This time, when we check it in Compass the age was not saved. Our Mongoose Model automatically discards any properties that are not predefined. This time change the model schema as well.
const Cat = mongoose.model('Cat', {name: String, age: Number})

const kitty = new Cat({name: 'Callie', age: 6})
kitty.save().then(savedKitty => console.log(`${savedKitty.name} says 'meow'`))
We can also insert many objects into the database at once.
const Cat = mongoose.model('Cat', {name: String, age: Number})

const newCats = [
  {name: 'Fluffy', age: 2},
  {name: 'Pink Spots', age: 12},
  {name: 'Tabatha', age: 16}
]
Cat.insertMany(newCats).then(docs => console.log(docs))
We have added many documents to our collection. How do we retrieve them? Add a new line to find all of the cats from the database.
Cat.find().then(result => console.log({listAll: result}))
How about listing just the Cats with the name 'Spot'?
Cat.find({name: 'Spot'}).then(result => console.log({spot: result}))
That found all of the cats with the exact name 'Spot'. But, what if we wanted to check for names like Spot? We can use regular expressions (opens new window) to match patterns. Replace the quotes with slashes. Now it will match 'Spot', 'Spots', 'Spotty', or 'Pink Spots'.
Cat.find({name: /Spot/}).then(result => console.log({regex: result}))
Regular expressions can be a very powerful tool. Checkout the resources linked below to learn more.
Putting it all together, the final version of our mongooseTest.js should look like this.
'use strict'

// Import the Mongoose library
const mongoose = require('mongoose')

// Connect the mongoose instance to our MongoDB
mongoose.connect('mongodb://localhost:27017/test', {
  useNewUrlParser: true,
  useCreateIndex: true,
  useFindAndModify: false,
  useUnifiedTopology: true
})

// Define the document model for the 'cats' collection
const Cat = mongoose.model('Cat', {name: String, age: Number})

// Create a new Cat document and save it to the database
const kitty = new Cat({name: 'Callie', age: 6})
kitty.save().then(savedKitty => console.log(`${savedKitty.name} says 'meow'`))

// Directly insert an array of Cat property objects
const newCats = [
  {name: 'Fluffy', age: 2},
  {name: 'Pink Spots', age: 12},
  {name: 'Tabatha', age: 16}
]
Cat.insertMany(newCats).then(docs => console.log(docs))

// List all of the Cats in the collection
Cat.find().then(result => console.log({listAll: result}))

// List only the Cats with 'Spot' in the name
Cat.find({name: /Spot/}).then(result => console.log({regex: result}))
There is a lot more to learn about how to use Mongoose and we will continue next week. In particular we will look at how to integrate Mongoose with our carsRouter.js from last week. In preparation, please review the reading material below.
# EX5 Set-up MongoDB
Submit a screenshot of MongoDB Compass showing the connection to localhost:27017/test.cats and the listing of the documents in the collection after your test transactions.
# For next week
Before next week's class, please read these additional online resources.
- Mongoose Docs: Models (opens new window)
- Mongoose Docs: Documents (opens new window)
- Mongoose Docs: Queries (opens new window)
- Regular Expressions (regex) (opens new window) video
- Regex tutorial — A quick cheat sheet by examples (opens new window)
- Intro to Regex (opens new window) video
- RegEx in JS (opens new window) video
Quiz
There will be a short quiz next class. The questions could come from any of the material referenced above.
Family Day
Our scheduled class for next week falls on Family Day, and the college is closed. I will post a pre-recorded lecture/demo explaining object data modelling with Mongoose. You can watch that when it is convenient for you.
I will also be holding a special open lab session on Tuesday, February 16, 2021 from 10:00 am until 12:00 pm for anyone who would like assistance with the lab exercises.
This week's quiz will be available to be completed any time before 11:59 pm on Tuesday, February 16, 2021