Week 8
Access Control with JWT
Assignment Due
Assignment 2 - Mongo CRUD - is due before 10:30 am on Monday, March 8th.
It is worth 10% of your final grade.
Quiz 6: Data Sanitization 20 mins
There will be a quiz today. It will be worth 2% of your final grade.
# Agenda
- AMA (5 mins)
- Quiz (20 mins)
- Break (5 mins)
- Register new users (30 mins)
- Break (5 mins)
- Login a user (30 mins)
- Break (5 mins)
- OOP Information Expert Principle (30 mins)
- Break (5 mins)
- Authentication guard middleware (30 mins)
# EX8 Authentication & Authorization
Objective
Create the modules necessary to support user registration and authentication.
We will pick-up where we left off before the break week. Create a new GitHub repo and import this starter repo (opens new window) for a working version of the code from that exercise.
# Auth Router
It is a common practice to separate the authentication related routes from the main API routes. This has several advantages. Chief among them is making it easier to extract user management into a separate micro service or delegate it to a third party web service like AWS Cognito (opens new window) or Auth0 (opens new window).
Start by creating a new folder in the /routes folder called auth. In that new folder, create a new module called index.js with this placeholder content. We will use this initial code to prove that everything is wired-up correctly and then come back to add the real application logic.
import express from 'express'
const router = express.Router()

// Register a new user
router.post('/users', async (req, res) => {
  res.status(201).send({ data: 'new user created.' })
})

export default router
Tell Express to use that router in app.js.
import authRouter from './routes/auth/index.js'
// ...
app.use('/auth', authRouter)
# Test it with Postman
# Register a new user
# Mongoose Model
You will need a Mongoose Model so that your app can actually talk to the database. Let's keep it simple for now with just four properties: firstName, lastName, email, and password.
Create a module called User.js in the /models folder.
import mongoose from 'mongoose'

const schema = new mongoose.Schema({
  firstName: { type: String, trim: true, maxlength: 64, required: true },
  lastName: { type: String, trim: true, maxlength: 64 },
  email: { type: String, trim: true, maxlength: 512, required: true },
  password: { type: String, trim: true, maxlength: 70, required: true }
})

const Model = mongoose.model('User', schema) // factory function returns a class

export default Model
# POST /auth/users
In the /routers/auth/index.js module, we can now update the route handler for creating new users. To save time, let's borrow the POST method from the cars router as a starting point and then modify it for our User model.
router.post('/users', sanitizeBody, async (req, res) => {
  try {
    let newUser = new User(req.sanitizedBody)
    await newUser.save()
    res.status(201).send({ data: newUser })
  } catch (err) {
    debug(err)
    res.status(500).send({
      errors: [
        {
          status: '500',
          title: 'Server error',
          description: 'Problem saving document to the database.',
        },
      ],
    })
  }
})
Don't forget to require the dependency modules (User.js, sanitizeBody.js, and debug) at at the top of the router module.
OK. Test it with Postman.
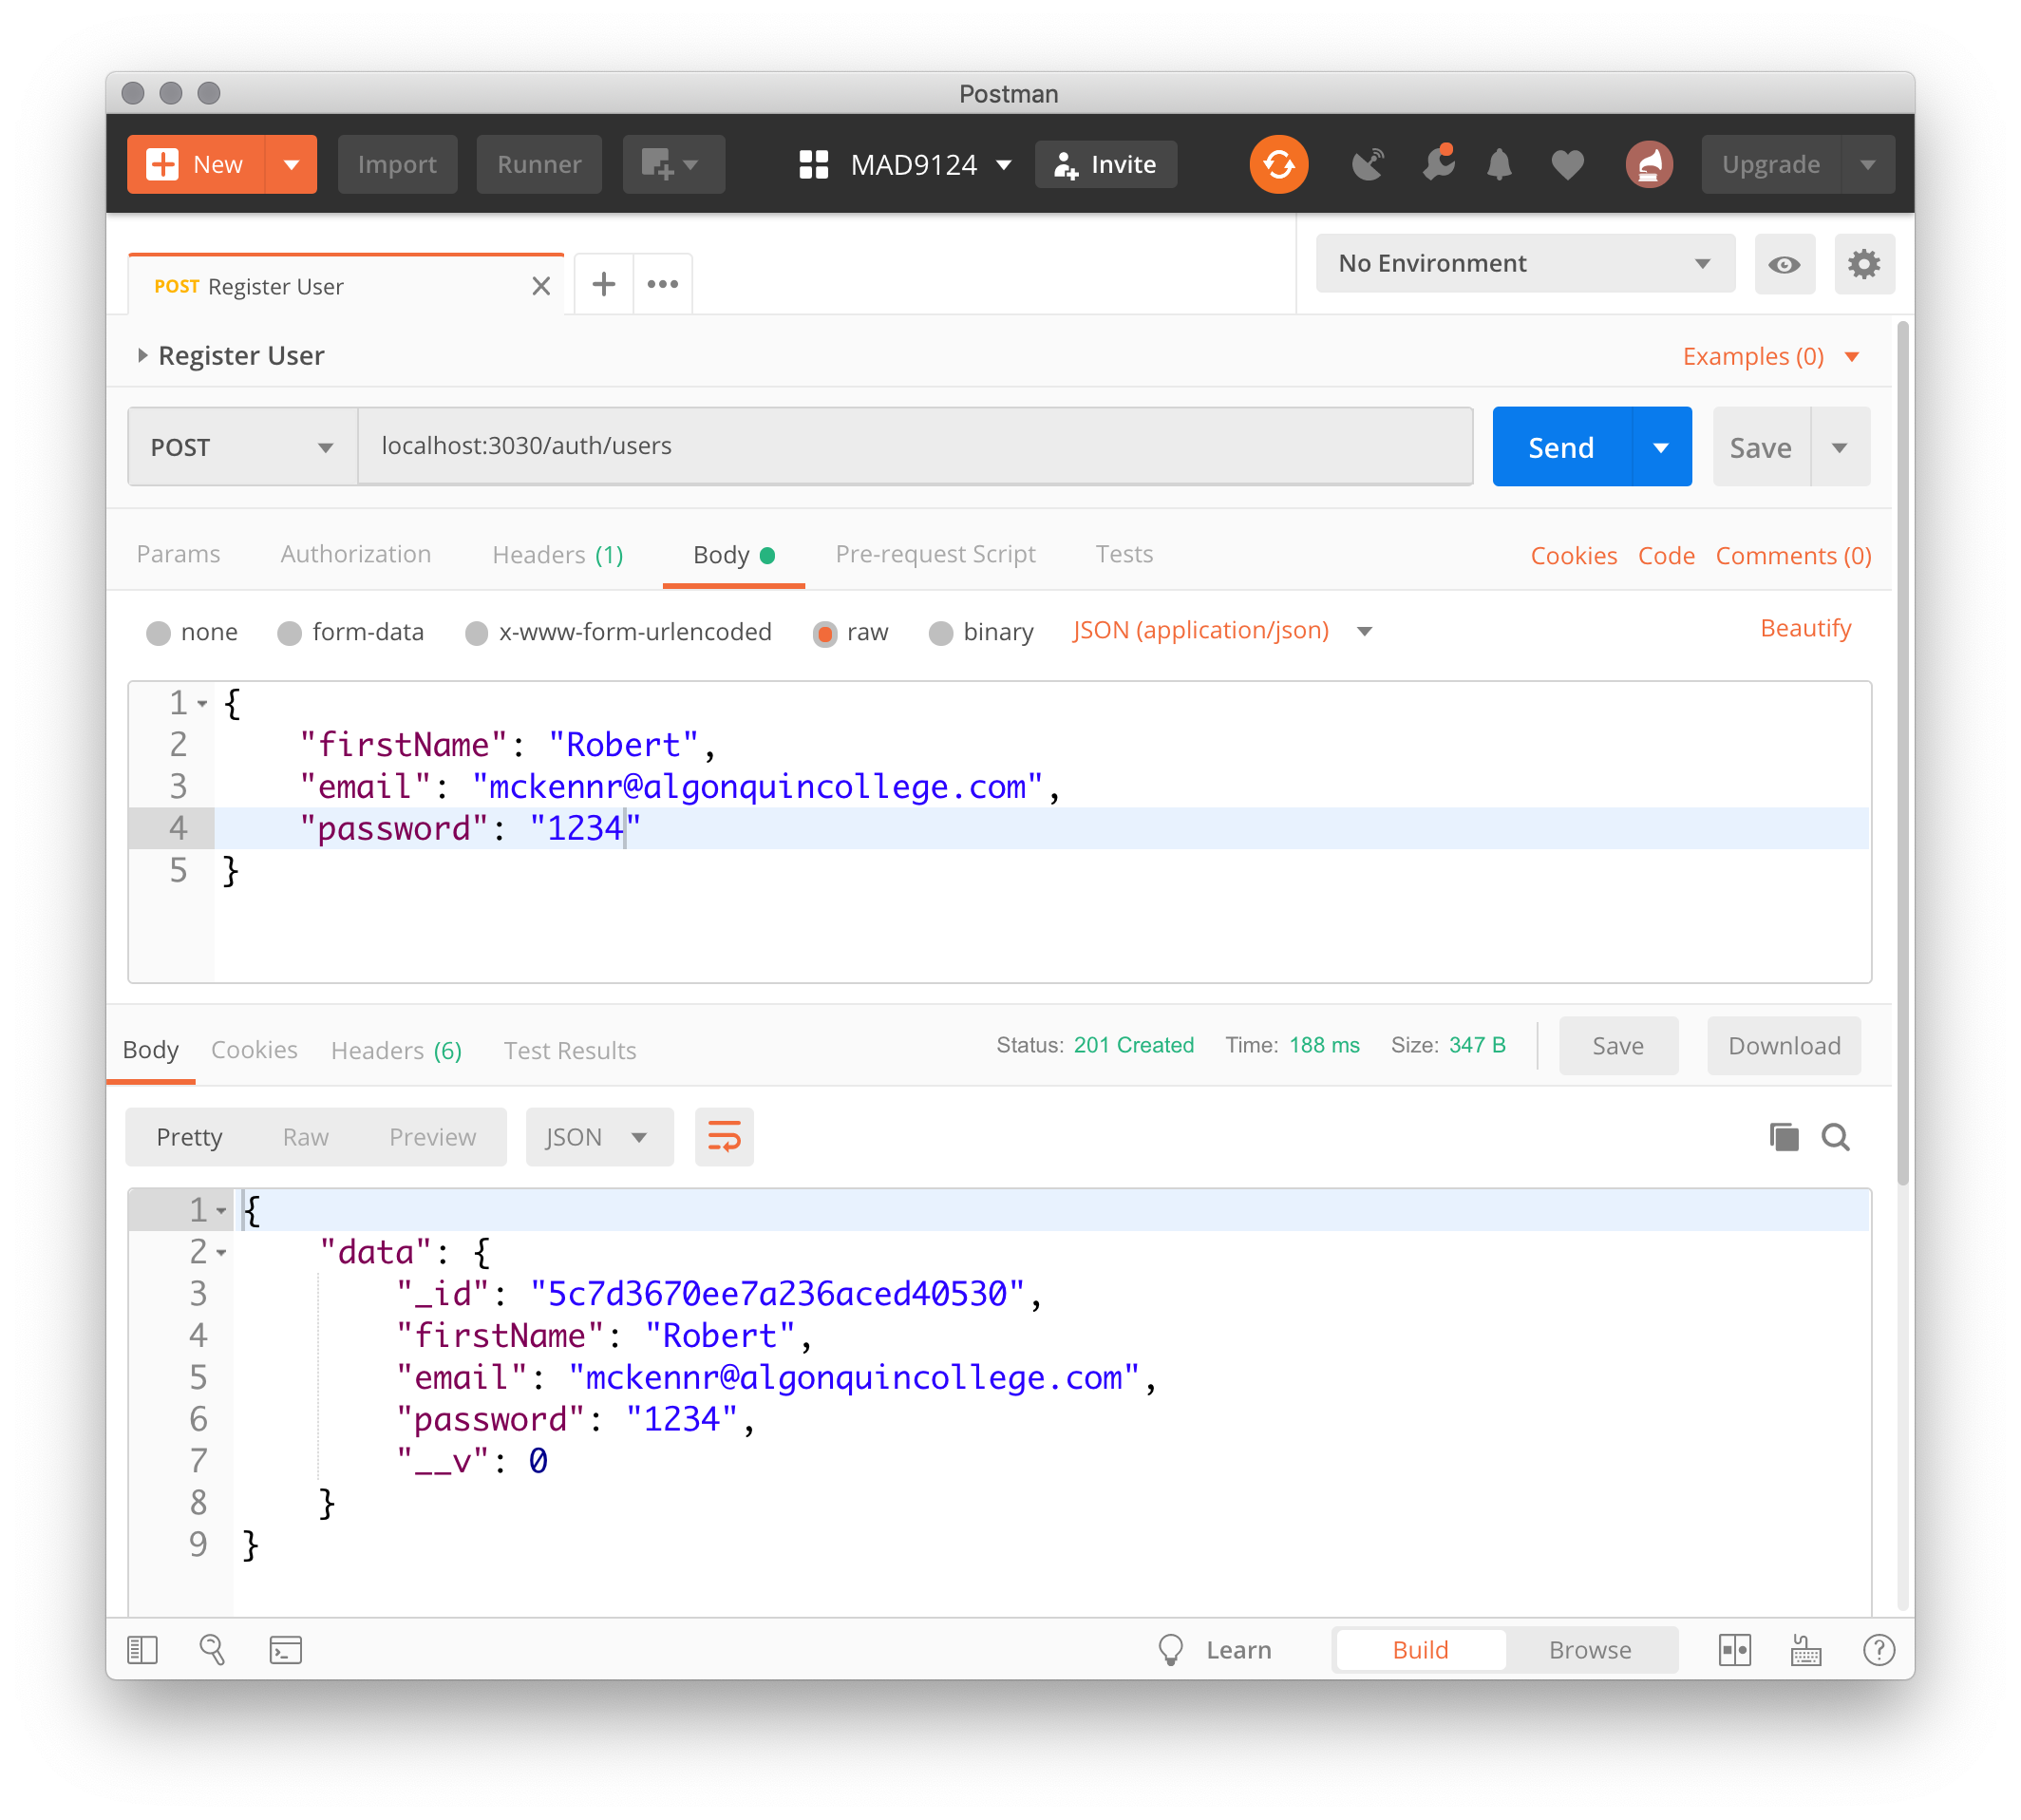
That works, but ...

The password is saved in plain text. That is an enormous security risk!
# Encrypt password
Obviously passwords should never be stored in plain text. The current best practice for storing passwords is to use a strong cryptographic algorithm to generate a one-way hash. That means that once the password is encrypted, there is no practical way to decrypt it.
Wait a minute ... how do we process a login request?
To validate a user supplied password, we encrypt it and then compare that against the encrypted password stored in the database. Given the same inputs, the encrypted hash values should also be the same.
# bcrypt
bcrypt (opens new window) is the most widely used encryption library. It has been ported to most popular programming languages including, JavaScript, PHP, Python, C#, and Java.
Let's add bcrypt as a project dependancy.
npm install bcrypt
At the top of the routes/auth/index.js module, import the bcrypt library. Then create a new variable called saltRounds and set it to 14.
import bcrypt from 'bcrypt'
const saltRounds = 14
What is a salt?
A salt is random data that is used in cryptography as additional input along with the user supplied data. This ensures that even if two users have the same plain text password, the hashed values stored in the database will look different.
A new salt is randomly generated for each password. Salts defend against dictionary attacks (opens new window) or against their hashed equivalent, a pre-computed rainbow table attack (opens new window).
# Cryptographic Cost
When hashing the input data, bcrypt will go through a series of iterations or rounds to finally generate a secure hash. The saltRounds value is applied not as an integer, but as an exponent. Each hash generated will go through 2^saltRounds iterations.
Given a typical 2Ghz core processor, you could expect hashing throughput similar to this ...
rounds=8 : ~40 hashes/sec
rounds=9 : ~20 hashes/sec
rounds=10: ~10 hashes/sec
rounds=11: ~5  hashes/sec
rounds=12: 2-3 hashes/sec
rounds=13: ~1 sec/hash
rounds=14: ~1.5 sec/hash
rounds=15: ~3 sec/hash
rounds=25: ~1 hour/hash
rounds=31: 2-3 days/hash
We want to make the hashing process as slow as is tolerable by legitimate users. The slower it is, the greater deterrent against brute-force hacking attempts. The default value is 10. It is recommended to use a higher value of between 13 and 15.
Regardless of the number salt rounds, the resulting hashed value will always be 60 characters long.
# hash()
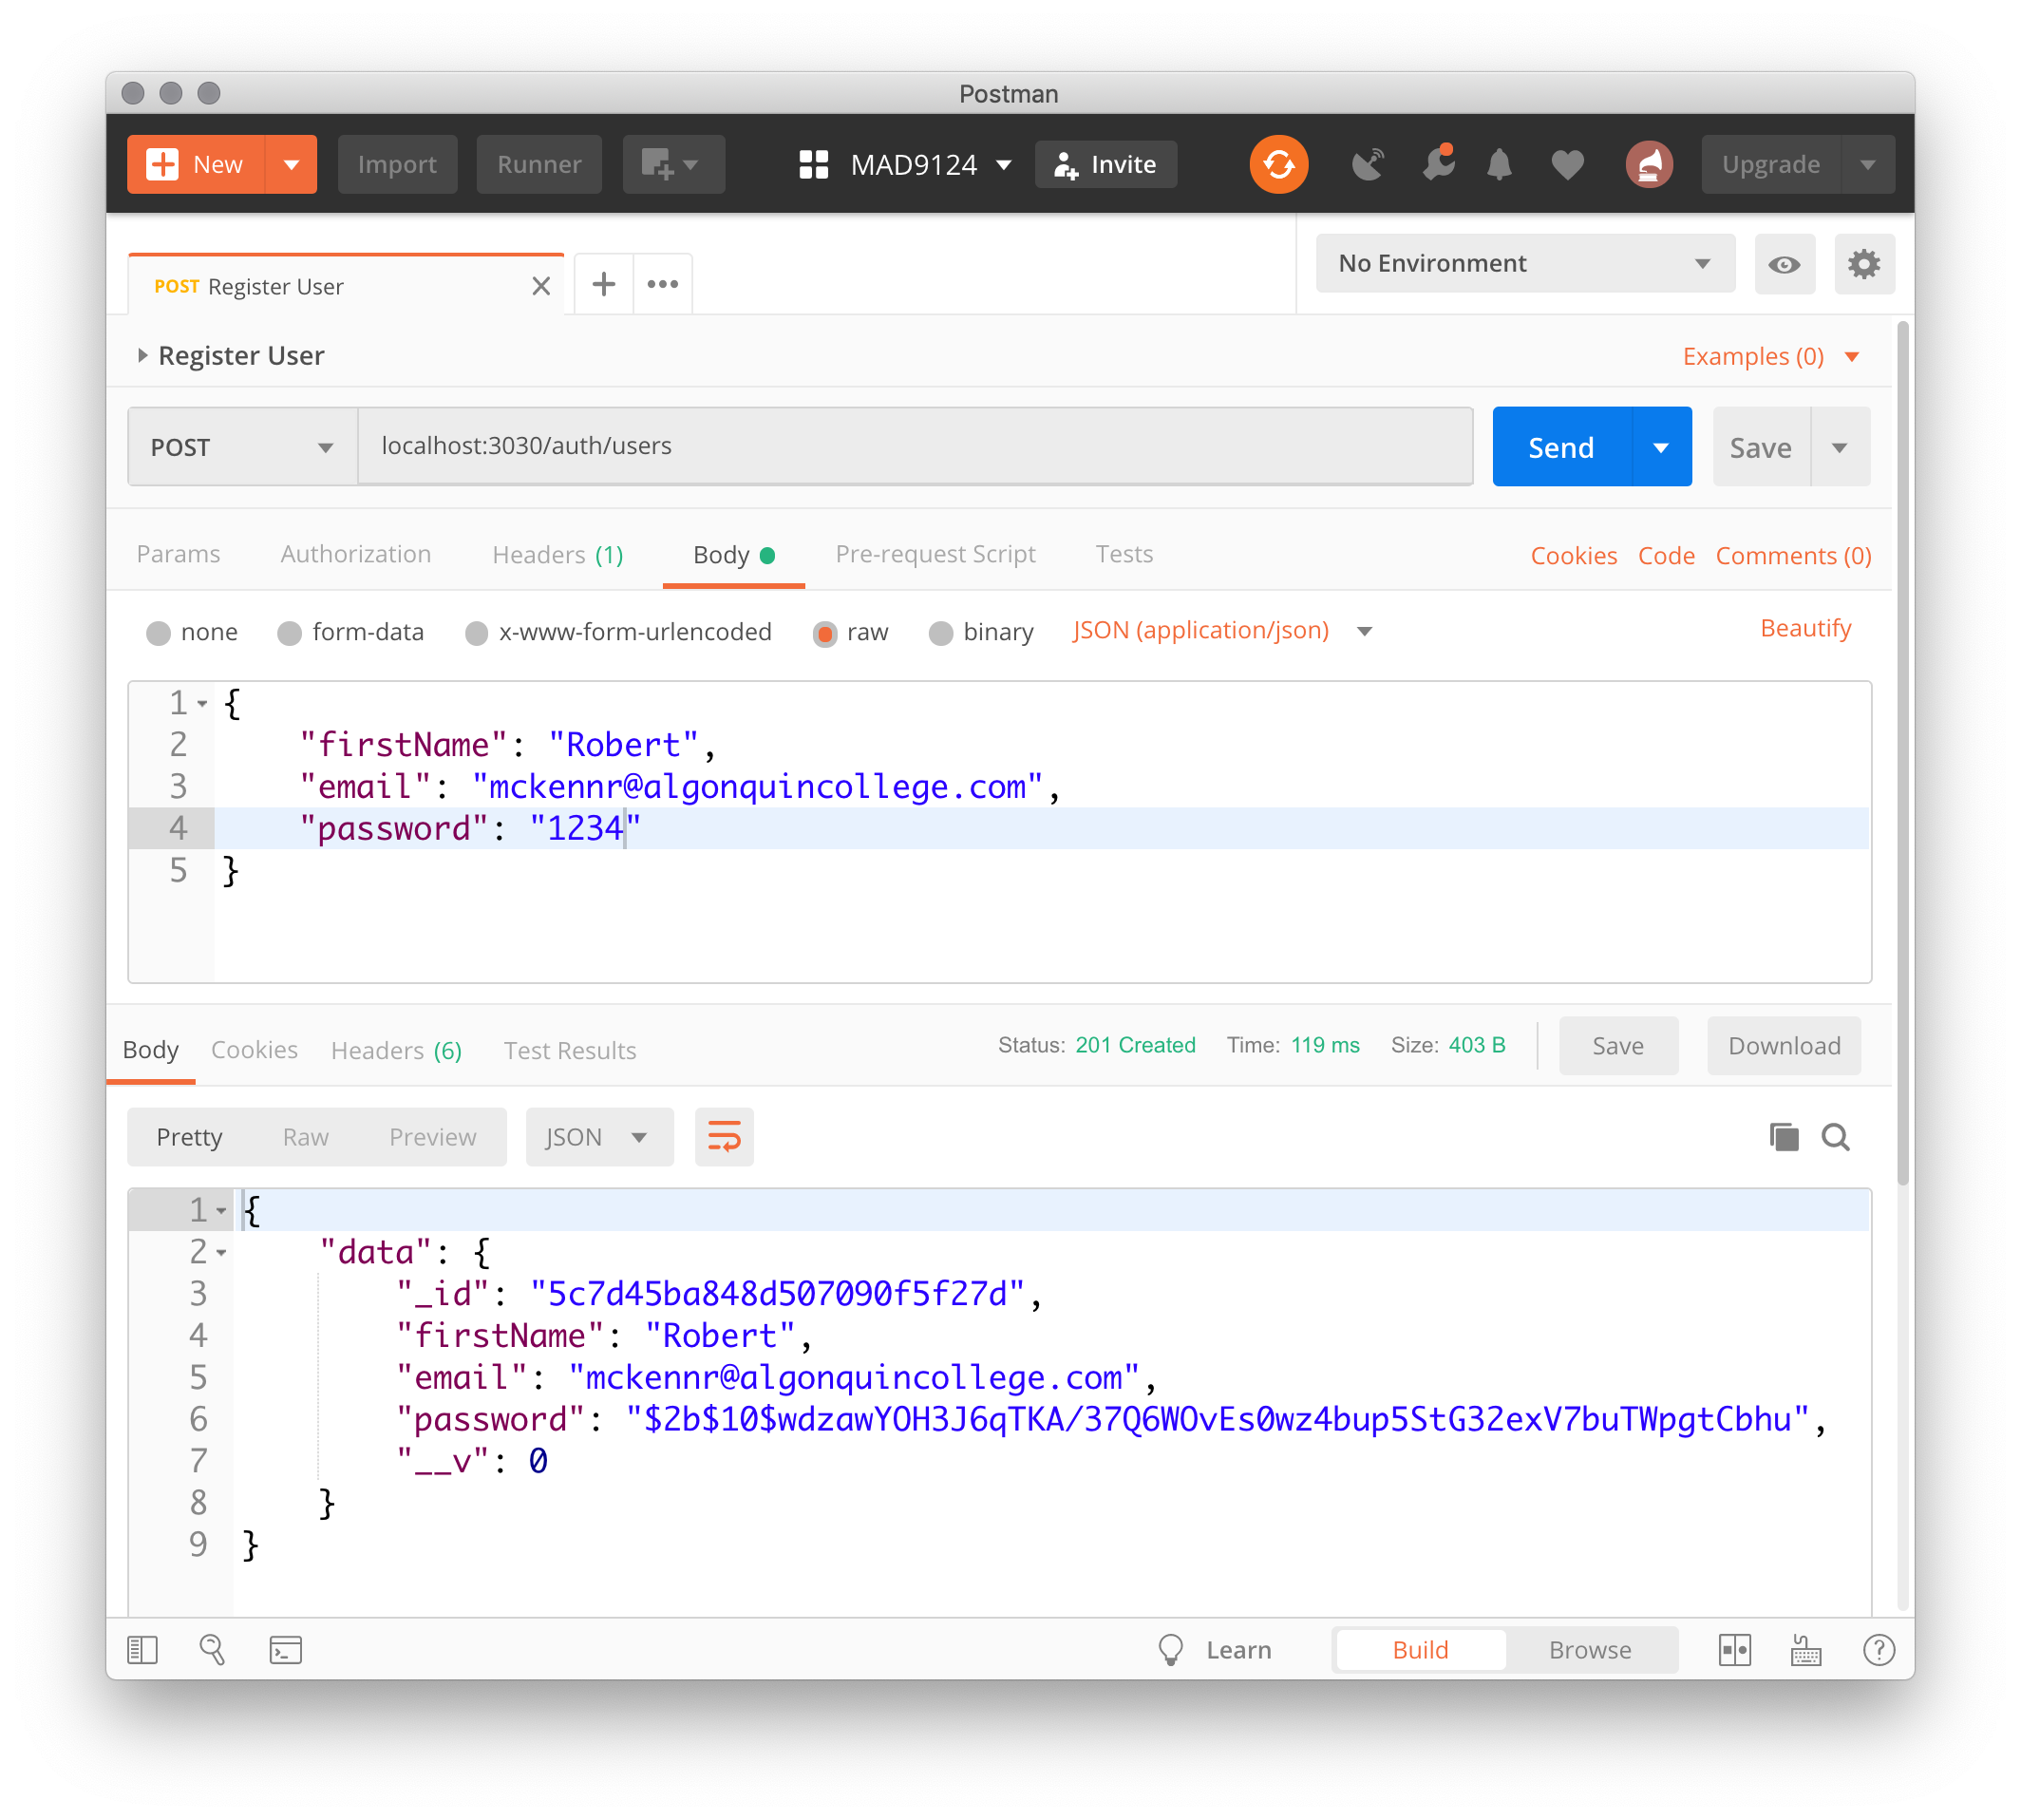
Now, in the 'create user' route handler, use the hash method to encrypt the password. Replace the user supplied password with an encrypted version before saving to the database.
// ...
const newUser = new User(req.sanitizedBody)
newUser.password = await bcrypt.hash(newUser.password, saltRounds)
await newUser.save()
// ...
OK. Test it with Postman.
# Unique email
We will use the user's email property as the login name. So, the email address needs to be unique in the users collection of our database, and we need an index on that property to speed up the queries.
In the User model, modify the schema to add unique: true to the email property. This will tell MongoDB to create a 'unique index' on the email property.
WARNING
The unique Option is Not a Validator (opens new window). It is a helper method for creating an index with a unique value constraint.
If you attempt to save a new User with the same email address as another User, MongoDB will throw an error ...
week8:auth Error saving new user:
E11000 duplicate key error collection:
mad9124.users index: email_1 dup key: { : "mckennr@algonquincollege.com" }
TIP
You may need to stop your Express server and drop the mad9124 database, for the new schema (with the unique index) to be correctly compiled.
It is necessary to query the database in order to validate that the new email address is not already registered before saving the new User. To make this query as fast as possible, we don't need to read the actual collection data, we can just see if it is already in the index.
The countDocuments() method on the User model takes a MongoDB query expression and returns the number of matching occurrences in the collection. The JavaScript Boolean() function converts the result into a Boolean value (true or false) – if the email is not in the index, the return value will be 0 which is a falsy value.
Strictly speaking, this is not required. The if condition would correctly process the numeric return values, but it more clearly communicates the intent to the reader.
//...
const newUser = new User(req.sanitizedBody)
const itExists = Boolean(await User.countDocuments({ email: newUser.email }))
if (itExists) {
  // return error
}
newUser.password = await bcrypt.hash(newUser.password, saltRounds)
//...
That is the core logic for the unique check. Now, let's expand the handling of the validation error.
if (itExists) {
  return res.status(400).send({
    errors: [
      {
        status: '400',
        title: 'Validation Error',
        detail: `Email address '${newUser.email}' is already registered.`,
        source: { pointer: '/data/attributes/email' }
      }
    ]
  })
}
WARNING
Calling the res.send() method does not halt execution. So we need the return keyword to exit the route handler function.
# Login a user
OK. You can now successfully register new users. It is time to think about how to handle authenticating them. What should the RESTful URI be? You might think to try POST /auth/user/:id/login, but that breaks some of the "rules" by overloading the primary resource path and adding an action verb.
It might help if I told you that we would send the client back a "id token" upon successful authentication. The client will then send that back as a header variable with each subsequent API call. So, in RESTful terms, what we really want to do is create a new authentication token. This makes more sematic sense.
# POST /auth/tokens
This resource path will support only the POST action and will expect the payload to contain the username/loginName and password. Near the bottom of the Auth Router module, let's pseudo code this new route handler.
// Login a user and return an authentication token.
router.post('/tokens', sanitizeBody, async (req, res) => {
  // check if the payload.username is valid
  // retrieve the stored password hash
  // compare the payload.password with the hashed password
  // if all is good, return a token
  // if any condition failed, return an error message
})
OK. How do we do that? Let's take them one at a time. Use the mongoose findOne() method on the User model to search for a matching email. If we find it, then we also have the hashed password. If not, send an error response with a 401 status code.
TIP
The Mongoose findOne() method returns null if there is no matching record in the database.
// Login a user and return an authentication token.
router.post('/tokens', sanitizeBody, async (req, res) => {
  const { email, password } = req.sanitizedBody
  const user = await User.findOne({ email: email })
  if (!user) {
    return res.status(401).send({ errors: ['we will build this later'] })
  }
  // compare the payload.password with the hashed password
  // if all is good, return a token
  // if any condition failed, return an error message
})
Next, use the bcrypt.compare() method to validate the client supplied password.
// Login a user and return an authentication token.
router.post('/tokens', sanitizeBody, async (req, res) => {
  const { email, password } = req.sanitizedBody
  const user = await User.findOne({ email: email })
  if (!user) {
    return res.status(401).send({ errors: ['we will build this later'] })
  }

  const hashedPassword = user.password
  const passwordDidMatch = await bcrypt.compare(password, hashedPassword)
  if (!passwordDidMatch) {
    return res.status(401).send({ errors: ['we will build this later'] })
  }
  // if all is good, return a token
  // if any condition failed, return an error message
})
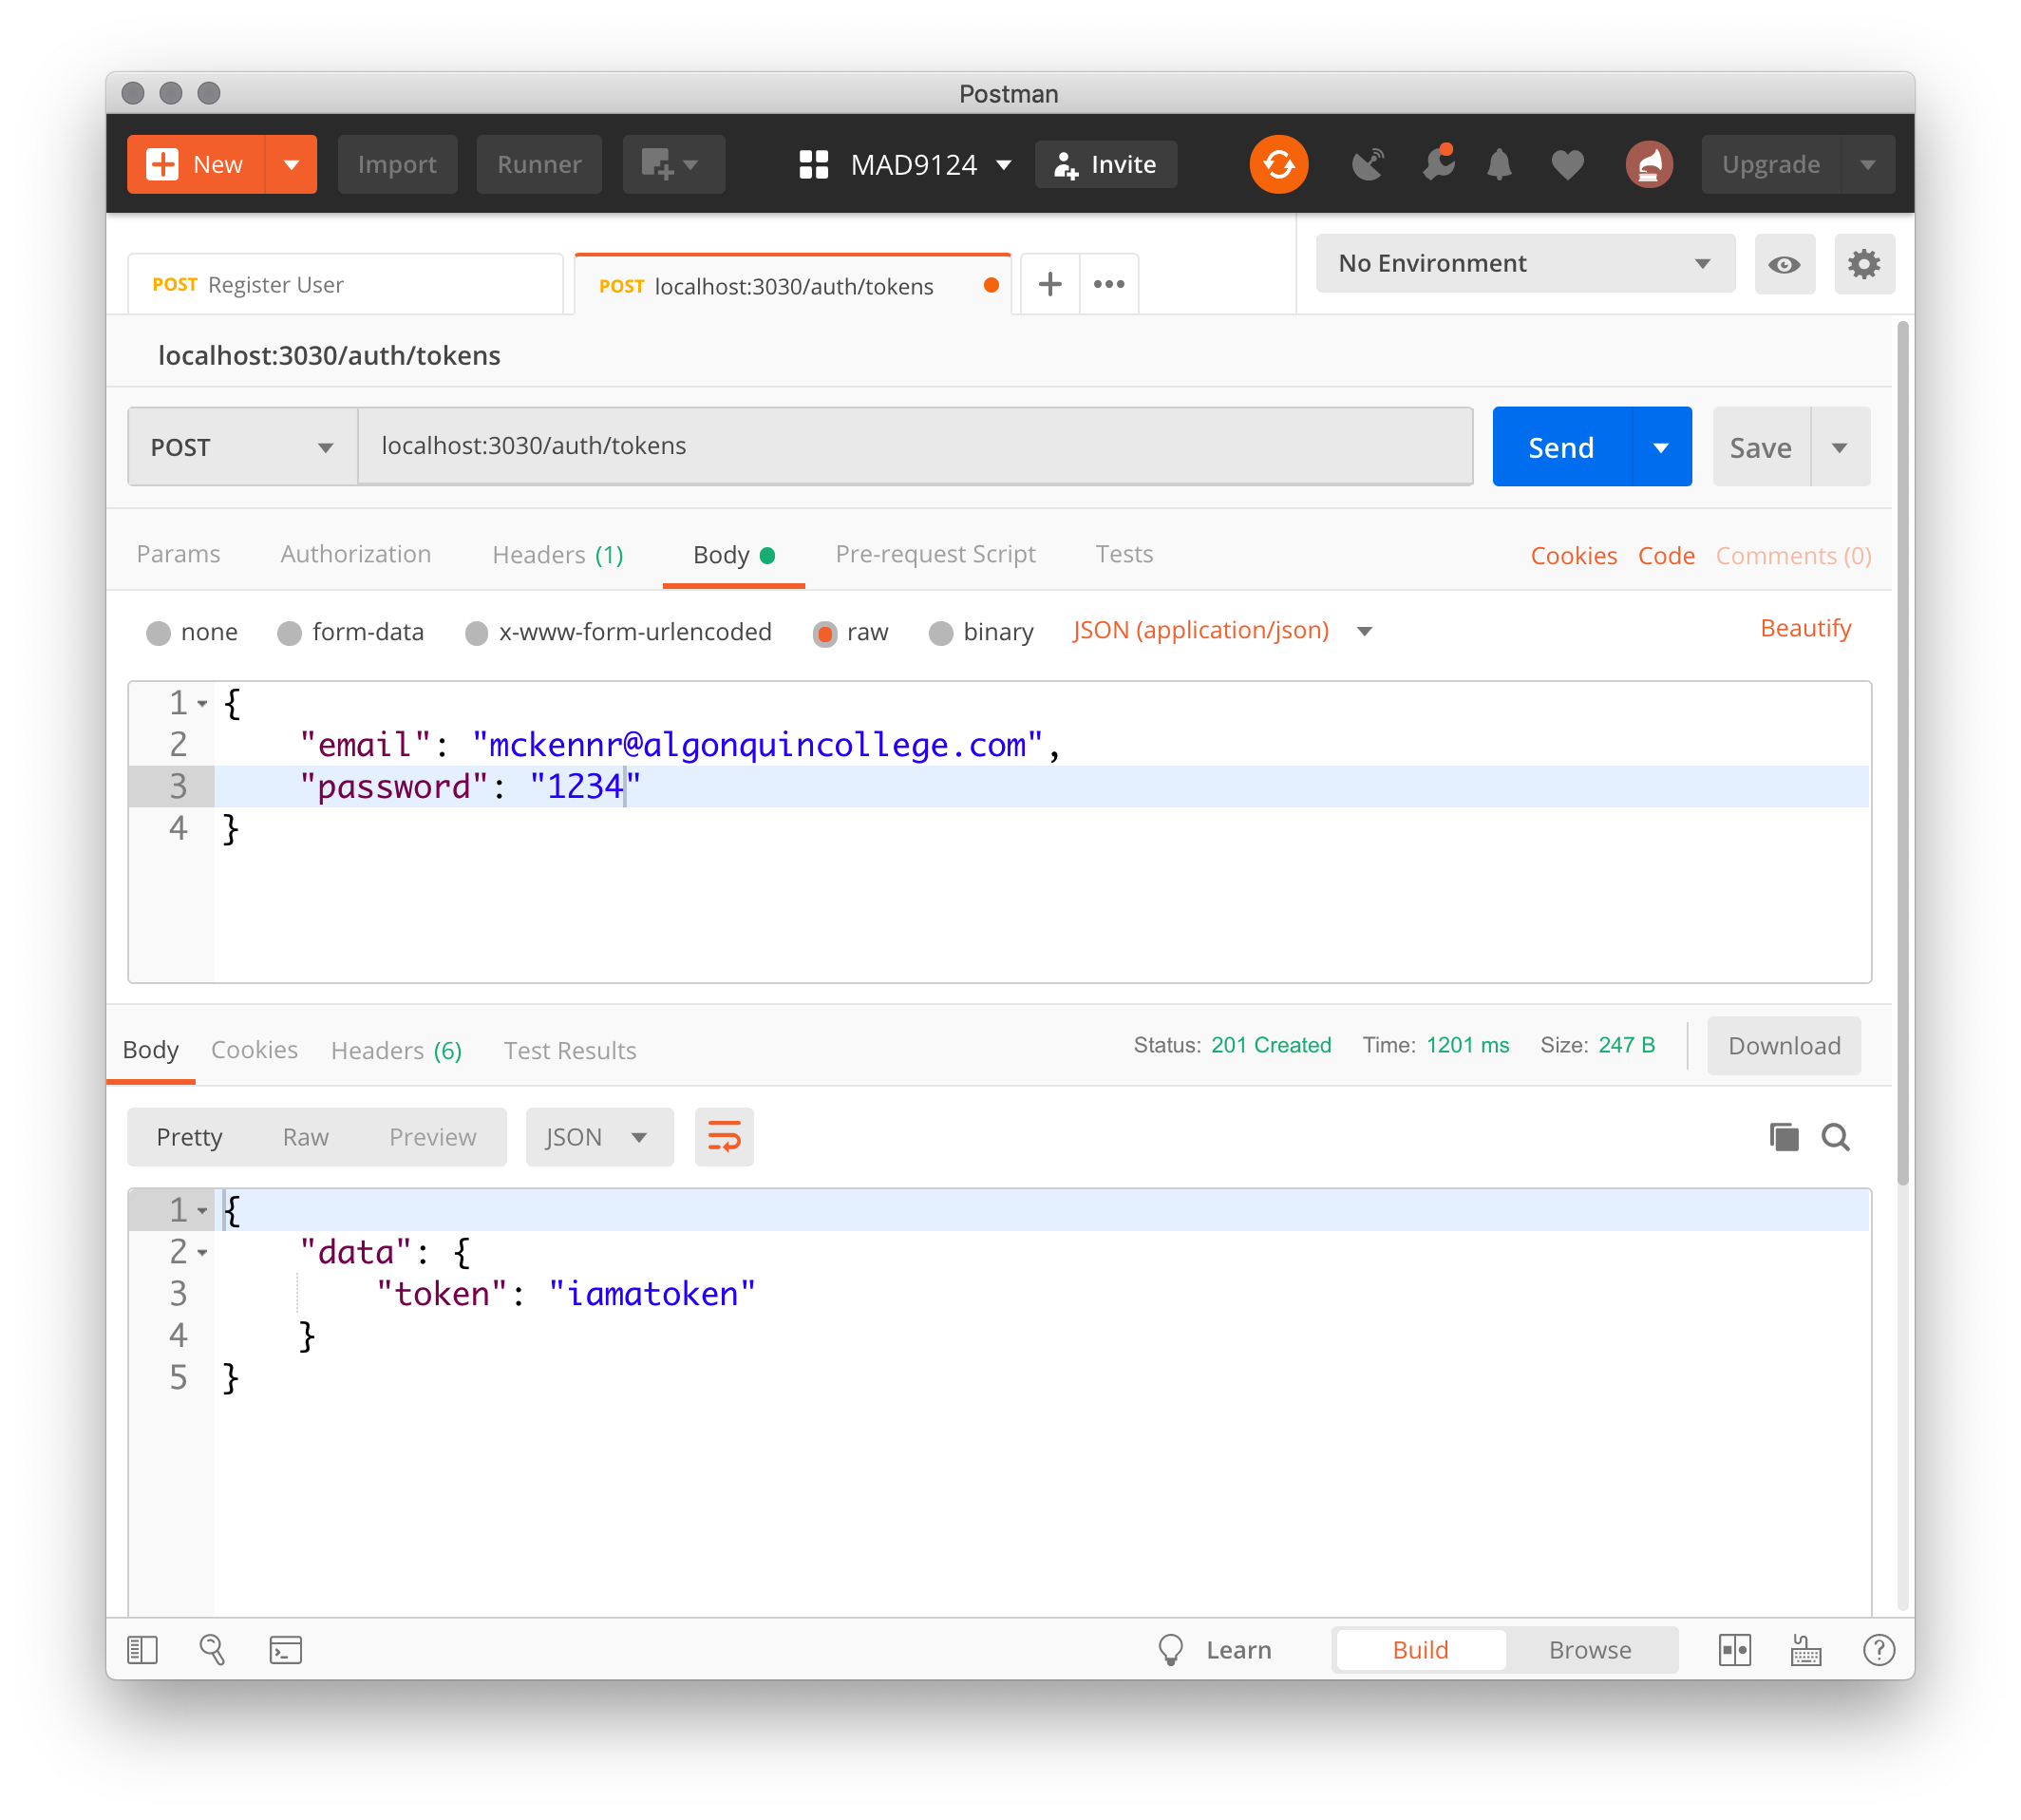
If we got this far, everything is good and we can return a token. Add these two lines as a placeholder for the moment. We will look at how to generate an industry standard token in just a minute.
const token = 'iamatoken'
res.status(201).send({ data: { token } })
This should be enough to test our logic. Let's go to our old friend Postman.
It works! But, there is a marked difference in the response time when we give it an invalid email. Hackers can use this timing difference to their advantage. Let's refactor this to mask that difference.
To make sure the timing is consistent, we need the bcrypt.compare() function to run every time. So, change it to compare to a new variable called hashedPassword rather than user.password. Then conditionally set hashedPassword.
If there was no User with a matching email (username) then we can set a fake value for the hashedPassword that will never get a valid match.
TIP
The first three characters signify the bcrypt version. The next three signify the number of salt rounds. The next 22 characters are the salt and the remainder is the encrypted password.
const user = await User.findOne({ email: email })

const badHash = `$2b$${saltRounds}$invalidusernameaaaaaaaaaaaaaaaaaaaaaaaaaaaaaaaaaaaaaa`
const hashedPassword = user ? user.password : badHash
const passwordDidMatch = await bcrypt.compare(password, hashedPassword)

if (!user || !passwordDidMatch) {
  return res.status(401).send({ errors: ['we will build this later'] })
}

const token = 'iamatoken'
res.status(201).send({ data: { token } })
Test it again. Great!
# Create a JWT
It is time to generate a real token. We will use the de facto industry standard JSON Web Tokens (JWT) (opens new window). There are libraries for just about every popular programming language. Let's install the Node.js module.
npm install jsonwebtoken
You should read the full documentation on JWTs but here are two critical things to understand.
The payload is hashed, not encrypted. Anyone with some JavaScript can read it. So, never put sensitive data in the token payload.
The token is cryptographically signed using a secret key on your sever. So you can validate that no one has altered the contents of the payload. Which means you can trust it.
Check the usage instructions (opens new window) ...
We need to require the library at the top of the Auth Router module.
import jwt from 'jsonwebtoken'
Then in the route handler update the token assignment line. For the payload, you will just supply the authenticated User's the unique _id property.
To simplify the in-class exercise, we will hard code the secret key for now – never do this in production!
const payload = { uid: user._id }
const token = jwt.sign(payload, 'superSecureSecret')
Test it in Postman ...
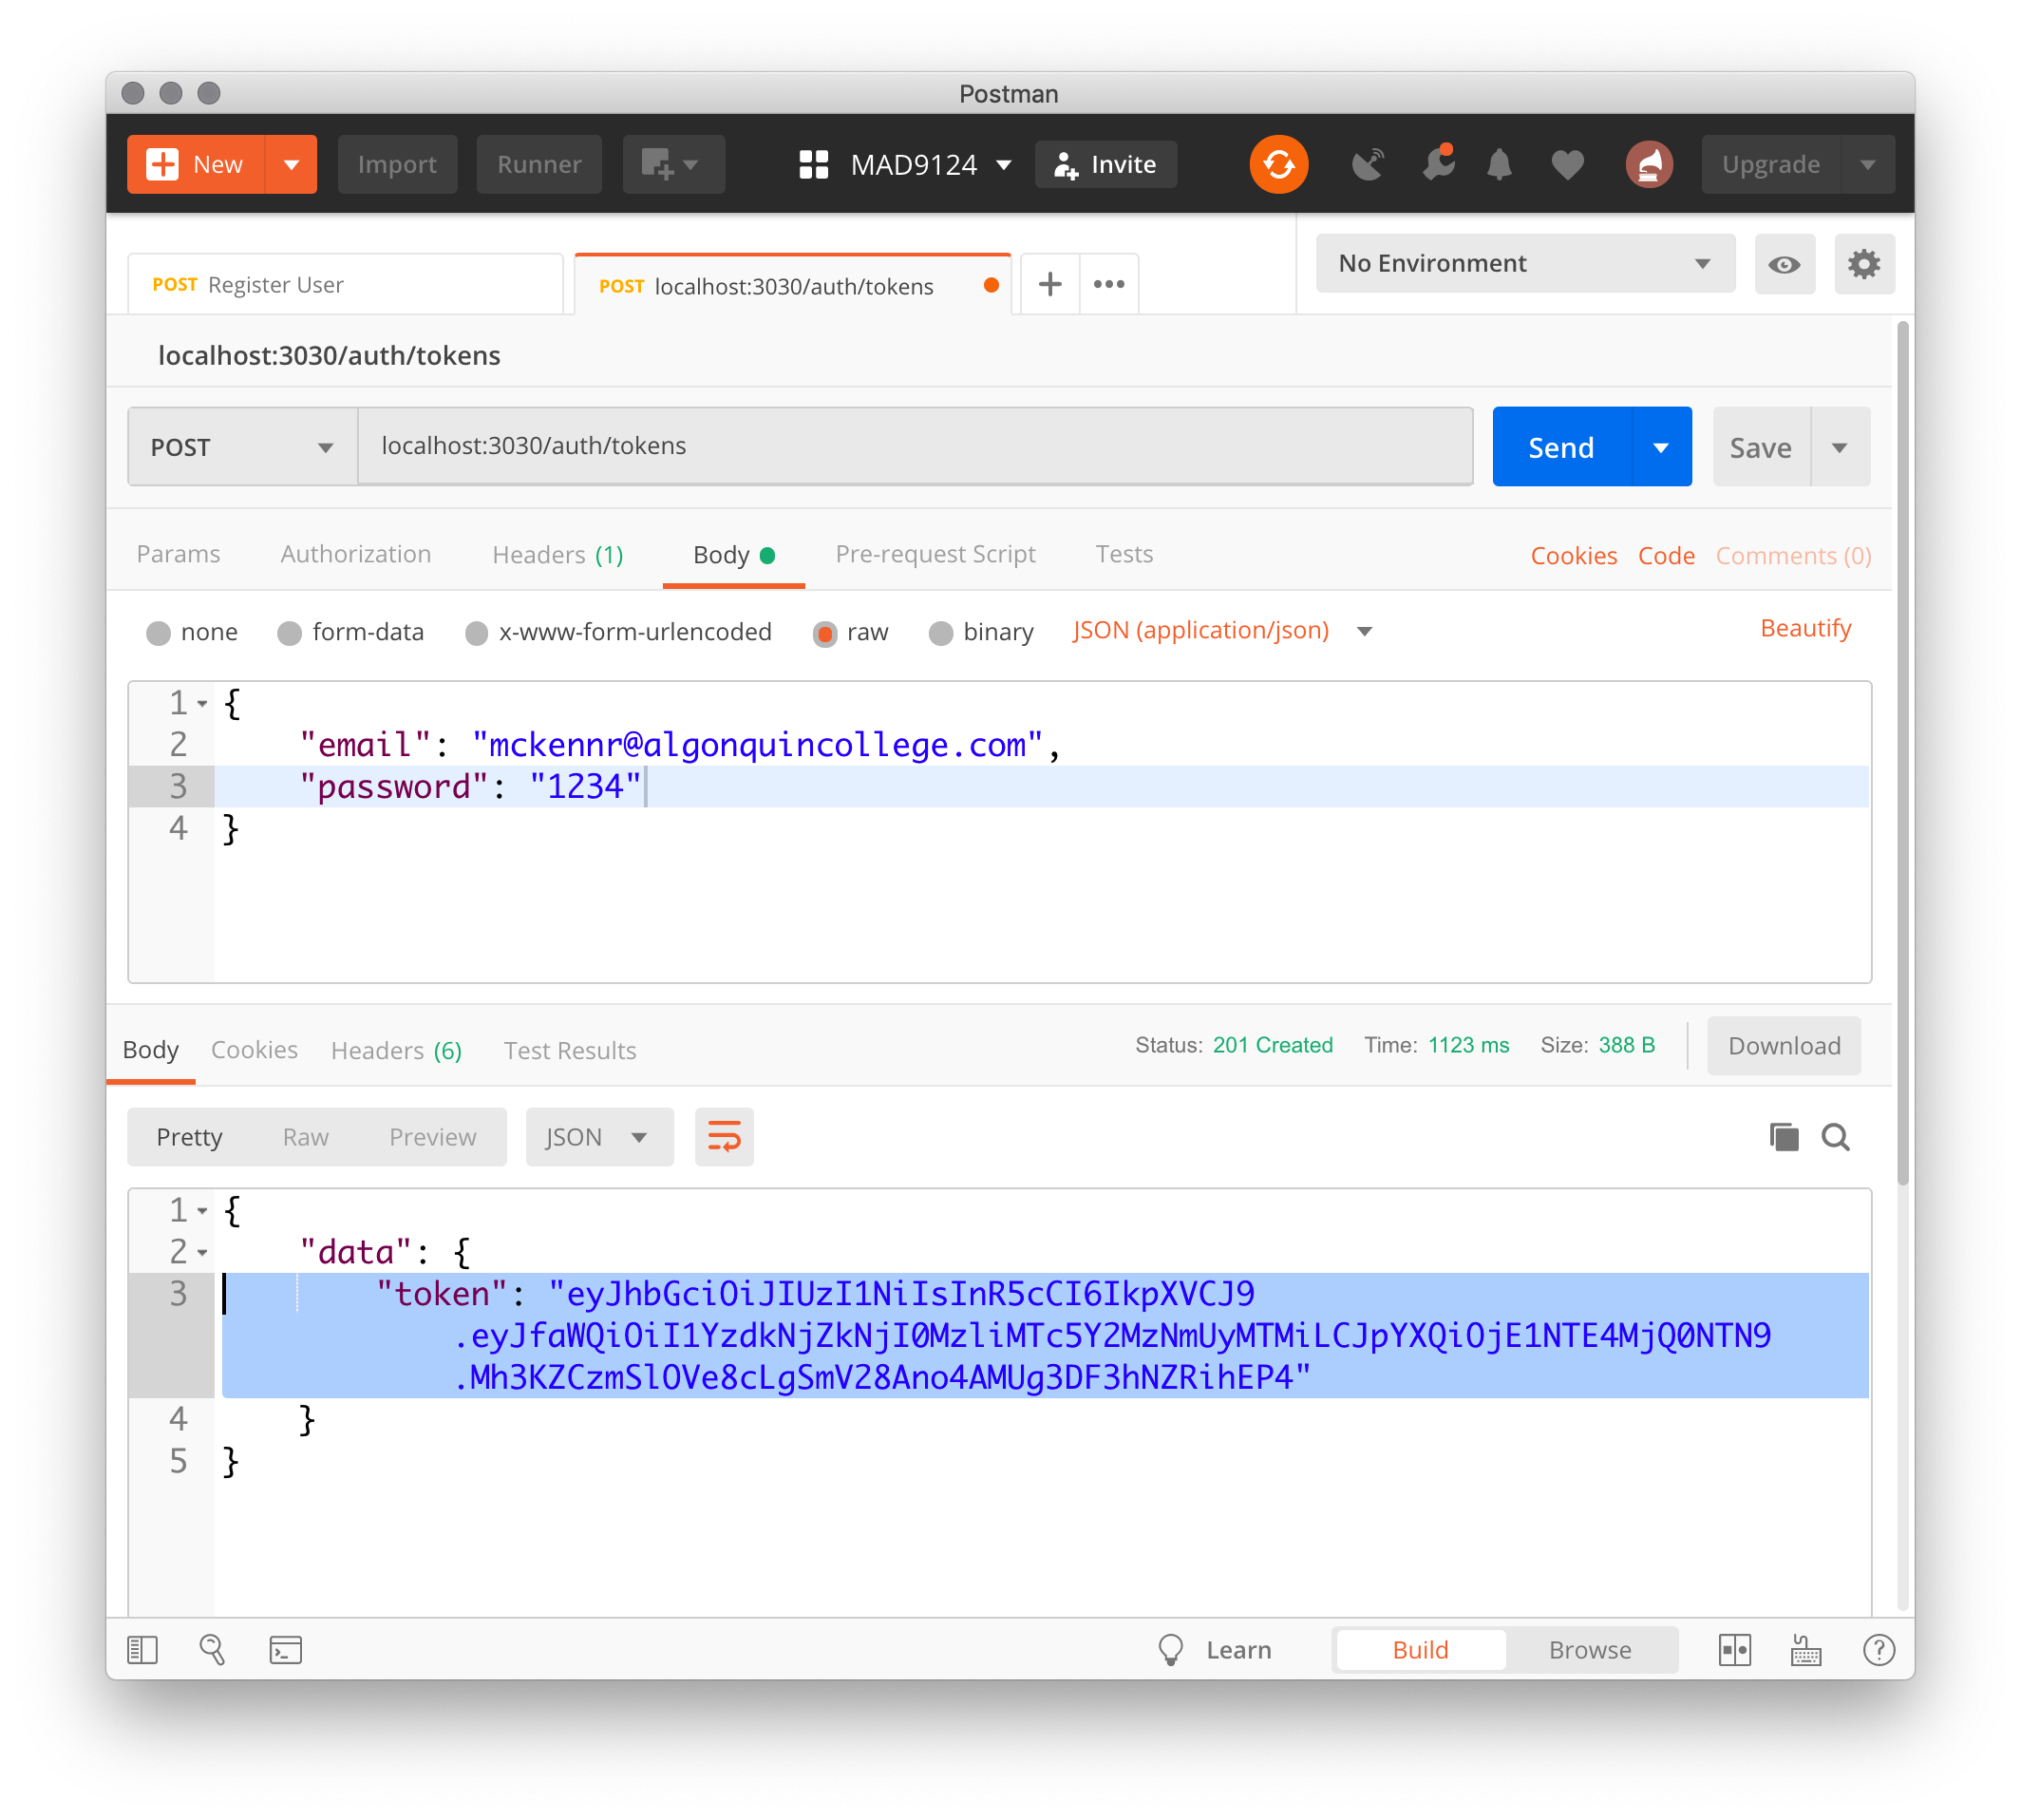
If you copy the token returned in Postman and paste it into the JWT Debugger at jwt.io (opens new window) you can verify the contents of the payload.

Yay! This works.
However, we are starting to get more and more logic about the User model leaking into the router module. In a small application, this is not really a big deal. But as an application grows in complexity this can lead to unwanted tight coupling between modules - making it harder to know where to look for implementation code, and harder to swap out the implementation to a third party web service or your own independent micro service.
The solution is to follow the OOP Information expert principle (opens new window) and move some of this logic to custom methods defined in the User model class.
# Custom instance methods
The mongoose.Schema class defines a methods object to which you can attach your own custom instance methods. These methods will be available to all Mongoose document objects created from this schema.
In this case, go to the /models/User.js file and before calling the mongoose.model() function, add a new property to the schema.methods called generateAuthToken and set it to hold a regular function. Then paste in the jwt.sign() method from the router module.
TIP
Since we are creating an "instance method", we need to update the payload. There is no user variable. Instead you can use the special this keyword to refer to the instantiated object (Mongoose Document).
import jwt from 'jsonwebtoken'
const mongoose = require('mongoose')
// ...
schema.methods.generateAuthToken = function () {
  const payload = {uid: this._id}
  return jwt.sign(payload, 'superSecureSecret')
}

const Model = mongoose.model('User', schema)
module.exports = Model
WARNING
Do not use an arrow function here. We need this inside the function to reference the instantiated model object.
Now update the route handler to call this new method ...
router.post('/tokens', sanitizeBody, async (req, res) => {
  const {email, password} = req.sanitizedBody

  const user = await User.findOne({email: email})

  const badHash = `$2b$${saltRounds}$invalidusernameaaaaaaaaaaaaaaaaaaaaaaaaaaaaaaaaaaaaaa`
  const hashedPassword = user ? user.password : badHash
  const passwordDidMatch = await bcrypt.compare(password, hashedPassword)

  if (!user || !passwordDidMatch) {
    return res.status(401).send({errors: ['we will build this later']})
  }

  res.status(201).send({data: {token: user.generateAuthToken()}})
}
# Custom class methods
Similarly, the route handler should not need to know about the password encryption implementation. We can relocate the authentication logic to a static class method and call it like User.authenticate(email, password) and expect either a User instance or null in return.
This time add a new authenticate property to the schema.statics object in the /models/User.js module. Copy over the logic from the router module and remember to change User to this.
const bcrypt = require('bcrypt')
const saltRounds = 14
// ...
schema.statics.authenticate = async function (email, password) {
  const user = await this.findOne({ email: email })
  const badHash = `$2b$${saltRounds}$invalidusernameaaaaaaaaaaaaaaaaaaaaaaaaaaaaaaaaaaaaaa`
  const hashedPassword = user ? user.password : badHash
  const passwordDidMatch = await bcrypt.compare(password, hashedPassword)

  return passwordDidMatch ? user : null
  // remember if the email did not match, user === null
}
And update the auth router module ...
router.post('/tokens', sanitizeBody, async (req, res) => {
  const { email, password } = req.sanitizedBody
  const user = await User.authenticate(email, password)

  if (!user) {
    return res.status(401).send({ errors: ['we will build this later'] })
  }

  res.status(201).send({ data: { token: user.generateAuthToken() } })
}
Test it with Postman to make sure that everything still works ... yay!
One last change to the POST /auth/tokens route handler ... let's put in a proper error message.
if (!user) {
  return res.status(401).send({
    errors: [
      {
        status: '401',
        title: 'Incorrect username or password.',
      },
    ]
  })
}
# Schema lifecycle hooks
There is one more implementation detail that is in the router module that should be moved to the User model. Currently the registration route is taking care of encrypting the password before saving the new User. It shouldn't need to know about this.
Mongoose Schema to the rescue again!
Mongoose provides some special middleware functions (opens new window) that are triggered by lifecycle events. We will use one that is triggered just before a model is saved to do the password encryption.
Add this code block to the /models/User.js module just below the custom methods that you added earlier.
schema.pre('save', async function (next) {
  // Only encrypt if the password property is being changed.
  if (!this.isModified('password')) return next()

  this.password = await bcrypt.hash(this.password, saltRounds)
  next()
})
We can now delete these lines from the router module ...
const bcrypt = require('bcrypt')
const saltRounds = 14
//...
newUser.password = await bcrypt.hash(newUser.password, saltRounds)
OK. This is a much cleaner implementation. The router does routing and the implementation details of how to manage password encryption and authenticate a user are in the User model.
# How does our code look now?
Auth Router
import User from '../../models/User.js'
import sanitizeBody from '../../middleware/sanitizeBody.js'
import createDebug from 'debug'
import express from 'express'

const debug = createDebug('week8:auth')
const router = express.Router()

// Register a new user
router.post('/users', sanitizeBody, async (req, res) => {
  try {
    const newUser = new User(req.sanitizedBody)

    const itExists = Boolean(await User.countDocuments({email: newUser.email}))
    if (itExists) {
      return res.status(400).send({
        errors: [
          {
            status: '400',
            title: 'Validation Error',
            detail: `Email address '${newUser.email}' is already registered.`,
            source: {pointer: '/data/attributes/email'}
          }
        ]
      })
    }

    await newUser.save()
    res.status(201).send({data: newUser})
  } catch (err) {
    debug('Error saving new user: ', err.message)
    res.status(500).send({
      errors: [
        {
          status: '500',
          title: 'Server error',
          description: 'Problem saving document to the database.'
        }
      ]
    })
  }
})

// Login a user and return an authentication token.
router.post('/tokens', sanitizeBody, async (req, res) => {
  const {email, password} = req.sanitizedBody
  const user = await User.authenticate(email, password)

  if (!user) {
    return res.status(401).send({
      errors: [
        {
          status: '401',
          title: 'Incorrect username or password.'
        }
      ]
    })
  }

  res.status(201).send({data: {token: user.generateAuthToken()}})
})

export default router
User Model
import jwt from 'jsonwebtoken'
import bcrypt from 'bcrypt'
import mongoose from 'mongoose'

const saltRounds = 14
const jwtSecretKey = 'superSecureSecret'

const schema = new mongoose.Schema({
  firstName: {type: String, trim: true, maxlength: 64, required: true},
  lastName: {type: String, trim: true, maxlength: 64},
  email: {
    type: String,
    trim: true,
    maxlength: 512,
    required: true,
    unique: true
  },
  password: {type: String, trim: true, maxlength: 70, required: true}
})

schema.methods.generateAuthToken = function() {
  const payload = {uid: this._id}
  return jwt.sign(payload, jwtSecretKey)
}

schema.statics.authenticate = async function(email, password) {
  const user = await this.findOne({email: email})

  const badHash = `$2b$${saltRounds}$invalidusernameaaaaaaaaaaaaaaaaaaaaaaaaaaaaaaaaaaaaaa`
  // remember if the email did not match, user === null
  const hashedPassword = user ? user.password : badHash
  const passwordDidMatch = await bcrypt.compare(password, hashedPassword)

  return passwordDidMatch ? user : null
}

schema.pre('save', async function(next) {
  // Only encrypt if the password property is being changed.
  if (!this.isModified('password')) return next()

  this.password = await bcrypt.hash(this.password, saltRounds)
  next()
})

const Model = mongoose.model('User', schema) // factory function returns a class

export default Model
# Protected routes
The whole point of authenticating users, is to restrict access to certain resources. This can be as simple as "are you logged in?" or a more complex Role Based Access Control (RBAC) (opens new window) system that applies a more fine-grained user authorization check.
Let's start with the simple case. Create a new resource route to retrieve the currently logged-in user model. We could create a route formatted as GET /auth/users/:id, but it is a very common practice to have a dedicated route for the active user. It is usually formatted similar to this, GET /auth/users/me. Sketch out the logic ... add this to the Auth router module.
// Get the currently logged-in user
router.get('/users/me', async (req, res) => {
  // Get the JWT from the request header
  // Validate the JWT
  // Load the User document from the database using the `_id` in the JWT
  // Remember to redact sensitive data like the user's password
  // Send the data back to the client.
})
Access to the currently logged-in user is something that we will want to do in many route handlers, so let's build that logic in a reusable middleware function. It will tackle the first two steps above and make the token's payload available on the request object as req.user.
Create a new module called auth.js in the middleware folder of your project. Require the jsonwebtoken module and set the jwtPrivateKey to the same value that we used in the User model module (we are still hard coding this for now, but we'll look at a better way to handle this in a future module). Then add the basic middleware function signature.
import jwt from 'jsonwebtoken'

const jwtPrivateKey = 'superSecureSecret'

export default function (req, res, next) {
  // Get the JWT from the request header
  // Validate the JWT
}
The client application will pass the token in a request header called Authorization. The corresponding value will be in the form of Bearer {{token}}, where {{token}} is a placeholder for the actual JWT. Note the word Bearer is capitalized and followed be a space.
We can use the req.header('Authorization') function to get the token
from the request headers and, if the token is missing, send an authentication error.
const token = req.header('Authorization')
if (!token) {
  return res.status(401).send({
    errors: [
      {
        status: '401',
        title: 'Authentication failed',
        description: 'Missing bearer token',
      },
    ]
  })
}
However, the value of the token is a string with two parts. The first part is the token type Bearer and the second part – after the space – is the actual token. We can use JavaScript's String.prototype.split() (opens new window) to isolate these two values as elements of an array. Then we can apply destructuring assignment (opens new window) to to extract the first two elements of the array into local variables, type and token.
const [type, token] = headerValue.split(' ')
To keep things clean and organized, let's move the logic to parse the Authorization header into a separate function.
const parseToken = function (headerValue) {
  if (headerValue) {
    const [type, token] = headerValue.split(' ')
    if (type === 'Bearer' && typeof token !== 'undefined') {
      return token
    }
    return undefined
  }
}

export default function (req, res, next) {
  const token = parseToken(req.header('Authorization'))
  if (!token) {
  // ... rest of the module
If we have a token, we can proceed to validate it with the jwt.verify() method. It takes two arguments: the token, and the secret key. If the token is verified as not having been tampered with, then the payload is decoded and returned. We can then set the decoded payload as the user key on the request object and call next().
const payload = jwt.verify(token, jwtPrivateKey)
req.user = { _id: payload.uid }
next()
But we need to send a validation error if the token is not good. So, let's wrap that in a try catch block.
try {
  const payload = jwt.verify(token, jwtPrivateKey)
  req.user = { _id: payload.uid }
  next()
} catch (err) {
  res.status(400).send({
    errors: [
      {
        status: '400',
        title: 'Validation Error',
        description: 'Invalid bearer token',
      },
    ],
  })
}
The final auth middleware module should look like this.
import jwt from 'jsonwebtoken'

const jwtPrivateKey = 'superSecureSecret'

const parseToken = function (headerValue) {
  if (headerValue) {
    const [type, token] = headerValue.split(' ')
    if (type === 'Bearer' && typeof token !== 'undefined') {
      return token
    }
    return undefined
  }
}

export default function (req, res, next) {
  const token = parseToken(req.header('Authorization'))
  if (!token) {
    return res.status(401).send({
      errors: [
        {
          status: '401',
          title: 'Authentication failed',
          description: 'Missing bearer token',
        },
      ],
    })
  }

  try {
    const payload = jwt.verify(token, jwtPrivateKey)
    req.user = { _id: payload.uid }
    next()
  } catch (err) {
    res.status(400).send({
      errors: [
        {
          status: '400',
          title: 'Validation Error',
          description: 'Invalid bearer token',
        },
      ],
    })
  }
}
Now we can go back to the Auth Router module and use this new middleware. Require it at the top.
import authenticate from '../../middleware/auth.js'
In the GET /auth/users/me route handler, leverage the authenticate middleware. If the application flow made it this far, we know that the token was valid and the currently logged-in user's _id is available on the request object.
Remember
When we encoded the token, we included only the user's unique id property.
You can now load the user document from the database and return it to the client.
router.get('/users/me', authenticate, async (req, res) => {
  const user = await User.findById(req.user._id)
  res.send({ data: user })
})
# Redact Sensitive Data
One more thing... we have to guard against revealing sensitive data like user.password. One solution is to chain the Mongoose select() (opens new window) method onto the findById() request and limit the fields that are returned.
Prefixing field names with - explicitly tells Mongo to exclude this properties.
router.get('/users/me', authorize, async (req, res) => {
  const user = await User.findById(req.user._id).select('-password -__v')
  res.send({ data: user })
})
But a better solution is to make this the default behaviour in the User model schema. By overriding the toJSON() method in the model schema, we can be assured that we never forget to remove unwanted fields in a rout handler.
Add this code snippet to the /models/User.js module.
schema.methods.toJSON = function () {
  const obj = this.toObject()
  delete obj.password
  delete obj.__v
  return obj
}
And then we don't need the select() method in the route handler.
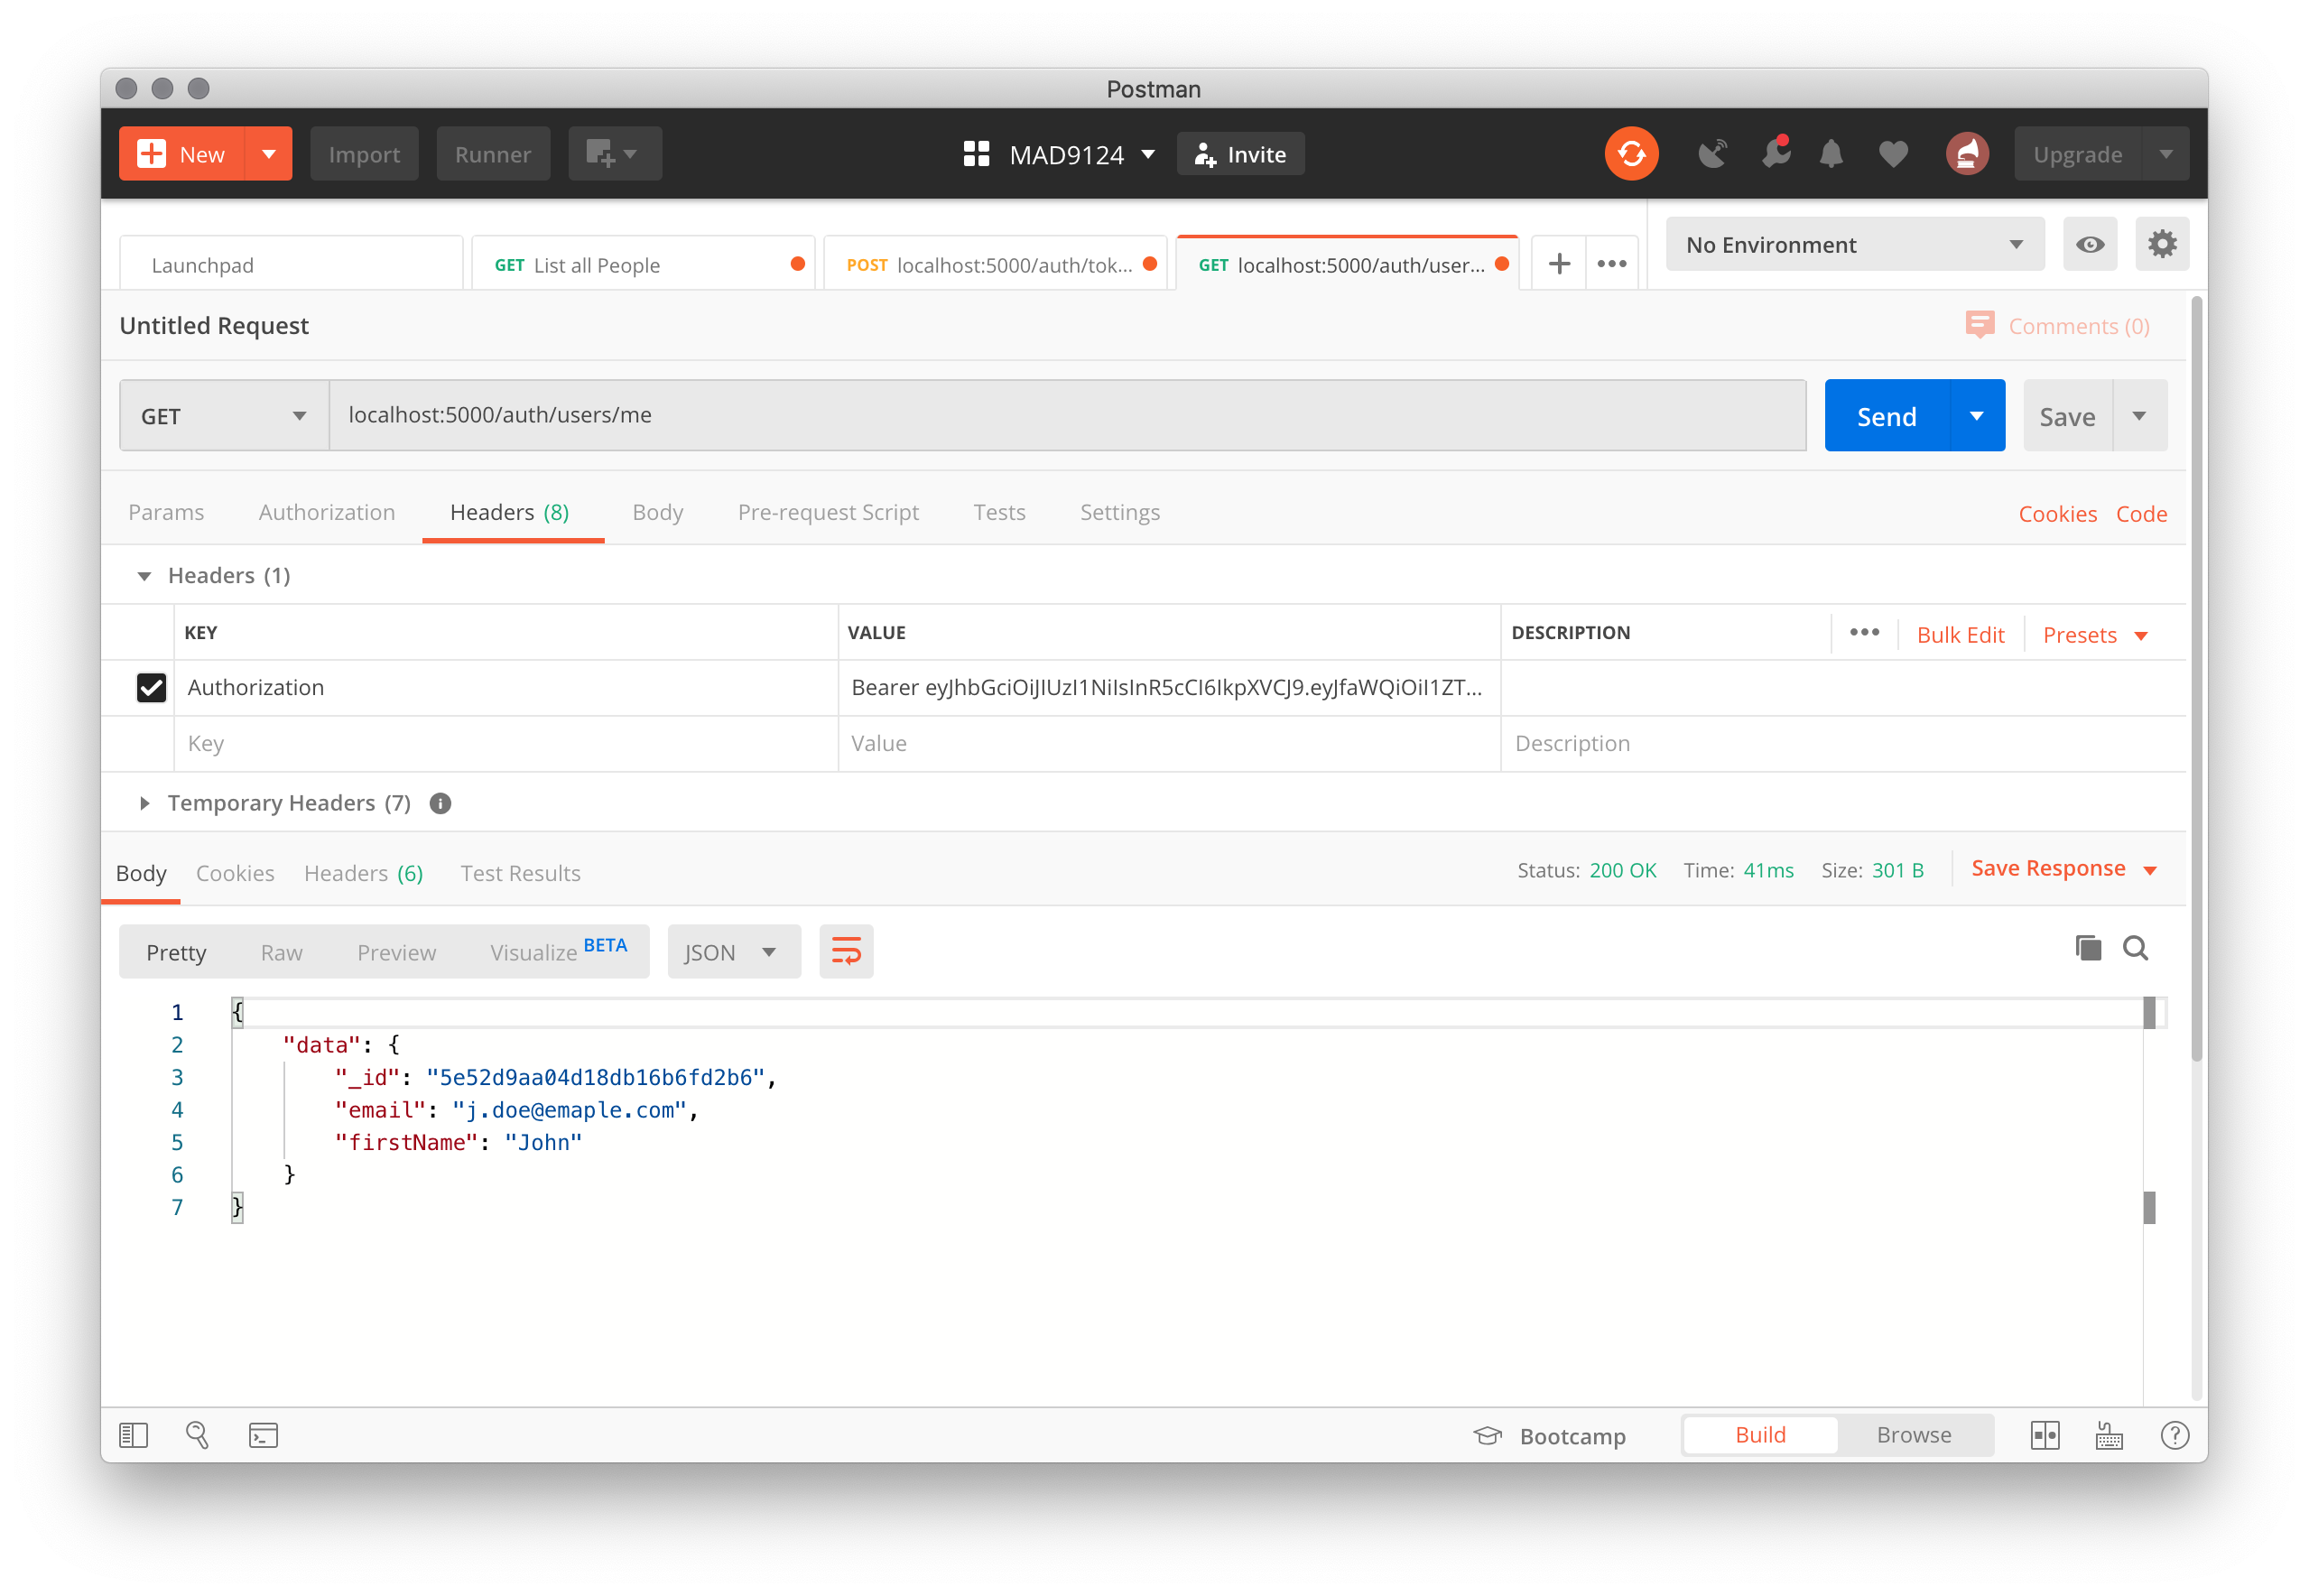
# OK. Let's test it with Postman.
Set the Authorization header property to be the encoded token string that was returned from the login test – prefixed by Bearer.
# Submit your work
Use git to commit your changes and then push your commits up to the remote GitHub repo. Submit the GitHub repo's URL on Brightspace.
# For next week
Before next week's class, please read these additional online resources.
- Hashing in Action: Understanding bcrypt (opens new window)
- Introduction to JSON Web Tokens (opens new window)
Quiz
There will be a short quiz next class. The questions could come from any of the material referenced above.