Week 10
Object Data Modelling with Mongoose
# Agenda
- AMA (15 min)
- Mongoose Models (20 mins)
- Mongoose Query Methods (10 mins)
- MongoDB on Atlas
- Assignment MongoDB CRUN on Cloud
# Object Data Modelling with Mongoose
# Mongoose Models
Mongoose is a Node.js based Object Data Modelling (ODM) library for MongoDB. It is used to abstract away the lower level MongoDB access APIs and manage the shape of application resource data structures. This is the M in the MVC software architecture pattern.
Mongoose provides two core features to simplify the implementation of a MongoDB backed application.
The
mongoose.model()method is a class factory -- meaning it is a function that returns a new class object which we can then use to instantiate individual document objects. This factory function takes two arguments: the name of the resource that this model represents, and a schema object describing the properties of that resource.The
mongoose.Schemaclass is used to define the expected shape of resource properties -- their names, types, and validation limits.
# Schema
A model schema could be a simple object specifying the property names and types.
    const catSchema = new mongoose.Schema({
      name: String,
      age: Number
    })
Or it can be expressed with more detailed options.
    const catSchema = new mongoose.Schema({
      name: {type: String, minlength: 3, maxlength: 50, required: true},
      age: {type: Number, min: 0, max: 25}
    })
# Schema Types
The following Mongoose Schema Types (opens new window) (opens new window) are permitted:
- Array
- Boolean
- Buffer
- Date
- Mixed (A generic / flexible data type)
- Number
- ObjectId
- String
Mixed and ObjectId are defined under mongoose.Schema.Types. We will look at this a little later when we create an owner relationship for the cars API.
# Making Models
Start by using the schema object with the model() factory method to generate a new class.
const Cat = mongoose.model('Cat', catSchema)
... and then we can use that Cat model to instantiate a new Mongoose document instance.
const kitty = new Cat({name: 'Spot', age: 2})
The mongoose.model factory function generates new class objects, customized with the given schema, that inherit all of the methods required to interact with the MongoDB service. This includes a list of static class methods (opens new window) (opens new window) as well as instance methods (opens new window) (opens new window). e.g.
    // example class method
    Cat.find()

    // example instance method
    kitty.save()
# Relationships
Most applications have more complex data structures than our simple Cat model. Often this involves a relationship to another model. For example we might want to extend the Cat model to include an owner. In traditional SQL database systems, this means creating a new table to store the details about the Person that is the owner of the Cat, and then adding a new property like owner_id to the Cat schema to store the foreign key pointer to people.id.
Document databases like MongoDB give us two options (opens new window) (opens new window): embedded documents, and document references.
# Document References
Document references are similar to an SQL foreign key. It stores the _id value of a document in another collection. Unlike SQL databases this relationship is not enforced at the database level -- there is no validation that the reference id exists. We would add it to the schema like this, where the ref option is the name of another model class in our application.
    const catSchema = new mongoose.Schema({
      name: {type: String, minlength: 3, maxlength: 50, required: true},
      age: {type: Number, min: 0, max: 25},
      owner: {type: mongoose.Schema.Types.ObjectId, ref: 'Person'}
    })
Another difference from SQL is that the reference property could be an array.
    const catSchema = new mongoose.Schema({
      name: {type: String, minlength: 3, maxlength: 50, required: true},
      age: {type: Number, min: 0, max: 25},
      owners: [{type: mongoose.Schema.Types.ObjectId, ref: 'Person'}]
    })
# Example usage
The owners property stores an array of one or more ObjectId (opens new window) (opens new window) references to the unique _id of a document in the Person collection.
    const Cat = mongoose.model('Cat', catSchema)

    const kitty = new Cat({
      name: 'Fluffy',
      age: 4,
      owners: ['6021b7be9d383359e30a1327', '6021b94e6a3a0b5a03fcd7ba']
    })
# Embedded Documents
The other option is to embed the related documents as properties of the main document.
    const personSchema = new mongoose.Schema({
      firstName: String,
      lastName: String,
      phoneNumber: Number
    })

    const catSchema = new mongoose.Schema({
      name: {type: String, minlength: 3, maxlength: 50, required: true},
      age: {type: Number, min: 0, max: 25},
      owners: [personSchema]
    })

    const Cat = mongoose.model('Cat', catSchema)

    const kitty = new Cat({
      name: 'Fluffy',
      age: 4,
      owners: [
        {firstName: 'Mickey', lastName: 'Mouse', phoneNumber: 14155551212},
        {firstName: 'Minnie', lastName: 'Mouse', phoneNumber: 14155551212}
      ]
    })
Trade-offs
The relationship modelling method you choose is ultimately a trade-off between read query speed and data consistency.
The referenced document method ensures that data remains consistent because it is stored in only one place for each schema model, but it requires an additional database query for each related document when retrieving the primary document. For queries returning a single document (most CRUD operations) this may be fine. However for complex search queries returning thousands of results, there could be a significant performance hit.
The embedded document method avoids these additional database queries when retrieving data, but exponentially increases the complexity of maintaining data consistency because you are potentially storing the same data in many places and need to update them all manually.
If we look at the Cat example above, and consider what happens when we want to change Mickey Mouse's phone number. In the reference method, we simply find the Person document for Mickey Mouse and update the phoneNumber property. Then whenever we need to contact Fluffy's owner, the data will be correct.
However if we use the embedded method, we have to lookup all of the Cats that have an owner with the name Mickey Mouse and then update the embedded phone number. But what if there is more than one Person named Mickey Mouse? How do we know if we are updating the correct information? It can get messy if you don't plan it out well.
# Mongoose Query Methods
Mongoose models provide several static helper functions for CRUD operations. Each of these functions returns a mongoose Query object (opens new window) (opens new window) ... A query also has a
.then()function, and thus can be used as a promise.
Review the mongoose documentation (opens new window) (opens new window) for the full list, but these are the most common ones that we will be using.
Model.find() (opens new window) (opens new window) is used to get an array of documents matching the given filter criteria.
const catsNamedSpot = Cat.find({name: 'Spot'})
These methods act on a single document matching the given id parameter.
- Model.findById()
- Model.findByIdAndRemove()
- Model.findByIdAndUpdate()
These methods act on the first document found matching the given filter criteria.
- Model.findOne()
- Model.findOneAndRemove()
- Model.findOneAndUpdate()
# Mongo Query Operators
In the filter criteria objects we can use any of the standard MongoDB query operators (opens new window) (opens new window). The syntax is to provide an object as the filter condition value for the given property. That object will have one of the Mongo query operators as it's key and the corresponding relative value. Let's look at some examples.
    const catsAgedFourOrMore = Cat.find({age: {$gte: 4}})
    const catsAgedLessThanFour = Cat.find({age: {$lt: 4}})
    const catsAgedTwoFourOrSix = Cat.find({age: {$in: [2, 4, 6]}})
    const catsNotAgedTwoFourOrSix = Cat.find({age: {$nin: [2, 4, 6]}})
# Mongoose Query Helpers
Mongoose provides some helper functions (opens new window) (opens new window) to make writing your queries more fluent. The syntax is sometimes more readable, but the end result is exactly the same. So, use whichever method is easier for you.
    const catsAgedFourOrMore = Cat.find()
      .where('age')
      .gte(4)
    const catsAgedLessThanFour = Cat.find()
      .where('age')
      .lt(4)
    const catsAgedTwoFourOrSix = Cat.find()
      .where('age')
      .in([2, 4, 6])
    const catsNotAgedTwoFourOrSix = Cat.find()
      .where('age')
      .nin([2, 4, 6])
# MongoDB vs MongoDB Atlas: What are the differences?
MongoDB and MongoDB Atlas are related, but they are not the same thing. Here are some of the key differences between MongoDB and MongoDB Atlas:
Deployment: MongoDB is a self-hosted database that can be installed on-premises or in the cloud, while MongoDB Atlas is a fully managed cloud-based database service provided by MongoDB Inc.
Management: With MongoDB, you are responsible for managing and maintaining your database infrastructure, including hardware provisioning, software updates, security, and backups. With MongoDB Atlas, these tasks are handled by MongoDB Inc., allowing you to focus on building and managing your applications.
Scalability: MongoDB can be scaled horizontally by adding more servers to the cluster, but this requires manual configuration and management. With MongoDB Atlas, scaling is automatic and can be done with a few clicks.
Availability: MongoDB can be configured for high availability using replica sets, but this also requires manual configuration and management. With MongoDB Atlas, high availability is built-in and automatically managed by MongoDB Inc.
Security: Both MongoDB and MongoDB Atlas provide robust security features, including authentication, encryption, and access controls. However, with MongoDB Atlas, MongoDB Inc. takes care of security updates and patches, ensuring that your database is always secure.
In summary, MongoDB is a self-hosted database that requires manual management and configuration, while MongoDB Atlas is a fully managed cloud-based database service that takes care of the management and maintenance of your database infrastructure.
# Create a MongoDB Atlas Account
MongoDB Atlas is a MongoDB Database-as-a-Service platform, which means that they configure and host the database for you. Then, your only responsibility will be to populate your database with what matters: data.
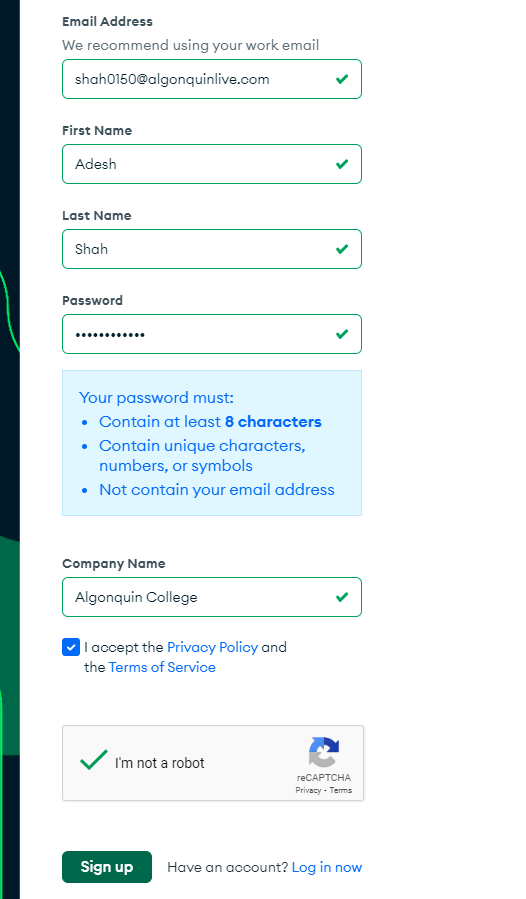
# Step one: Create an Account
Use your @algonquinlive.com email address for consistency.
- Go here (opens new window) to sign up for a new MongoDB Atlas account.
- Fill in the registration form with your information and click Sign up.
# Step two: Create an Organisation
- Name your organisation as per your student id like the image below
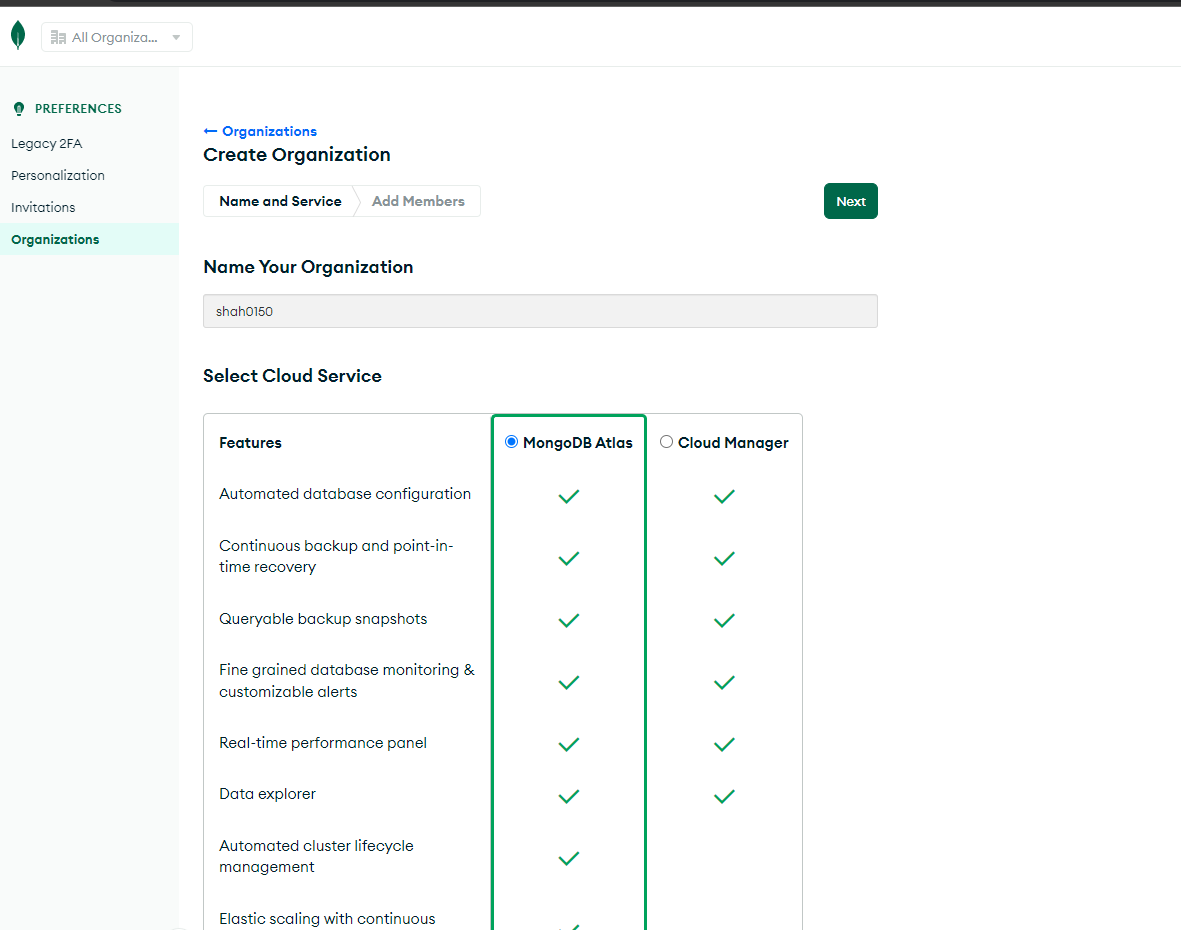
- Click Next
# Step three: Create a Project and Database
- Before we begin to store our data in MongoDB Atlas, let's create a project by click
New Projecton the top right corner.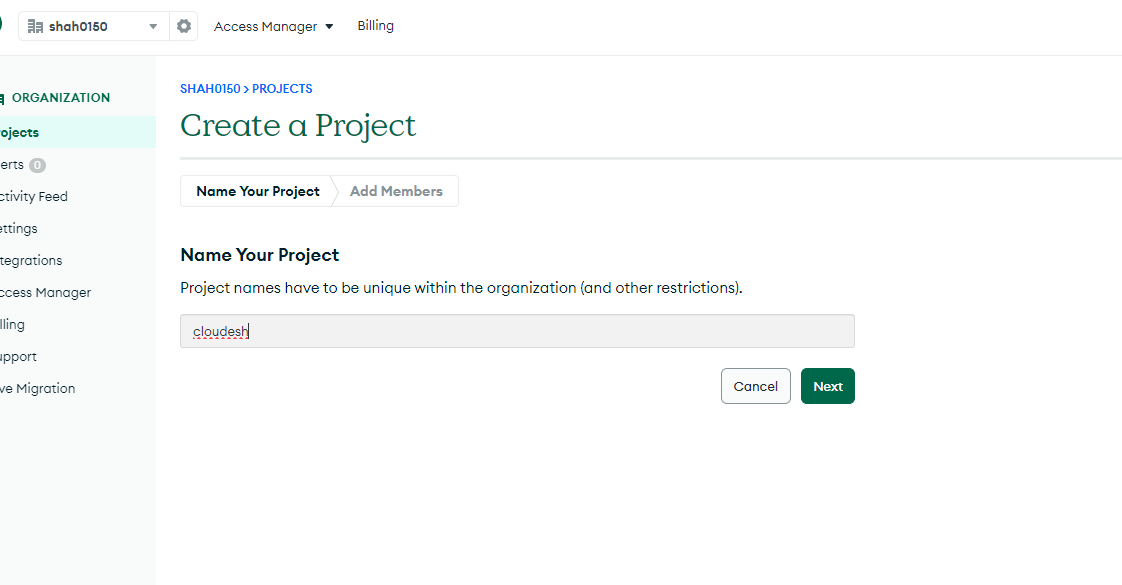
- After creating a project it's time to create a database. Click on green button
Build a database. - Select
M0free version, ProviderAWS, RegionN. Virginia (us-east-1), NameNebulaDB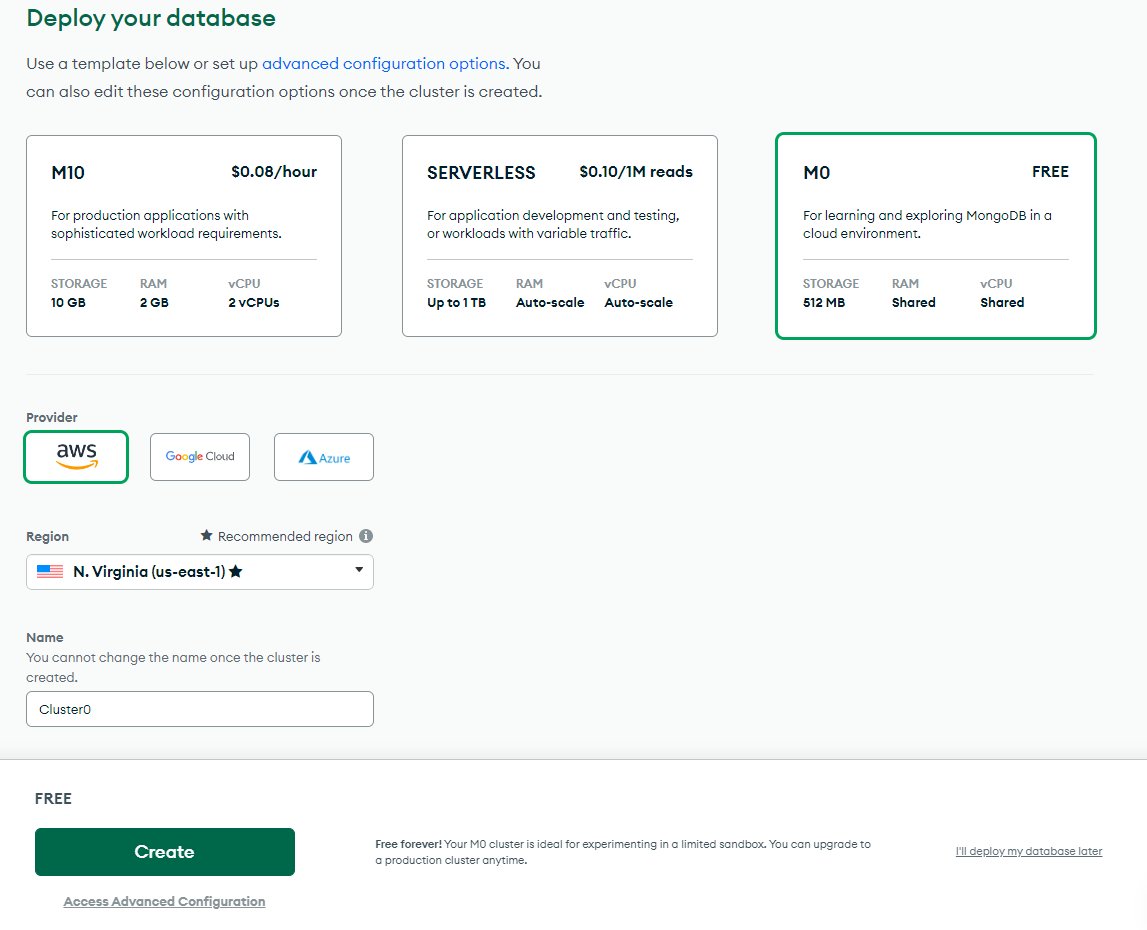
- You should now see the message "M0 Cluster Provisioning... This process will take 3-5 minutes." Wait until the cluster is created before going to the next step.
- In the meantime, let's create a user for our database thus we can authenticate to avoid any security issues.
::: Password Hint
Keep your password simple, for example,
FirstName!reason for this is because it might cause an issue while trying to authenticate via MongoDB Compass if you have any special characters. :::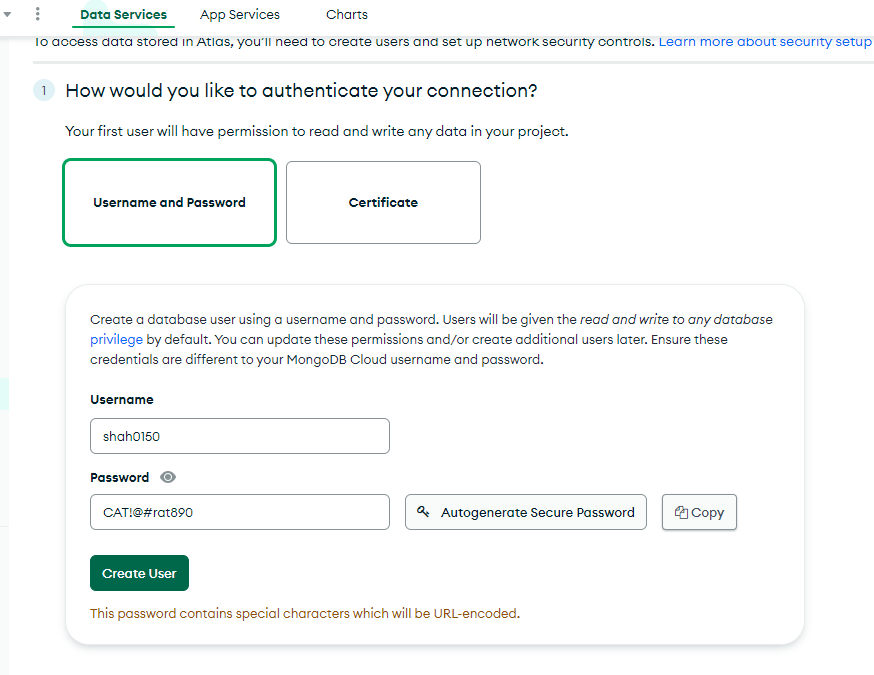
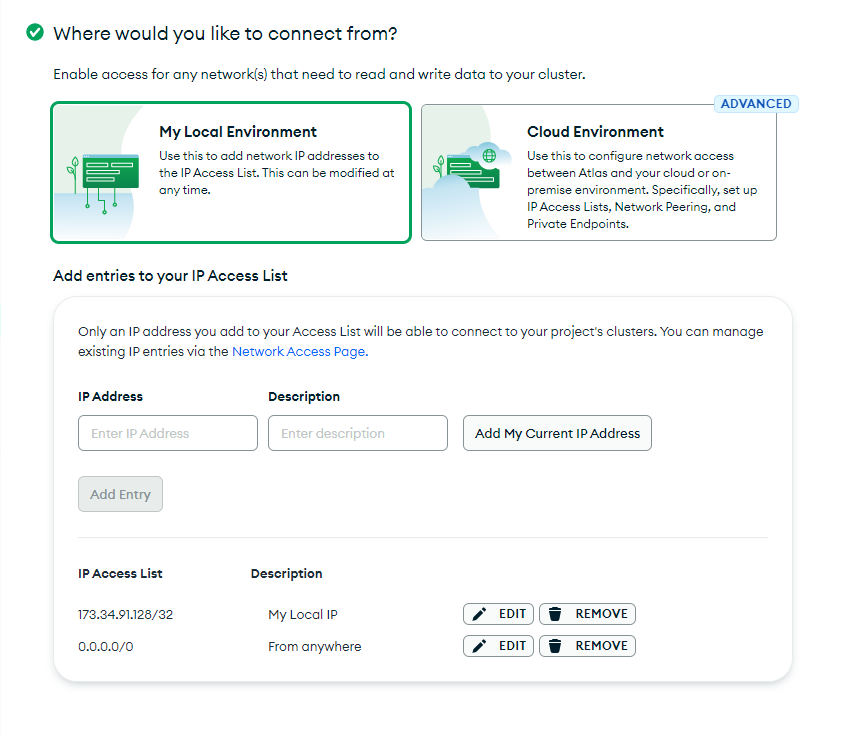
- Once we have the user created it's time to allow our local IP address and all network to have access to our database thus we can interact. We will add your local IP address and all network for the professors to test your application.
# Connect to Your Cluster
- It's time connect your MongoDB Atlas database to local MongoDB Compass. From
Database Deploymentspage selectconnect. There are several different ways to connect to database; however, we will be selectingConnect using MongoDB Compass. Copy the connection string.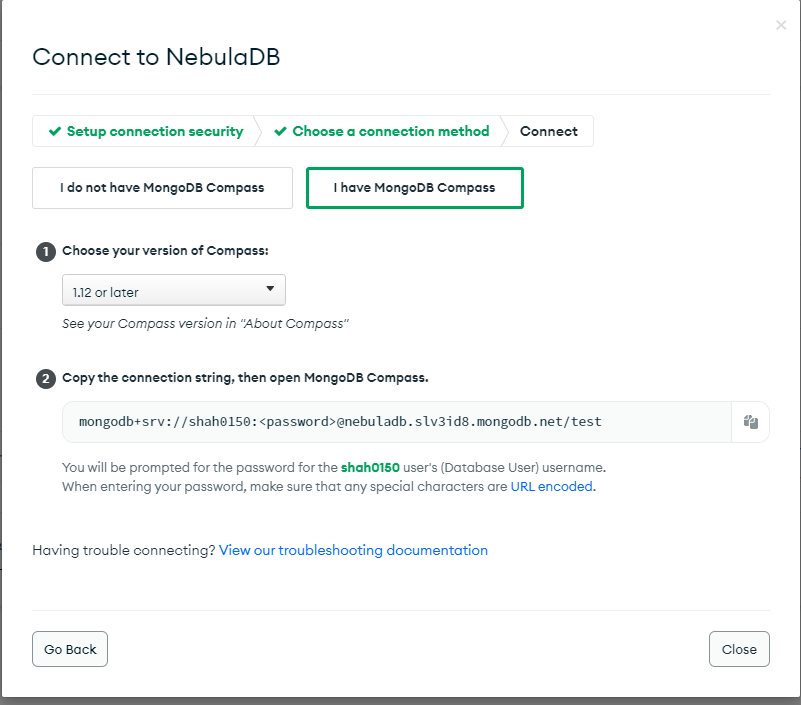
- Head over to your MongoDB Compass paste your copied connection string in URI textfeild and replace it with your user password. Click
connect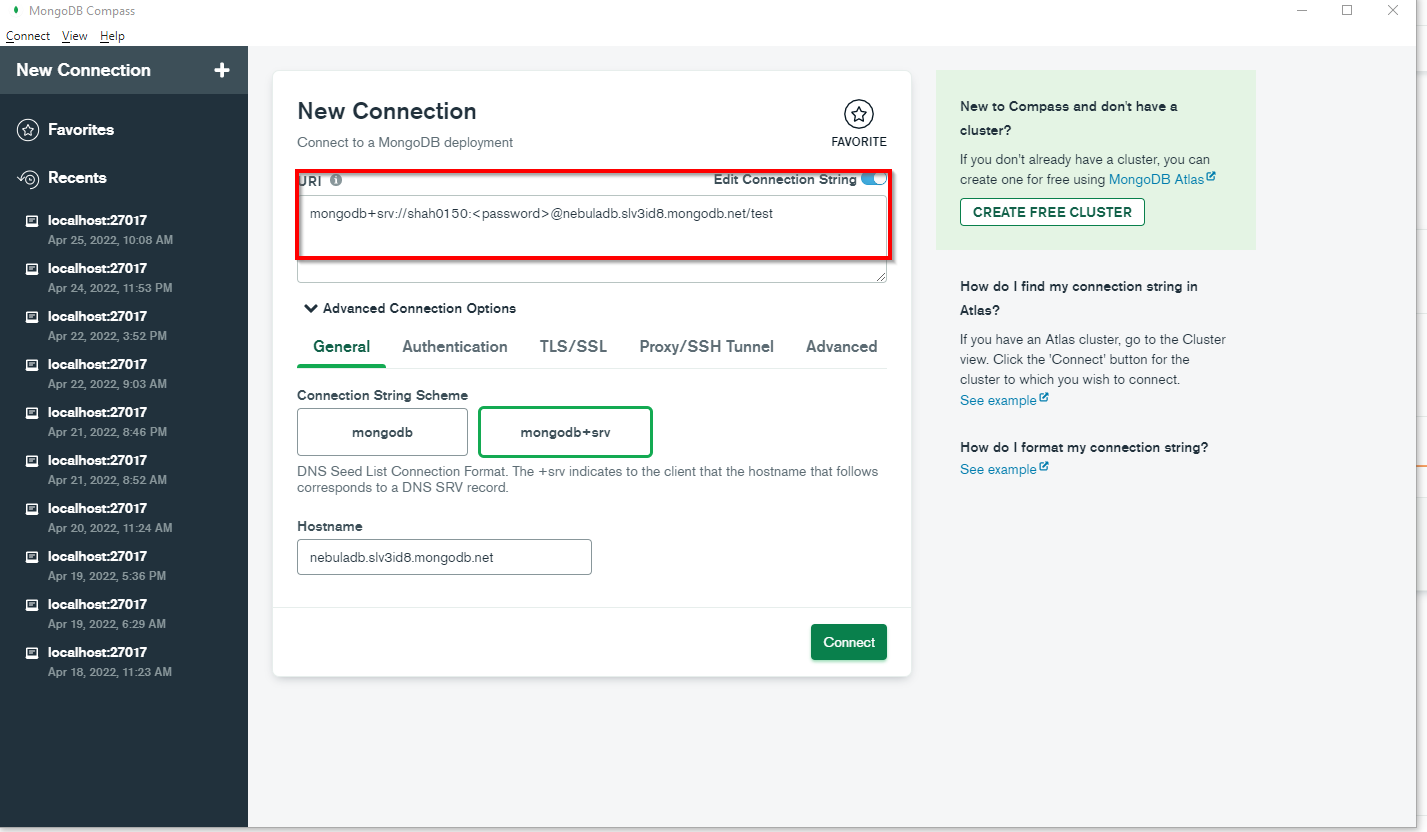
- Once you have connected succesfully to the database on the cloud using MongoDB Compass. It's time to add data.
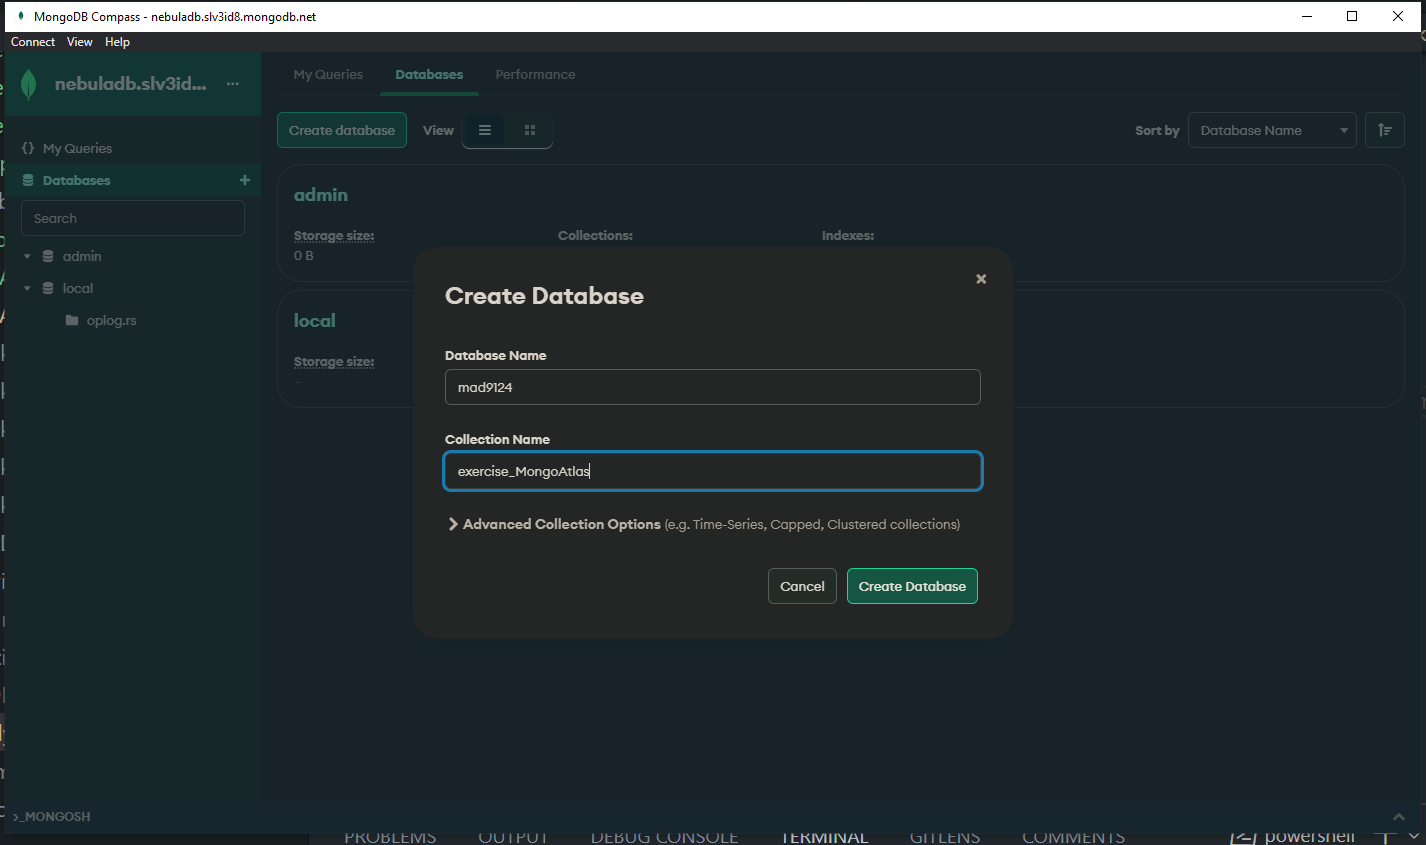
- Let's start by creating a database and collection. Name your database and collection like below:
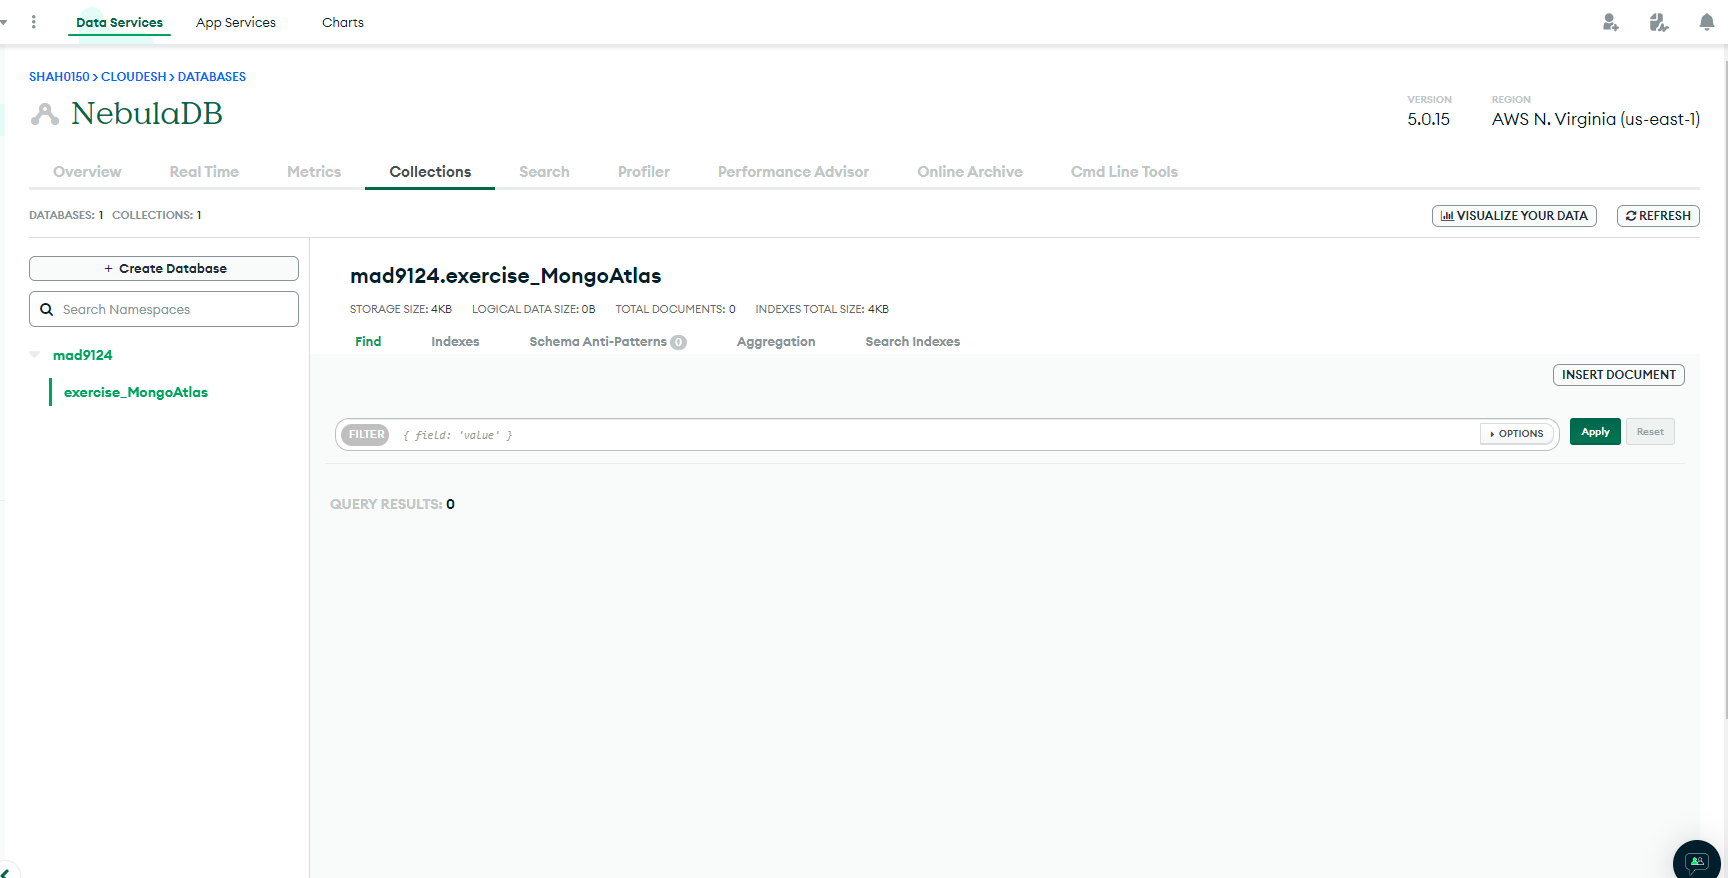
- Head over to your browser and check on MongoDB Atlas if the database and collection was created successfully.
# Import Data
Just for testing purpose before we write the code, let's just import data using Compass Add Data feature. Download the students.json file.


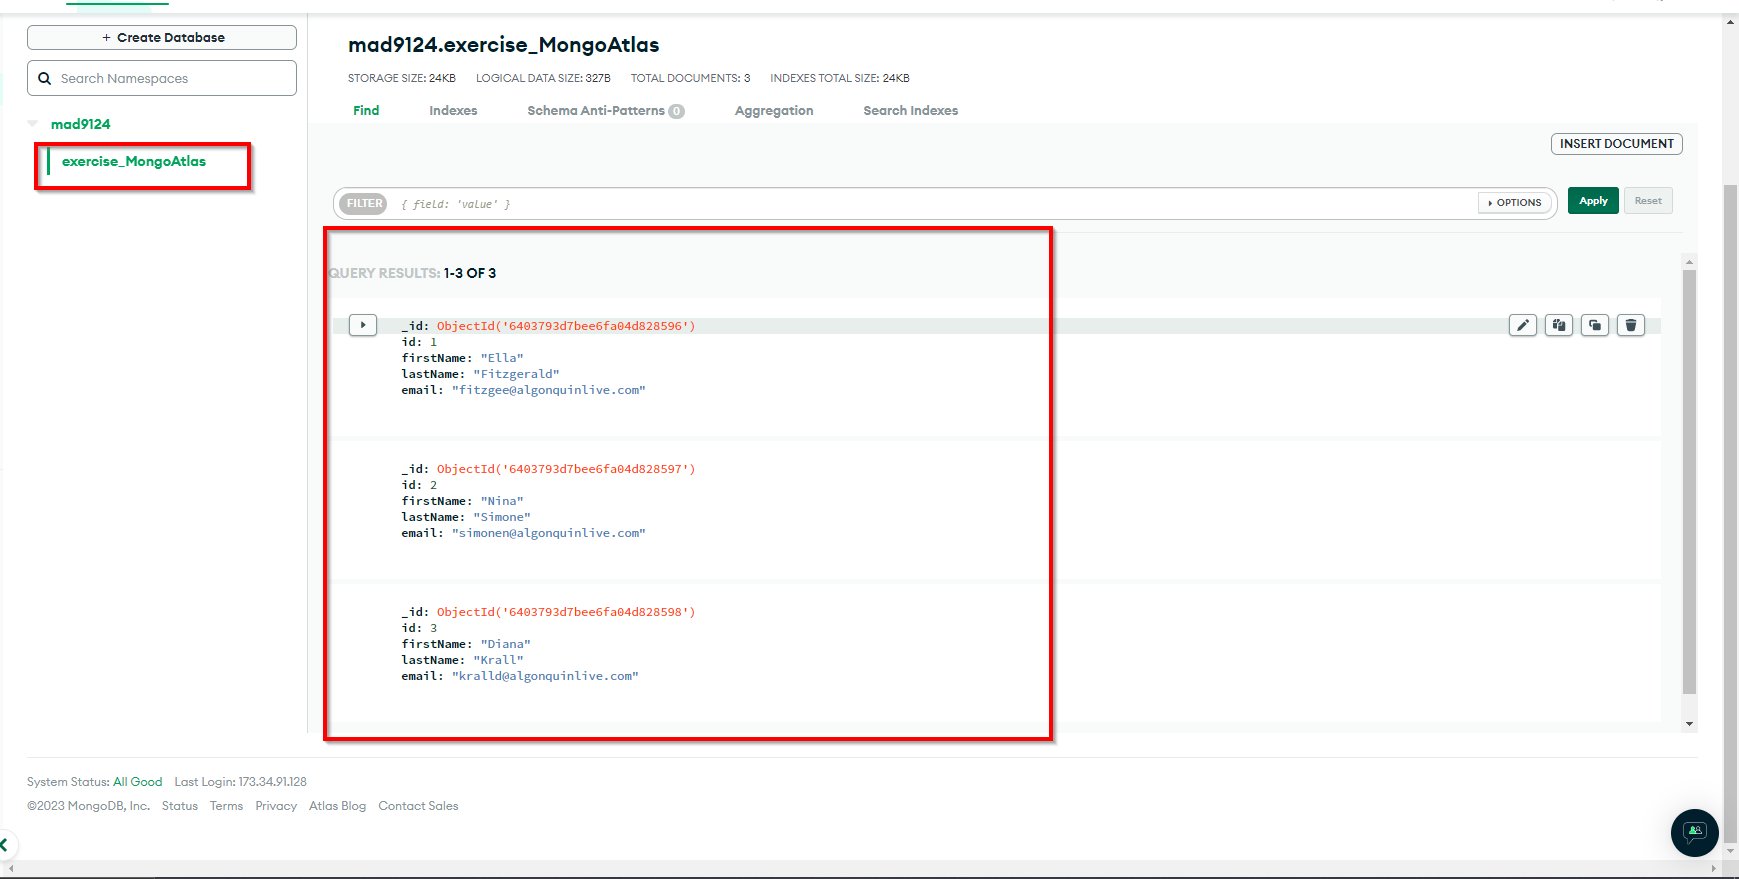
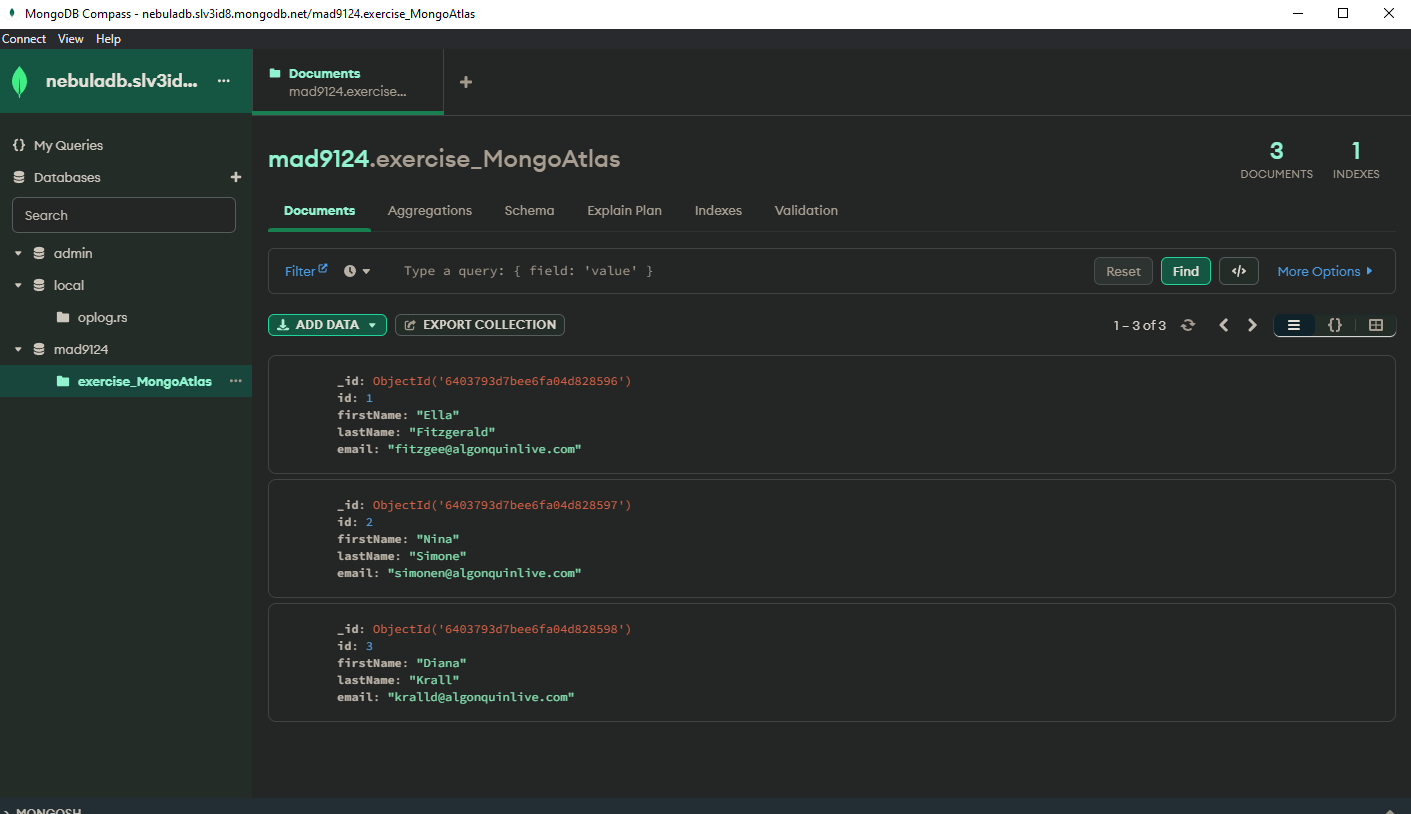 Go to MongoDB Atlas browser and refresh your database. You should see your data imported and on cloud ready to use.
# Connect to MongoDB Atlas from Node.js
From pervious class we learned about Moogoose. Let's use Moogoose to connect to MongoDB Atlas using NodeJS.
Create and navigate to a new folder by running the following commands on a terminal.
$ mkdir mongoAtlas
$ cd mongoAtlas
Then install Express and Mongoose by executing the following command on a terminal.
$ yarn add express mongoose
# Creating the connection
Create a new file server.js to start our Express.js server. Load mongoose and express by adding the following code to server.js.
const express = require("express");
const mongoose = require("mongoose");
const Router = require("./routes")
const username = "<mongodb username>";
const password = "<password>";
const cluster = "<cluster name>";
const dbname = "mad9124";
const db = mongoose.connection;
const app = express();
app.use(express.json());
app.use(Router);

mongoose.connect(
    `mongodb+srv://${username}:${password}@${cluster}.mongodb.net/${dbname}?retryWrites=true&w=majority`,
    {
      useNewUrlParser: true,
      useUnifiedTopology: true
    }
  );

db.on("error", console.error.bind(console, "connection error: "));
db.once("open", function () {
  console.log("Connected successfully");
});


app.listen(3000, () => {
  console.log("Server is running at port 3000");
});
It’s important to note that the cluster variable is the values appearing between the @ and .mongodb.net. In my case the cluster variable is nebuladb.slv3id8.
# Assignment - MongoDB CRUD on the cloud using Pokemon data
- Copy your Pokemon midterm into a new project in your mad9124 repo under
week10.
cp -a path/to/midterm/ week10/exercise
- Create
src/utils/db.jsfile to connect your db.
  'use strict'

  const mongoose = require('mongoose');

  // add connection logic here
Don't forget to import this file into index.js!!!
- Migrate all of your service methods to use
mongooseinstead of an in memorypokemonarray. NOTE you only need to upgrade your pokemon resource, trainers will not be evaluated for this assignment
# NOTE - Validation can now be taken care of by mongoose
- Make sure to use async / await correctly
- Make sure to import and export correctly to and from each module
- Start the Express server and test the user creation route using a Postman.
- Once you are confident it is running as expected, commit your changes, push to github, and submit with a link to your github repo in Brightspace!