Week 11
Authentication With Passport
# Agenda
- AMA (10 mins)
- What is Passport
- Create a Google Application
- Setting up Passport Application
- Sessions
- Locking Down Routes
- Persisting our Session
- Testing in Postman
# AMA / Review
# What is Passport?
Passport is authentication middleware for Node.js. Extremely flexible and modular, Passport can be unobtrusively dropped in to any Express-based web application. A comprehensive set of strategies support authentication using a username and password, Google, Facebook, Twitter, and more. Check out their website here (opens new window). We will be using passport-google-oauth2.0 (opens new window)
# Create a Google Application
# Creating your Google Account
Before we can use passport to login via Google, we will need to create a Google application, and generate keys that we will share with Google, so they know who we are.
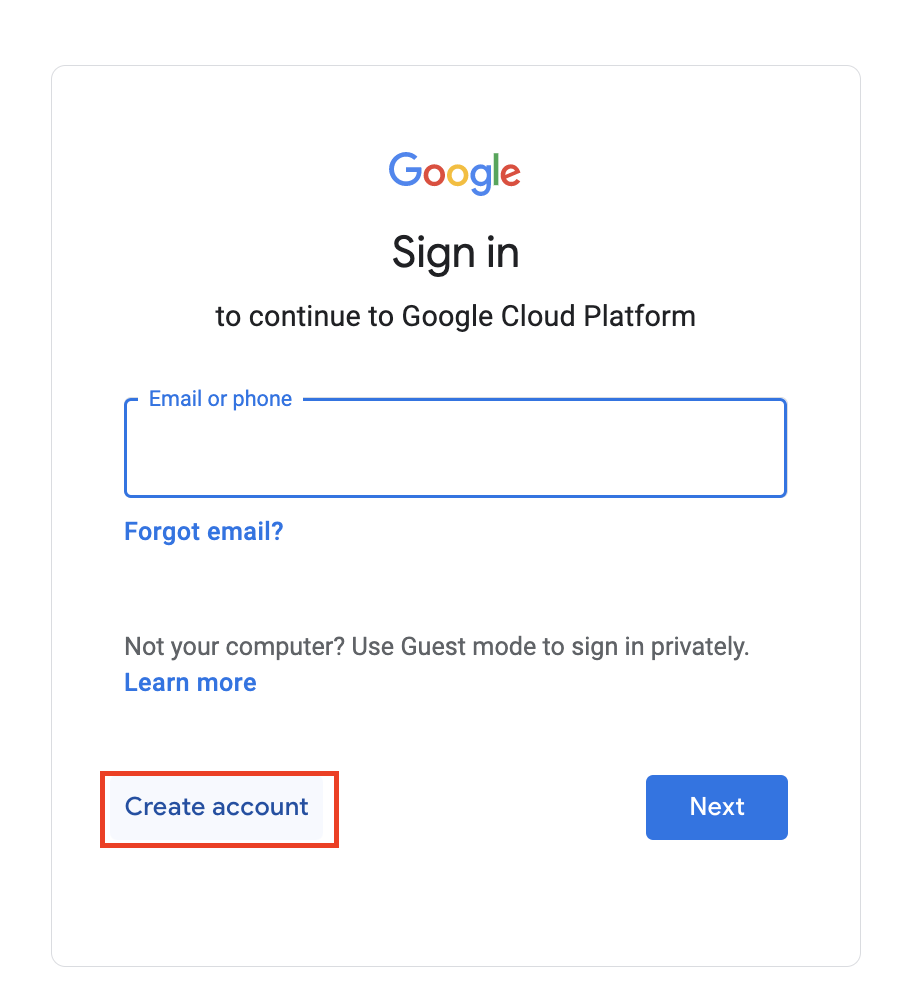
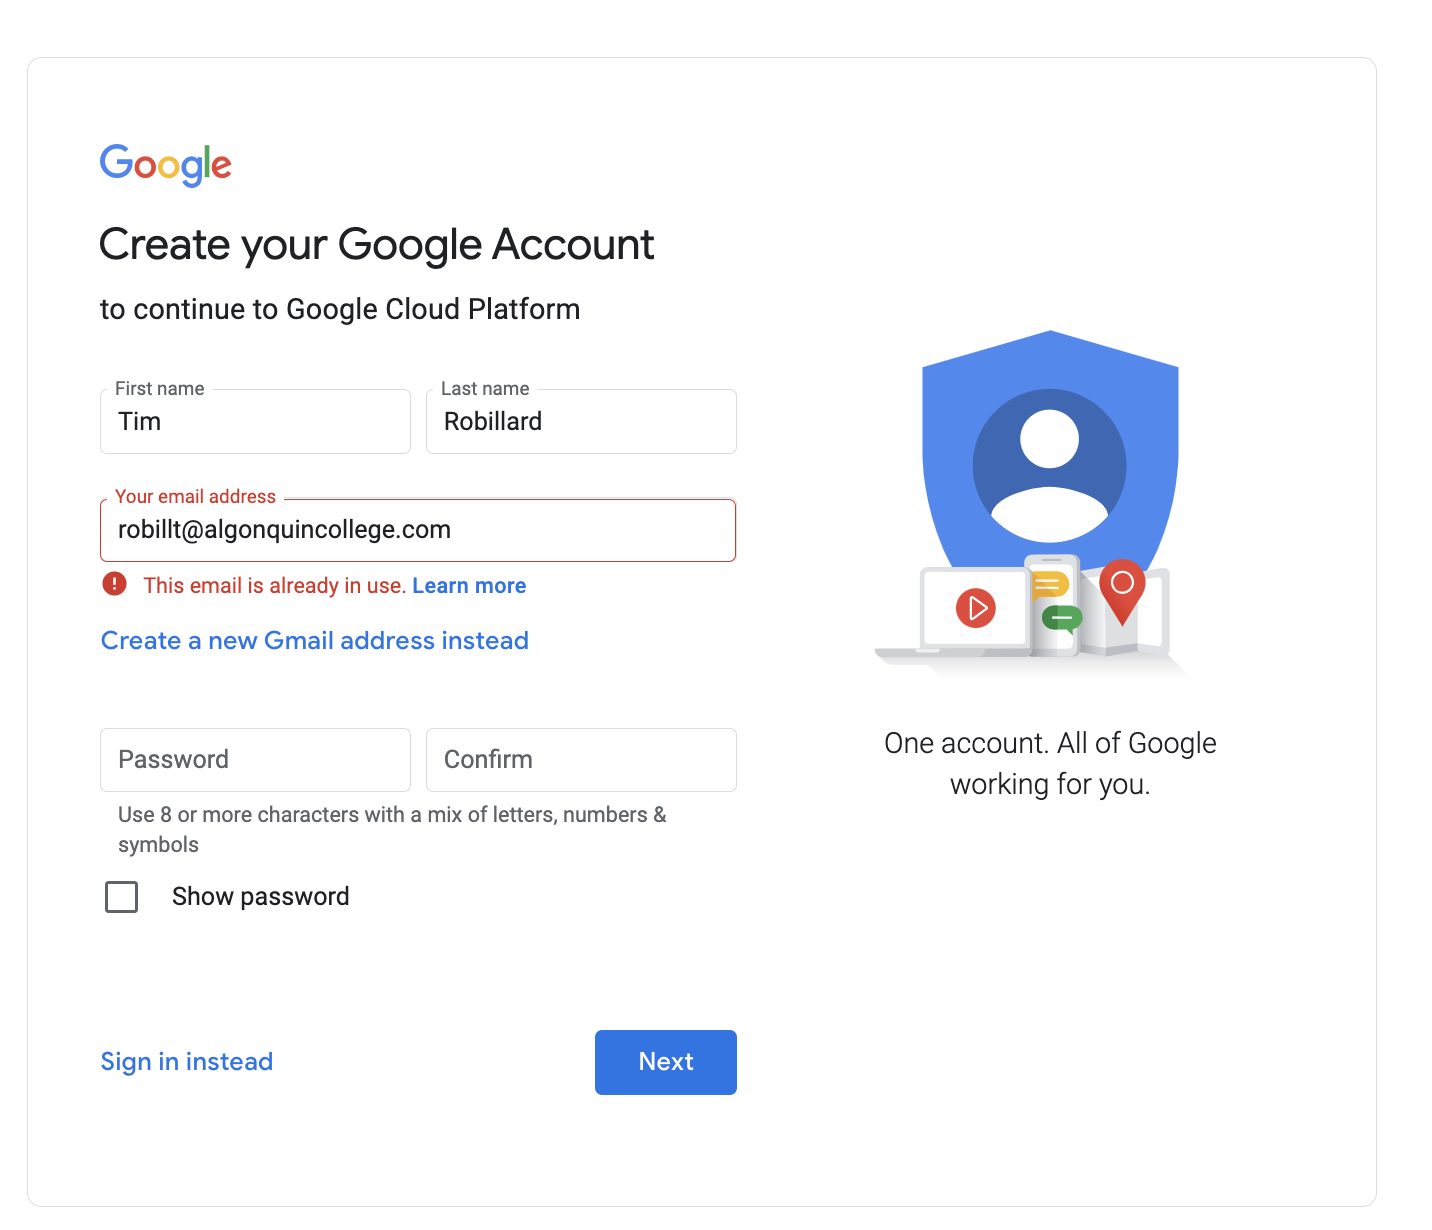
Begin the process by going to Google Developers Console (opens new window), and creating a google account with your algonquincollege email.
You will need to provide your phone number for 2FA, as well as a few other details.
Once you are signed up and signed in, you should be able to get to this page (opens new window):

# Creating your first project
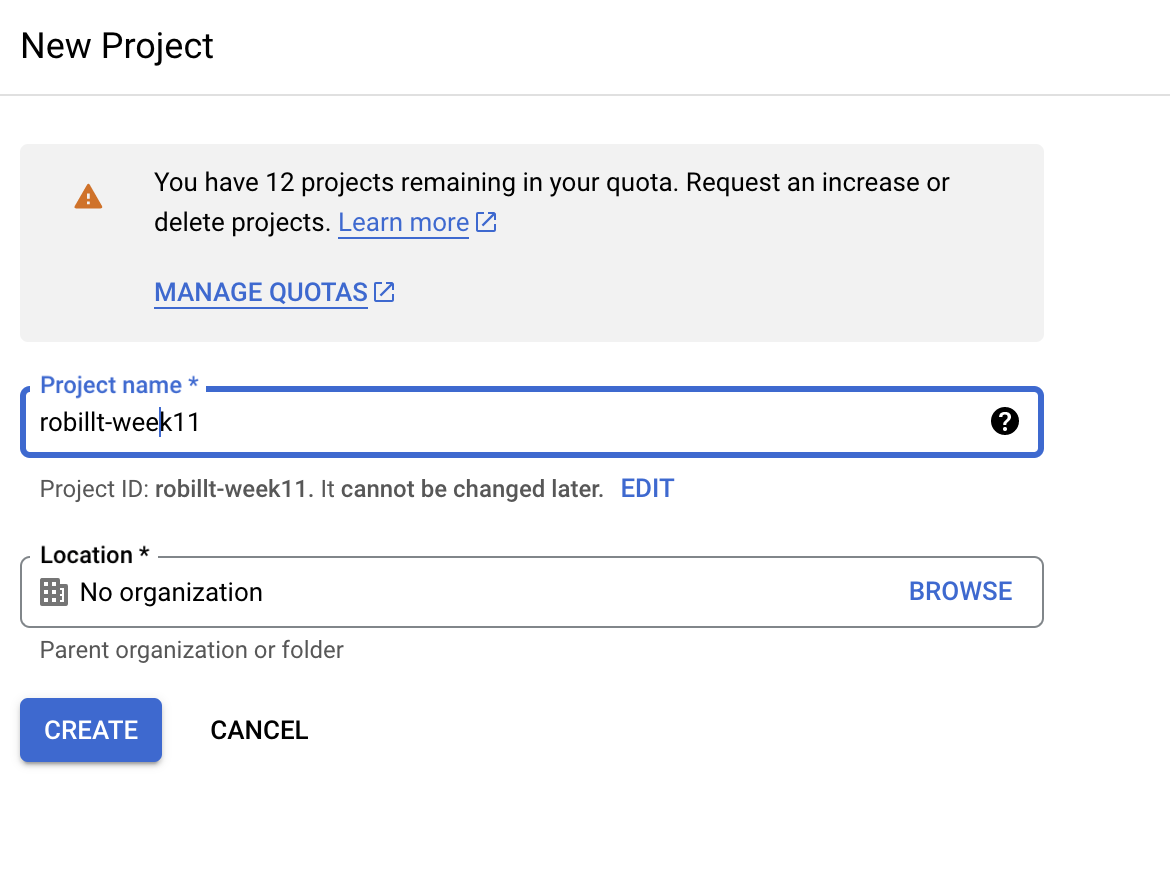
Now we need to create a project.
- click on the
Select a projectdropdown at the top left of the page.
- name your project using your student number and week11
# Setting up the OAuth Consent Screen
- Navigate to APIs & Services / Oauth consent screen
- Select User Type External and click CREATE
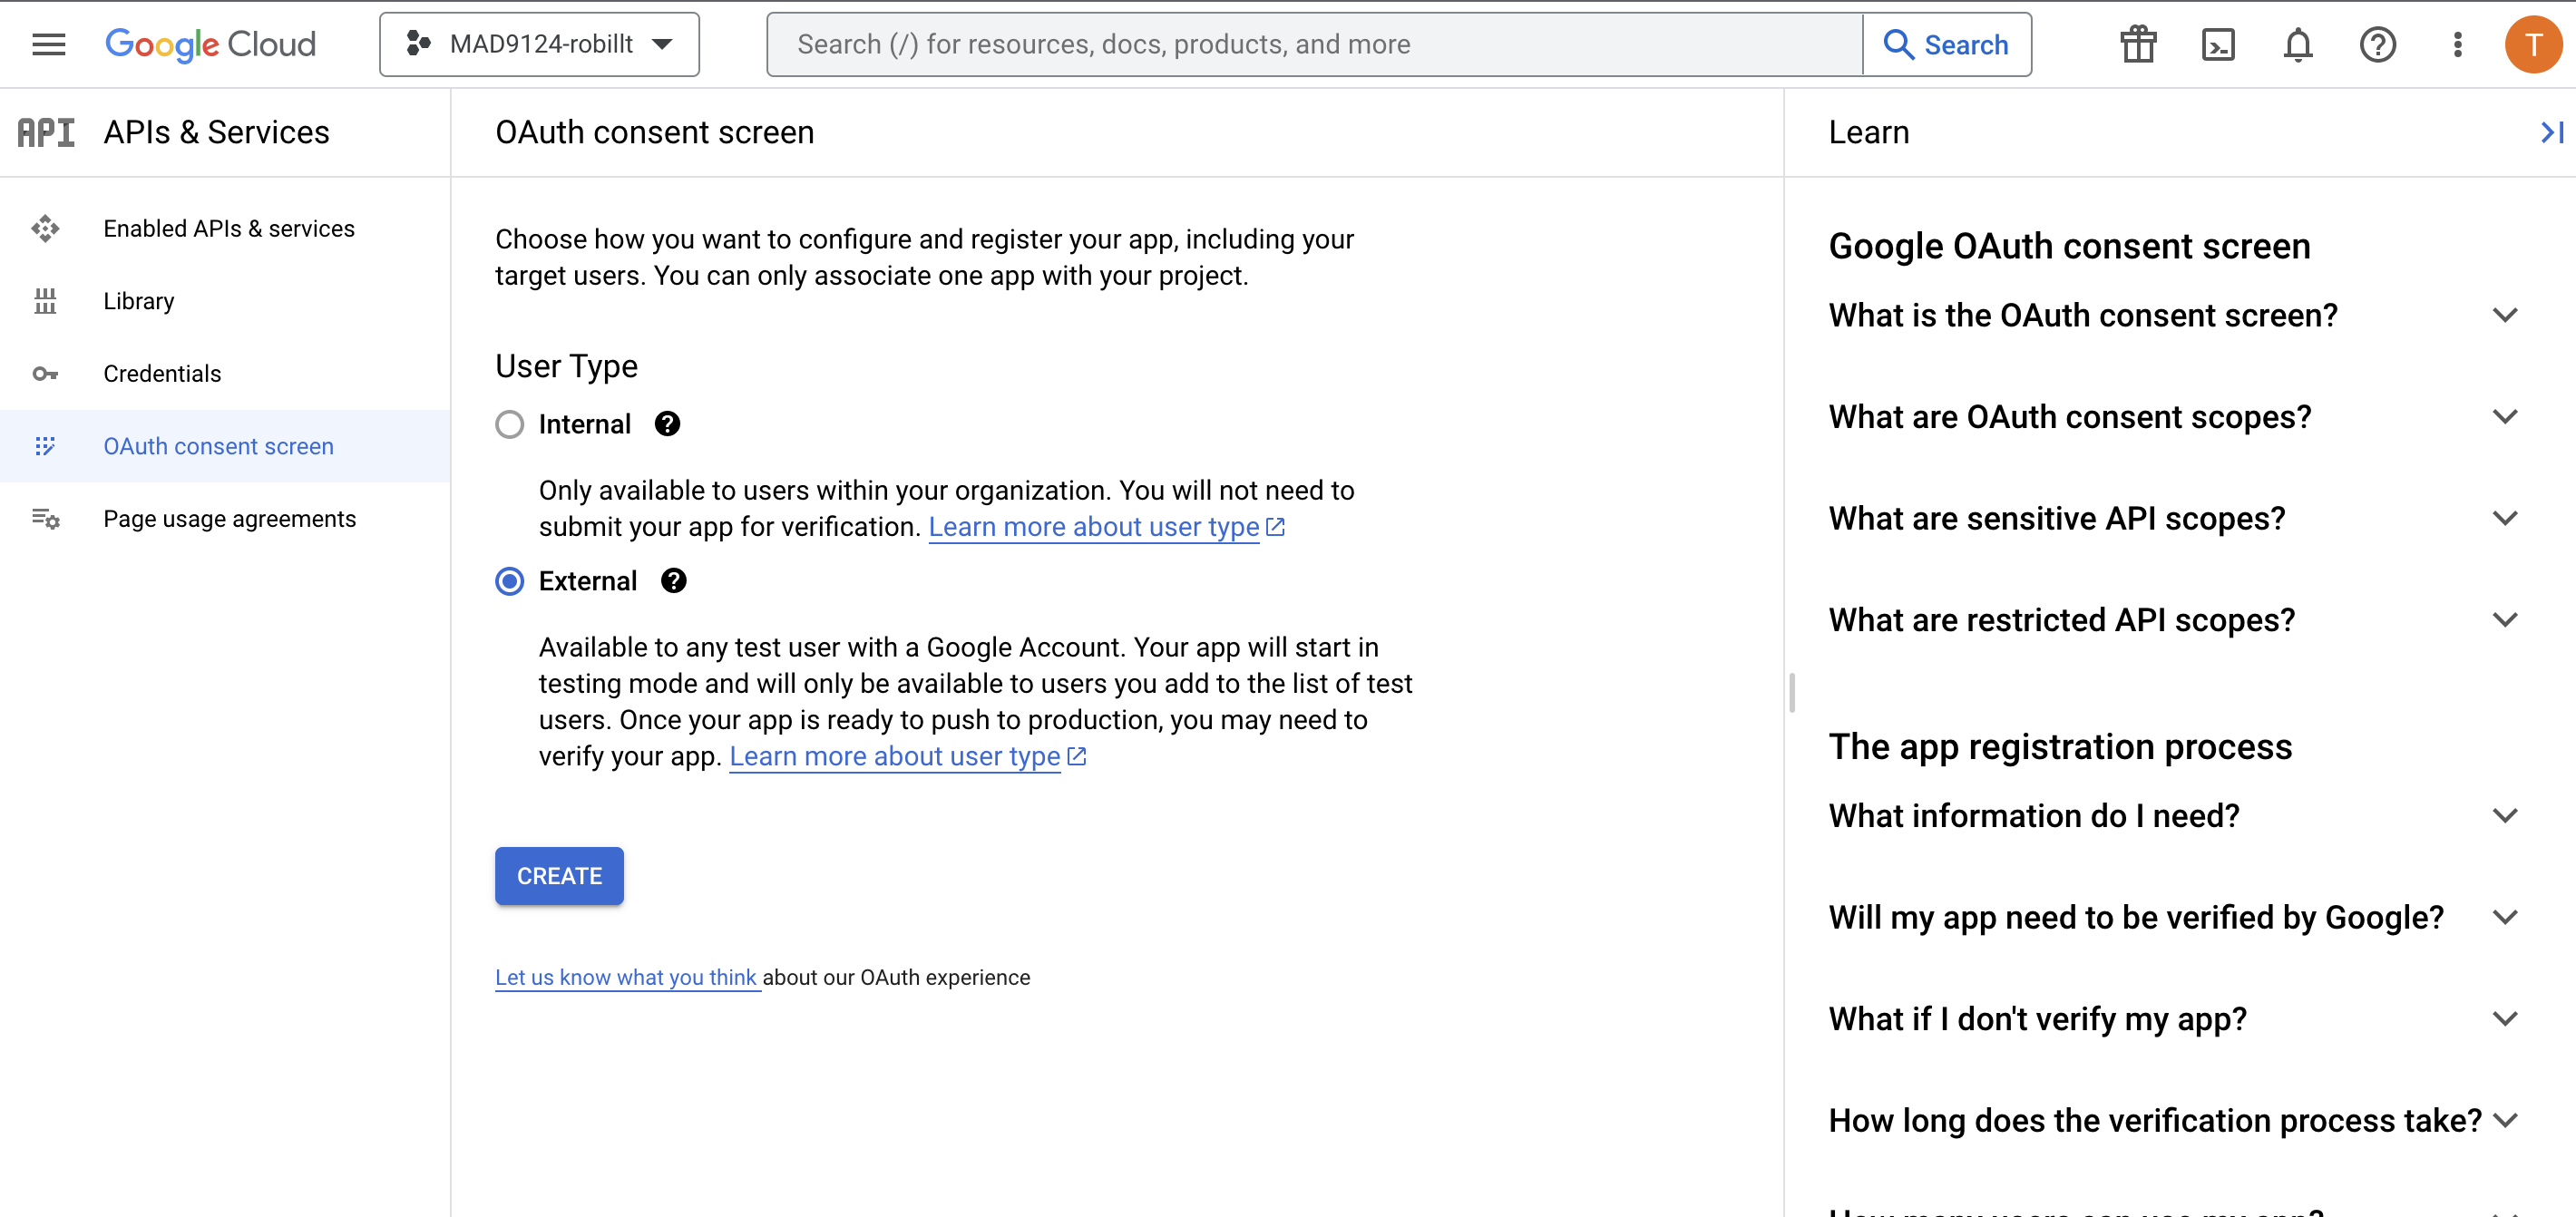
- Fill out the form with App name, User support email (your algonquin email), and Developer contact email (also you algonquin email)
The rest of the information can be skipped for now, but should be filled out in a non testing environment
- Add the scope
./auth/userinfo.profile, we will get the user's name and email from google.
We will not be needing any sensitive scopes for this project
- Add test users. Only users on the list will be able to sign in to your app. Please add yourself and me
robillt@algonquincollege.comso I can sign in to your app!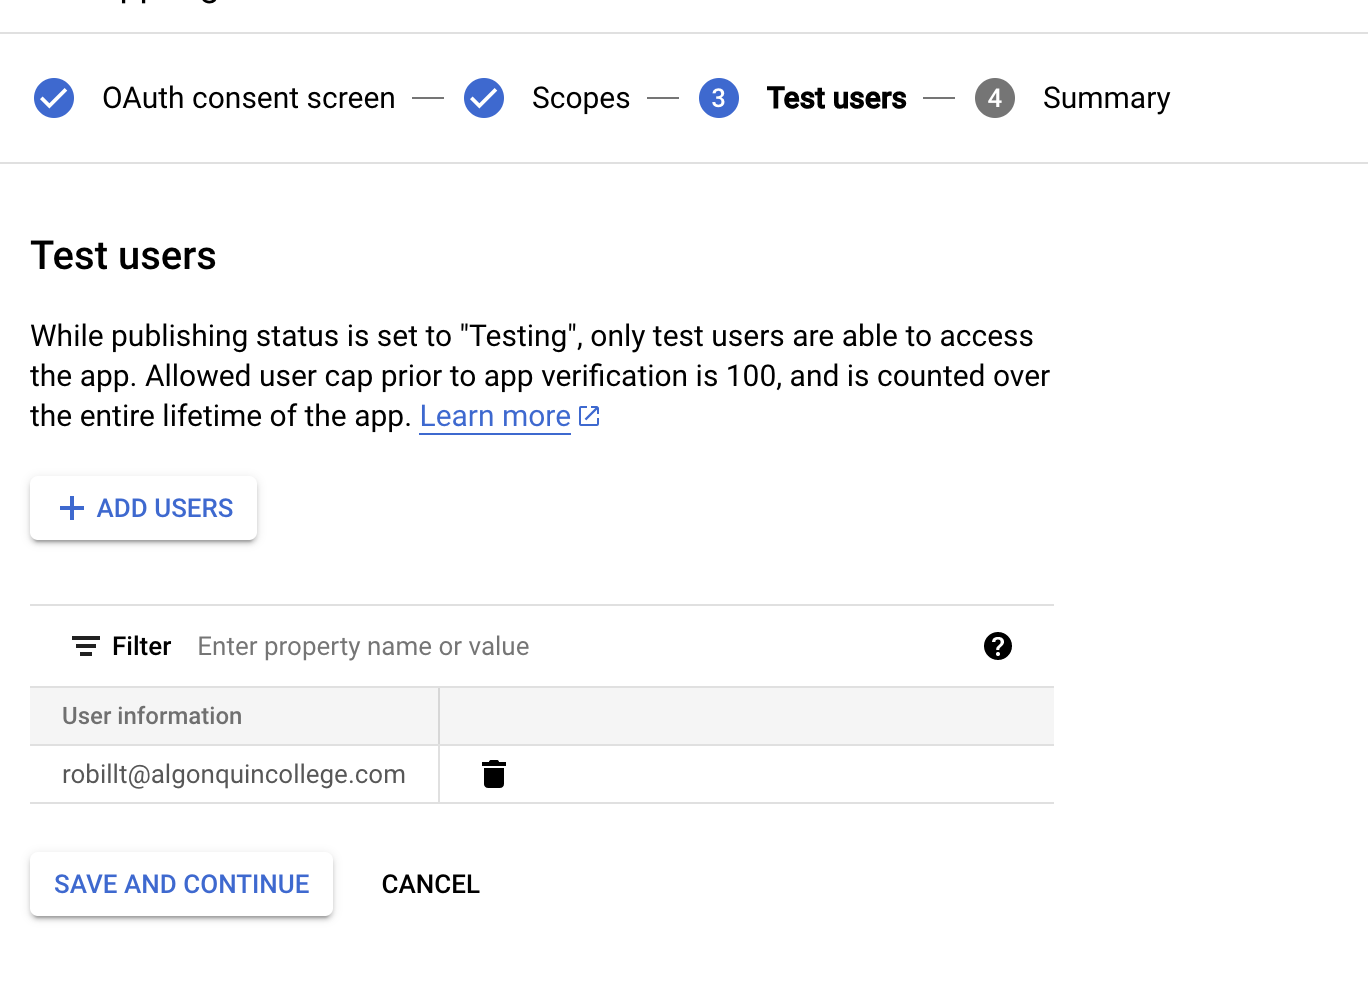
- Fill out the form with App name, User support email (your algonquin email), and Developer contact email (also you algonquin email)
- Review all of your entries, and hit back to dashboard if it is all good.
# Creating our shared credentials
Google will need a way to connect requests coming from our node application to the application we are setting up in Google. We can do this using generated credentials.
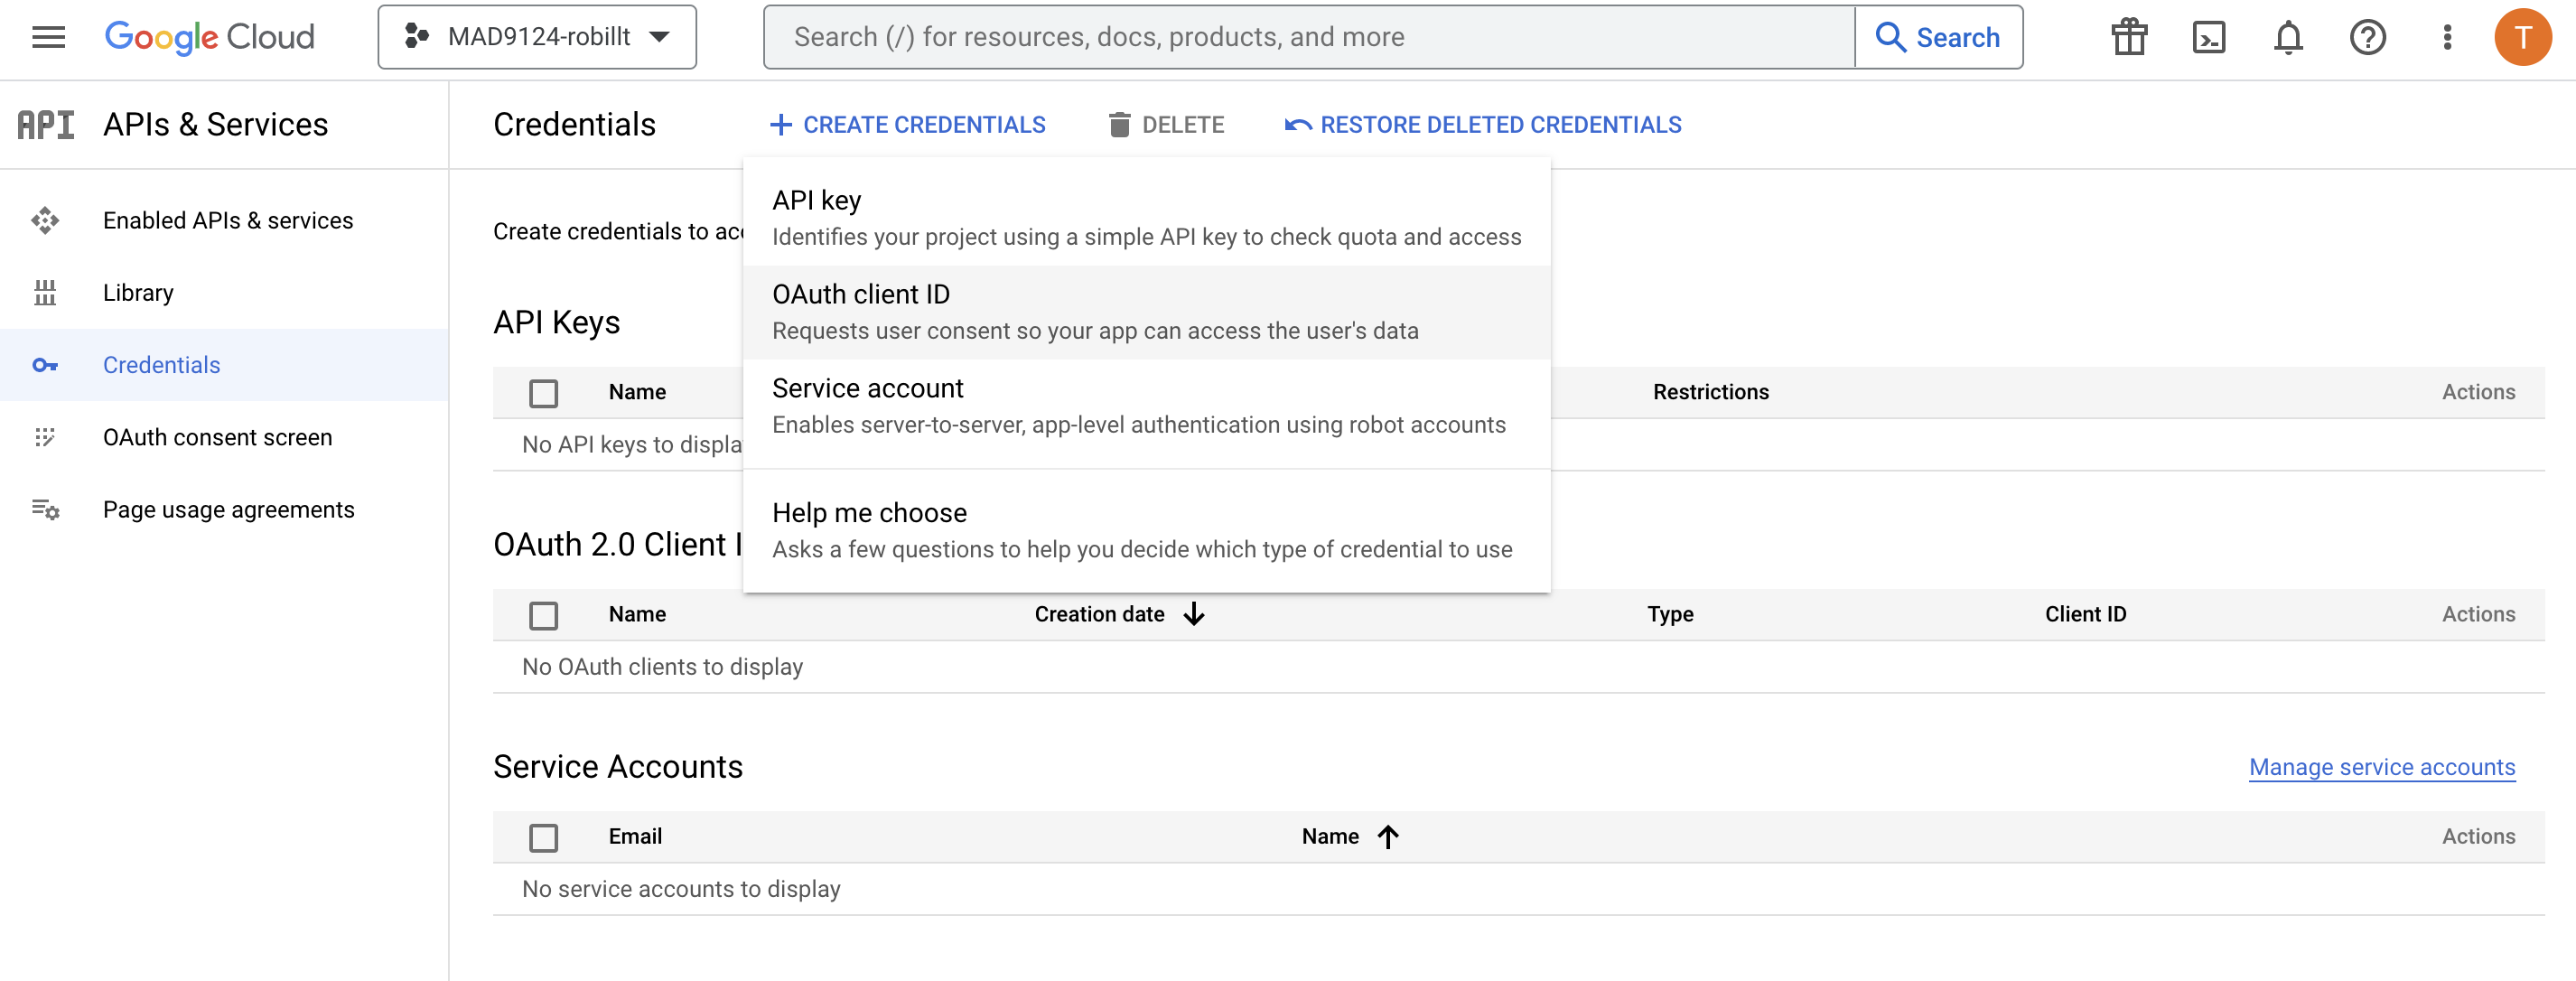
- Navigate to APIs & Services / Credentials
- Click Create Credentials, OAuth client ID
- Fill out the form with Application type:
Web application, name whatever you like, and addhttp://localhost:3000as the authorized JavaScript origin, andhttp://localhost:3001/auth/google/callbackas the Authorized redirect URI
NOTE - You will have to tell google your production domains when you are ready to deploy. ex https://example.ca
- Once it is done you should see the following modal. Copy the client ID and Client Secret, and add it to your .env file
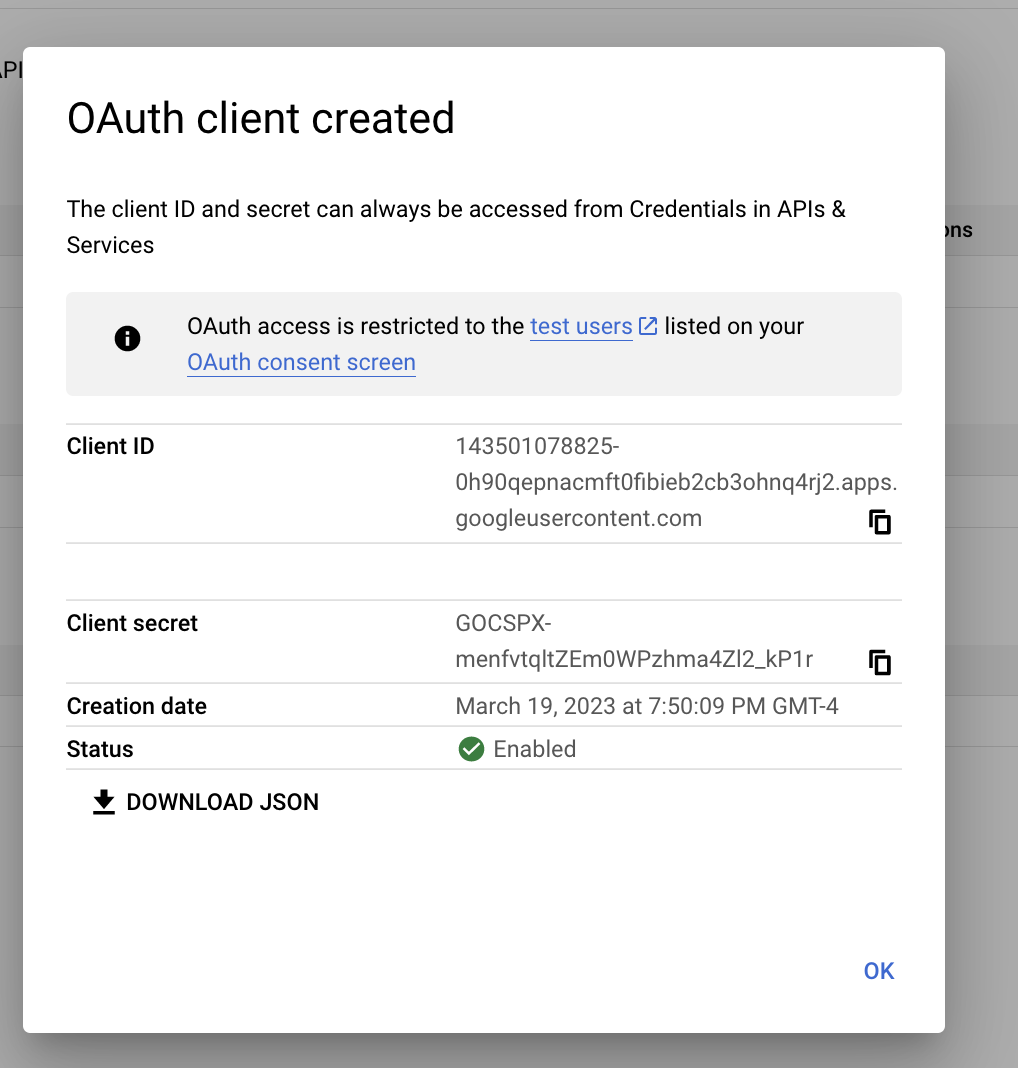

It is important to keep these safe. DO NOT COMMIT THEM TO GITHUB. I have deleted the credentials in the picture
# We are all set with Google!
# Setting up Passport Application
# Install the dependencies
We will need to install our usual depencies, plus 3 new dependencies:
yarn add express mongoose morgan passport passport-google-oauth2 express-session
NOTE more on express-session later
# Set up our index.js file
'use strict'

require('dotenv/config');
const express = require('express');
const morgan = require('morgan');
const app = express();

app.use(express.json());
app.use(morgan('tiny'));

app.get('/', (_req, res) => {
res.send('Hello, world!')
})

const PORT = process.env.PORT || 3001;
app.listen(PORT, () => {
console.log(`Server listening on port ${PORT}`);
})
# Create the User Model
In src/models/User.js, define the User schema and model. We will be getting the name and googleId from google.
"use strict";

const { model, Schema } = require("mongoose");

const UserSchema = new Schema({
  name: {
    type: String,
    required: true,
  },
  googleId: {
    type: String,
    unique: true,
    required: true,
  },
}, {
    timestamps: true
});

UserSchema.set('toObject', {
  transform: (_doc, ret) => {
    return {
      ...ret,
      id: ret._id.toString()
    }
  }
})


module.exports = model("user", UserSchema);
# Configure the strategy
We will configure passport in its own file to keep it neat.
Begin by importing the required libraries and User Model
// util/passport.js
"use strict";

const GoogleStrategy = require("passport-google-oauth20");
const passport = require("passport");
const User = require("../models/User");

const { GOOGLE_CLIENT_ID, GOOGLE_CLIENT_SECRET, GOOGLE_CALLBACK_URL } =
  process.env;
Next, we tell passport to use the the GoogleStrategy, and configure it with our ids and urls.
passport.use(
  new GoogleStrategy(
    {
      // Dont forget to import from process.env
      clientID: GOOGLE_CLIENT_ID,
      clientSecret: GOOGLE_CLIENT_SECRET,
      callbackURL: GOOGLE_CALLBACK_URL,
    },
    async (_accessToken, _refreshToken, profile, cb) => {
      try {
        // here, we will look up a user by the googleId, and either
        // create a new User if none exists, or
        // update the existing User, in case they changed their name in google.
        const user = await User.findOneAndUpdate(
          { googleId: profile.id },
          {
            $set: {
              name: profile.displayName,
              googleId: profile.id,
            },
          },
          // upsert is how we tell mongoose to UP-date the document or in-SERT a new one
          // don't forget to tell mongoose to return the updated document!
          { upsert: true, returnDocument: 'after' }
        );
        return cb(null, user);
      } catch (error) {
        return cb(error);
      }
    }
  )
);
Finally, passport needs to know how to serialize and deserialize the User.
- Serializing the User takes it from its expanded state, and stores it how we want it in the session. The safest way to do this is by saving just the id.
- Deserializing is the opposite, and will take the serialized version (in our case the id) and transform it back into the full User object.
passport.serializeUser((user, done) => {
  done(null, user._id);
});

passport.deserializeUser(async (id, done) => {
  try {
    const user = await User.findById(id);
    done(null, user);
  } catch (error) {
    console.log(error);
    done(error);
  }
});
Now we will create our authentication routes. One will be the route to redirect to google, asking to login. The next is the route google will send its response to with either a success or an error depending on what happens with google.
// router/auth.js
"use strict";

const { Router } = require("express");
const passport = require("passport");
const authRouter = Router();

// make sure to import the configuration we set up above
require("../util/passport");

// this route will redirect the user to google
authRouter.get(
  "/google",
  passport.authenticate("google", { scope: ["profile"] })
);

// this route will be hit by google once they are finished.
authRouter.get(
  "/google/callback",
  passport.authenticate("google", { failureRedirect: "/login" }),
  (_req, res) => res.redirect("/test")
);

module.exports = authRouter;
# Sessions
Because HTTP requests are stateless, we need a way to keep track of data between requests. Cookies and URL parameters are one way, but what about for data you don't want the client to know about? This is where sessions come in. We store the data on the server with an id, and let the client only know the id for the session. We can then look it up again on the server and access the data.
Passport uses sessions to keep tracked of whether or not we have been signed in with google.
// src/index.js
app.use(
  session({
    secret: process.env.SESSION_SECRET,
    resave: false,
    saveUninitialized: false,
  })
);
Now we can initialize passport, and connect it to the session we set up.
app.use(passport.initialize());
app.use(passport.session());
With everything set up correctly, passport will check the session on every request, and attach a user to the request if their is a successful login saved in the session.
We can test this out with a simple middleware.
app.use((req, _res, next) => {
  console.log('user', req.user)
  next()
})
Note that it should log out user undefined initially. Once we go to /auth/google and sign in with google, we should see a user object logged out. We are in!
# Locking down routes with middleware
We now know that any request from a logged in user will have a user object attached to the request. We can leverage this to create a super simple middleware function call isAuthenticated
// src/middleware/isAuthenticated.js
'use strict'

const isAuthenticated = (req, res, next) => {
  if (!req.user) {
    req.status(401).json({ error: 'You must be signed in to access this' });
    return;
    // NOTE if your error handler is set up, you can throw an UnAuthenticatedError here instead
    // throw new UnAuthenticatedError('You must be signed in to access this');
  }
  return next()
}

module.exports = isAuthenticated
Let's create a second route that you must be authenticated to see.
app.use('/private', isAuthenticated, (_req, res) => {
  res.send('You are logged in!');
})
# Persisting our Session
You may notice, and be quite frustrated, that every time our server restarts, we lose our session, and need to log in again. This is because the default session is stored in memory (just like we stored our student data in arrays).
The most popular way to save a session is using Redis, a quick and lightway database, but we will use connect-mongo to save learning a whole new DB.
// src/index.js

// update our session object to look like this
app.use(
  session({
    store: MongoStore.create({
          mongoUrl: process.env.MONGO_URL,
        }),
    secret: process.env.SESSION_SECRET,
    resave: false,
    saveUninitialized: false,
  })
);
Thats it! Our session will now be stored in mongo, and will persist even after refreshing our server!
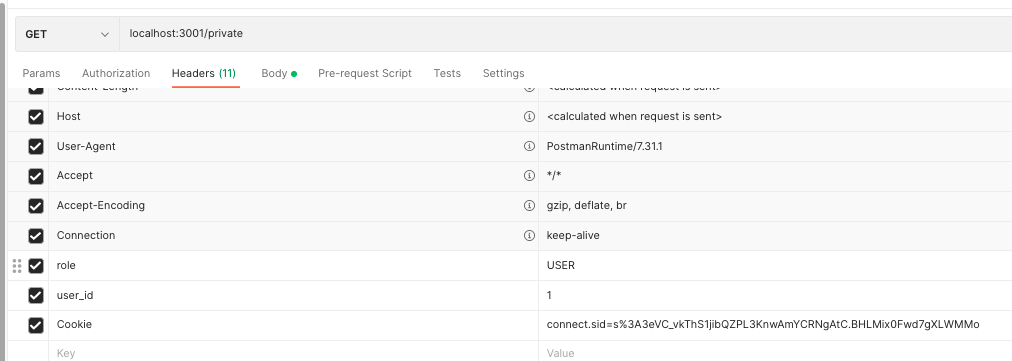
# Testing in Postman
How can we access private routes in postman? We can copy the session id from the browser, and add it to the headers in Postman.
After successfully logging in to our app in the browser, open up the developer tools and go to the Application tab. You should see our session under Cookies, with the default id connect.sid.
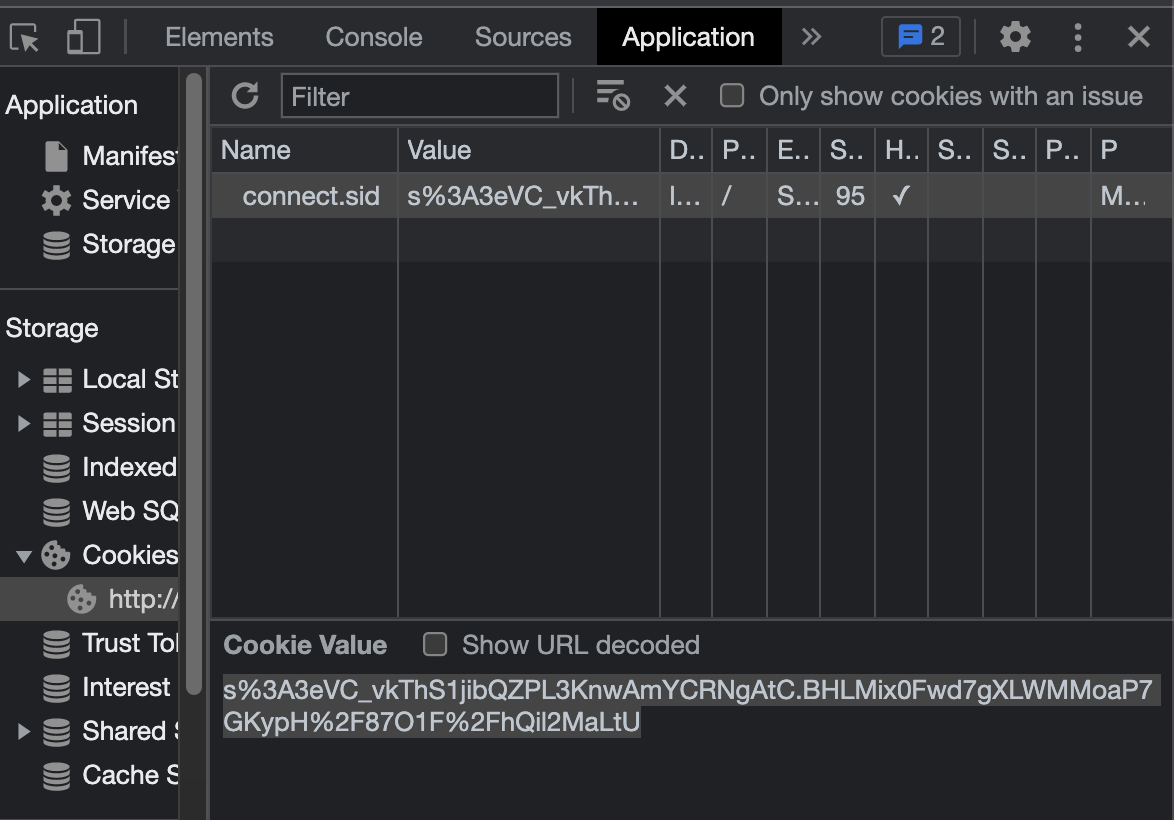
We can copy this session id, and add it to our headers in Postman. And just like that, we are now signed in!